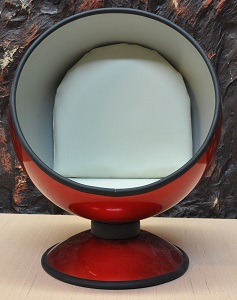
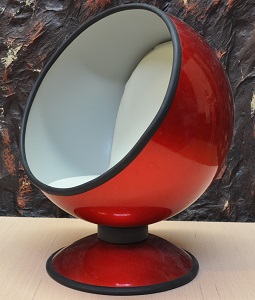
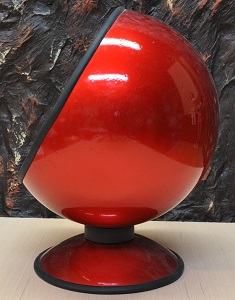
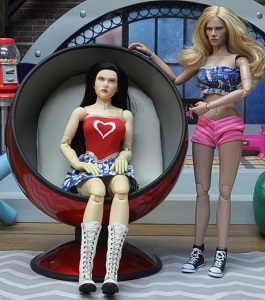
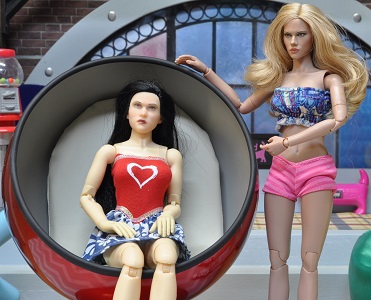
HOW TO MAKE A BALL CHAIR
|
|
|
Materials needed…
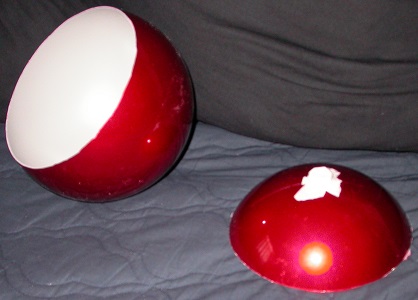
7” plastic Christmas ornament
1/32 Opening EPDM Rubber Edge Trim – 3 ½ feet per chair
2” PVC tubing and coupling
Thin plywood/cardboard for seat & cloth to cover it
Draw string for seat above
1/2" foam for cushions
Material to cover cushions
Epoxy
Masking Tape
7” plastic Christmas ornament
1/32 Opening EPDM Rubber Edge Trim – 3 ½ feet per chair
2” PVC tubing and coupling
Thin plywood/cardboard for seat & cloth to cover it
Draw string for seat above
1/2" foam for cushions
Material to cover cushions
Epoxy
Masking Tape
1. Remove the hanger from the ornament and discard. Use masking tape to tape off the 7” plastic Christmas ornament around hole for the hanger to protect the finish as well as apply several layers of tape over the hole for the hanger so you can use this location with the tip of a compass. Tape off the hanger hole only then, using a compass, check where the other tape will need to be applied in order to do step #2. WARNING: The first one I made was a high quality ornament (about $15.00) with a high quality mirror finish and I had no issues with this tape. The second was made from a low end ornament (about $7.00) with a less than impressive mirror finish and the tape pulled away some of the finish from the ornament.
2. Set compass to 4.375" and draw circle from approx. center of hanger point. (This should draw a 7” circle on the protective tape.)
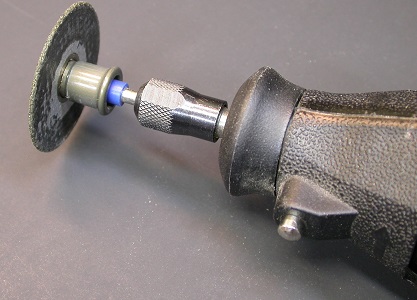
3. Clamp Dremmel tool in vice with cutter on left side. I used a blade intended for cutting metals so it would not, well, should not, grab during the cutting but rather melt through. These ornaments are too frail to be cut with conventional saws.
2. Set compass to 4.375" and draw circle from approx. center of hanger point. (This should draw a 7” circle on the protective tape.)
3. Clamp Dremmel tool in vice with cutter on left side. I used a blade intended for cutting metals so it would not, well, should not, grab during the cutting but rather melt through. These ornaments are too frail to be cut with conventional saws.
4. Turn on Dremmel, squat down and cut along compass line.
5. Save cutout for base part. Remove the tape except for over the hole for the hanger.
5. Save cutout for base part. Remove the tape except for over the hole for the hanger.
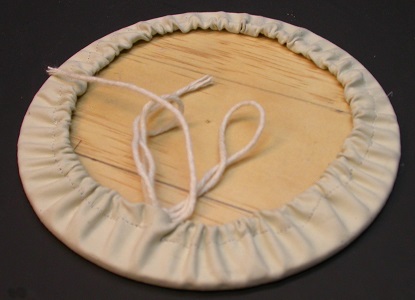
6. Cut 5 ½” diameter circle from luon (or other thin plywood or thick cardboard) for the seat. Sand edges.
7. Cut 8” circle of material to cover Luon.
8. Cover luon with material from step #7 by sewing a ¼” hem around edge for drawstring. Work a string through the hem, place Luon circle on material, draw up drawstring and tie off.
7. Cut 8” circle of material to cover Luon.
8. Cover luon with material from step #7 by sewing a ¼” hem around edge for drawstring. Work a string through the hem, place Luon circle on material, draw up drawstring and tie off.
|

|
|
|
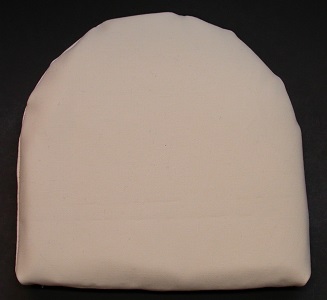
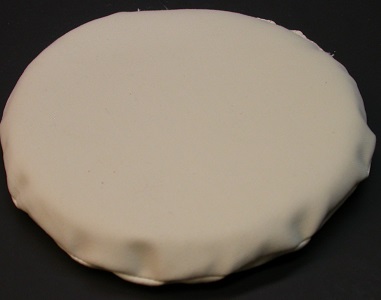
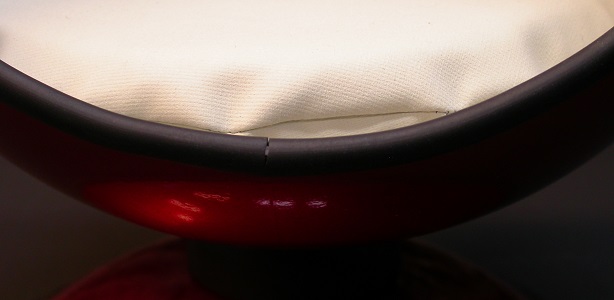
For step 8 For step 9
9. Upholster the back pad with a covering over ½” thick foam. For a pattern, cut out two squares of material at 6 1/4". Draw a 6 1/4" circle in this square and cut out half of the circle. Sort of a headstone shape. Place these with the "GOOD" sides facing each other and sew up one short straight section, around the half circle and down the other short straight about a 1/4" in. Turn this right side out. Cut a piece of 1/2" foam to fit snugly inside without wrinkling. Hand sew the bottom edge closed. I made a seat cushion in a similar fashion out of two 6 1/4" circles but this seemed to cause a "head room" issue so I probably won't use it much, if at all.
10. Add more tape if needed to the hole for the hanger and around the edge of the base then set a compass to 3 3/16” to mark cutout piece to 5 ½ inch circle for base and cut out as before.
11. Cut 2” PVC coupler to 9/16” long for top of base.
12. Paint this piece (flat black or color of choice), place it on the base at the center and mark the inside circle with a marker. Rough up this inner area on the base to remove shiny finish with a Dremmel tool and secure to the top of the base on center with epoxy. Watch for epoxy runs. I sealed around the ring with masking tape to prevent this from happening.
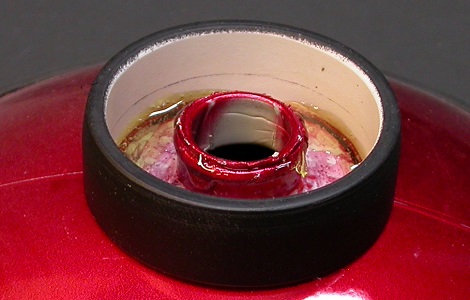
13. Turn a section of 2" PVC tubing to fit inside first ring freely to 7/16” long. It must be short enough so as not to drag on the epoxy used on the other ring.
14. Mark location on sphere for this ring on the BALL centered on seam line at 3.125” from front edge of hole and mark inner circle with marker.
14. Mark location on sphere for this ring on the BALL centered on seam line at 3.125” from front edge of hole and mark inner circle with marker.

15. Remove shiny finish within the marked area with a Dremmel tool and secure the ring to the sphere with epoxy. Again, be watchful of epoxy runs as in step 12.
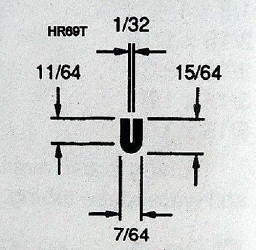
16. It takes 7 feet of edge trim for TWO of these chairs. You should end up with about a 7 inch piece left over. This trim should be made for 1/32” thick material. (1/32 Opening EPDM Rubber Edge Trim) 7/64"-¼” overall width with a 5/32”-11/64" deep slot. This stuff costs about $1.60/foot on ebay.
16. It takes 7 feet of edge trim for TWO of these chairs. You should end up with about a 7 inch piece left over. This trim should be made for 1/32” thick material. (1/32 Opening EPDM Rubber Edge Trim) 7/64"-¼” overall width with a 5/32”-11/64" deep slot. This stuff costs about $1.60/foot on ebay.
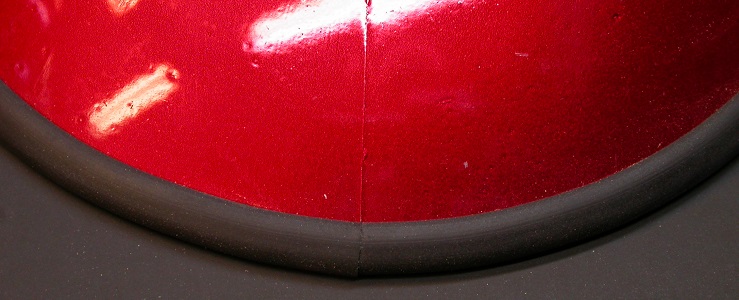
17. Start at the bottom seam of the ball opening and work the edge trim into place.
18. Cut and butt the two ends together to finish. This should NOT need glue.
18. Cut and butt the two ends together to finish. This should NOT need glue.
19. Start at either seam line on the base and apply the edge trim in the same manner.
20. Place the round seat inside so it sets level and fit the back pad inside so it leans back a bit. The chair is now finished and, depending on the fit of the PVC rings, the chair should rotate at this point. Other pillows or padding can be added to the interior as well as painting of the interior if you like.
|
|