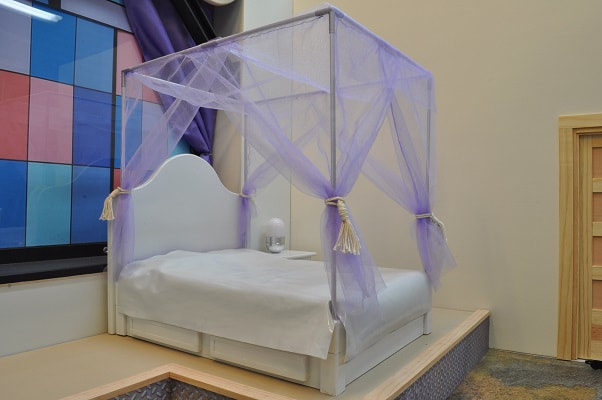
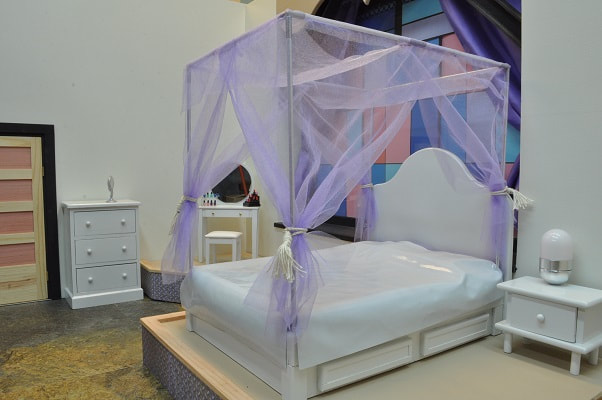
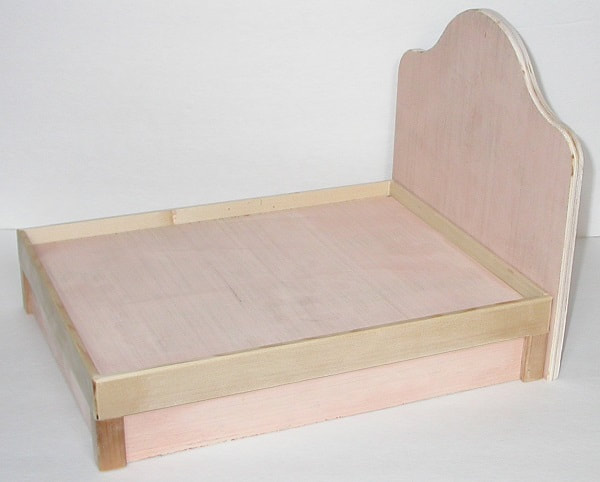
HOW TO MAKE A CANOPY BED

|
|
PARTS LIST
Mattress frame/deck & headboard
1) 2 pcs – 2” x 9 5/8” Luon ends
2) 2 pcs – 2” x 12 5/8” Luon sides
3) 4 – 3/8” x 3/8” x 2” wood (not plywood) corner braces
4) 4 – 1 9/16” (approx.-leave long) x ½” x 3/16” wood corner trim
5) 4 – 1 9/16” (approx.-leave long) x 11/16” x 3/16” wood corner trim
(You can easily use ½” x ½” wood corner trim here if you have some laying around as I did.)
6) 2 – 1 1/8” x 3/16” x 10” (approx.-leave long) wood end trim
7) 2 – 1 1/8” x 3/16” x 13 1/2” (approx.-leave long) wood side trim
8) 1 – 10” x 13” Luon top of bed frame (also approx.
mattress size)
9) 4 – 1” x 5” x ¼” wood (not plywood) drawer fronts (optional)
10) 8 – 5” x 1/4 x 1/32 basswood for drawer detail (optional)
11) 8 – ½” approx.(custom trim to fit) x 1/4” x 1/32” basswood for drawer detail (optional)
12) 2- 10 3/4 x 9 7/8” Luon headboard back (optional)
13) 3-4 - #4 x 3/4" flat head screws to attach headboard
CANOPY FRAME
All tubing for items 14-18 can be brass, copper or aluminum
14) 4 – 3/16 x 9 1/2” long tubing corner posts (alum)
15) 4 – 3/16” x 2 3/16”( or just short ) long tube corner post frame mounts (brass)
16) 4 – 5/32” x 2” long tubing corner post bottom coupling (copper)
17) 3 – 3/16” x 9 5/8” long tubing top center & end canopy rails (alum)
18) 2 – 3/16” x 12 5/8” long tubing top/side canopy rails (alum)
I chose aluminum for all exposed posts and rails so they did not need painted. Total cost about $7.00. The copper tube was about $1.50 and the brass tubing needed for all corner and cross member brackets was about $1.85. You can cut back on these costs as explained in the next paragraph but items 20-22 must be something you can solder. That’s why I call out for BRASS tubing. They will need painted. I went with silver (nickel actually) to near enough match the posts and rails.
Or, to go on the cheap, all these above parts can be replaced with 3/16 wood dowel. Eliminating item #16 but making item #15 11 11/16” long and it would run from the floor to the corner bracket. But to do this, you will have to modify the dowel rods as follows as wood dowel rods are not a true to size as they look. This can be done to full length dowels or the cut pieces. Just be careful NOT to crush the dowels in the drill chuck.
Burnishing the wood dowels to a “true” size.
First drill two holes in a piece of scrap wood at least ¾” thick with a #12 and #13 drill bit. Hand snug the chuck of an electric drill down on each dowel. At a high speed, feed each dowel through the #12 hole then the #13 hole. This will make the dowels a uniform size for insertion into the brass tubing. This also make the dowels look better when painted.
First drill two holes in a piece of scrap wood at least ¾” thick with a #12 and #13 drill bit. Hand snug the chuck of an electric drill down on each dowel. At a high speed, feed each dowel through the #12 hole then the #13 hole. This will make the dowels a uniform size for insertion into the brass tubing. This also make the dowels look better when painted.
20) 12 – ¾” long x 7/32” brass tubing(3/16” ID) for fabrication of canopy rail top corner brackets
21) 2 – 1.0” long x 7/32” brass tubing(3/16” ID) top center cross member brackets (part “A”)
22) 2 - ¾” long x 7/32” brass tubing(3/16” ID) top center cross member brackets (part “B”)
If you do not have Luon near you, it is simply cheap, thin (3/16”) plywood used primarily for underlayment of floors. A 4 foot by 8 foot sheet is about $13.00. Anything near this is fine
CURTAINS & LINENS & MATTRESS
23) 1 – half yard of micro netting curtains
24) 1 – half yard of matching satin material sheets/pillow cases
25) 10 (approx.) cotton balls stuffing for two pillows
26) 1 – 10” X 13” X 1” foam rubber mattress
27) 4 – 6” lengths of 1/8” diameter nylon cord for curtain tie-backs
28) kite string for tassels and securing tassels
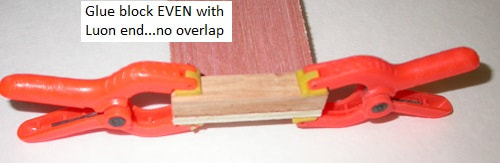
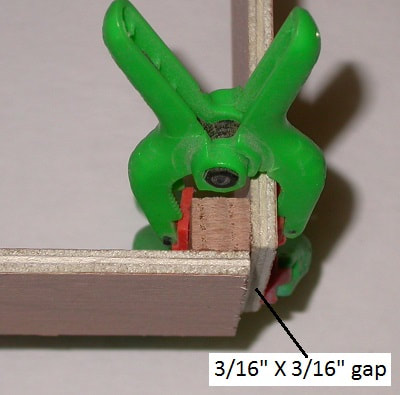
Glue and clamp one corner brace from item #3 so it is even with the ends of either part 1 or 2. It does not matter which at this point.

|
|
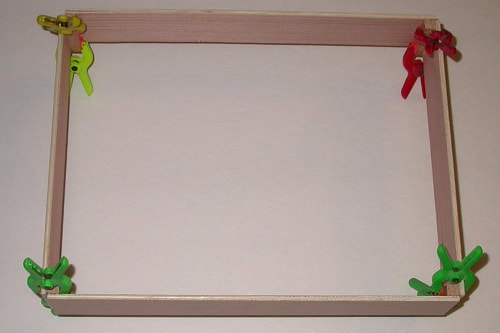
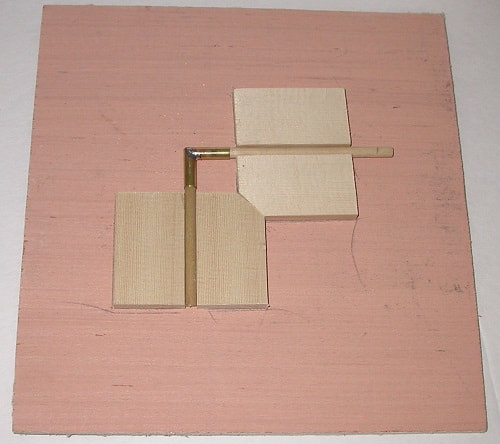
Once the glue is dry, glue and clamp these corner braces to the remaining pieces to form the rectangular main frame and pedestal of the bed with a 3/16” x 3/16” gap in each corner as shown.
|
|
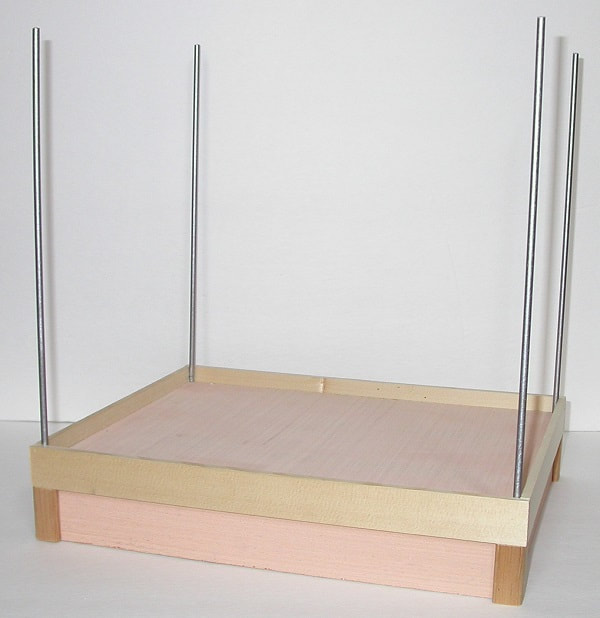
This gap is the location of four 3/16” hobby tubes (brass or aluminum is fine – I used brass tubing here) to match up with the 3/16” aluminum corner posts of the canopy. This tube will be installed later.
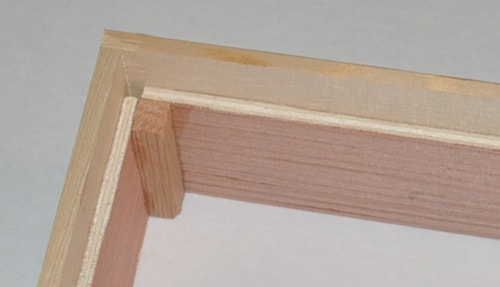
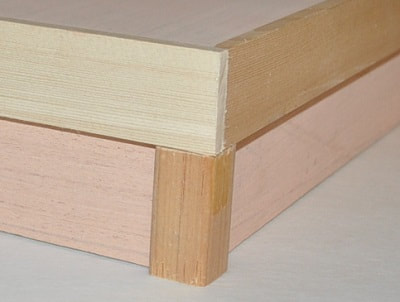
Once the glue is dry and the clamps are removed, trim parts 6 & 7 and glue in place around the top of the bed frame so that 11/16” of material sticks above the base section as shown. This allows for the thickness of the Luon top panel and the 1” thick mattress.
Once the glue is dry and the clamps are removed, trim parts 6 & 7 and glue in place around the top of the bed frame so that 11/16” of material sticks above the base section as shown. This allows for the thickness of the Luon top panel and the 1” thick mattress.
|
|
All four edge pieces installed close-up of 11/16”overhang
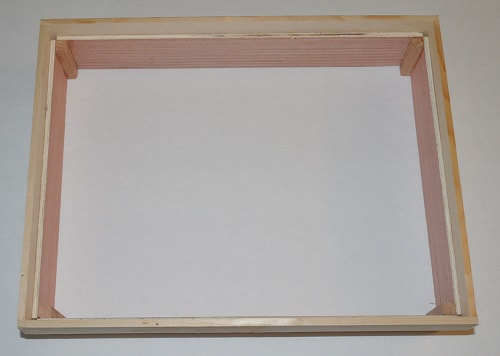
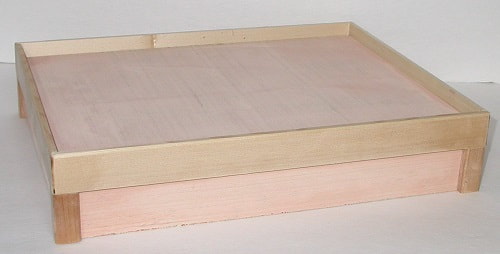
This is a good time to test fit the panel for the top of the bed frame, part #8. It should fit freely inside all four side trim pieces and not bow out the sides or ends (SEE BELOW). This panel will also square up the frame if not square. Do not glue in place yet but you can leave it in place…it should stay if not too undersized.
The corner trim pieces can be glued in place now and should run from the bottom of the side trim pieces to the bottom edge of the bed frame without protruding below. Trim if needed before gluing. The frame should be quite strong by now.
Remove the top of the bed frame from the sides. It is best to use a drill press to clear out the corners of the bed frame to make room for the corner post frame mounts to ensure they are perpendicular to the bottom of the assembly. Using a handheld drill will work…just be very careful. Using a 3/16” or a #13 drill bit, drill through each corner where the 3/16” x 3/16” gap is to make way for the brass tubing.
Glue the top of the bed frame in place. Once dry, again drill through the bed frame from the bottom with the 3/16” or #13 drill bit, placing a block in the corner being drilled to protect from splitting out the hole when you drill through the top panel of the bed frame.
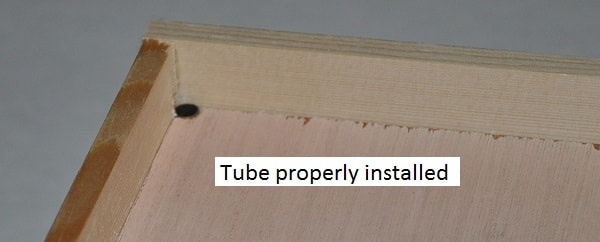
Cut four lengths of 3/16 OD tubing to 2 3/16” long or just short. This will allow it to run from the very top surface of the top panel of the bed frame to even or just short of the bottom of the bed…to protect from sticking through and scratching anything. Slide a 2 3/16” length of tubing into each corner so it is even with the top of the bed frame top and does NOT stick out the bottom. Remove and trim if needed. These tubes are what accepts the corner post couplings for the canopy. NOTE: Both pictures below COULD be correct if the one that sticks out, sticks out the same on all four tubes. Making them flush just seems simpler to control.
Glue the top of the bed frame in place. Once dry, again drill through the bed frame from the bottom with the 3/16” or #13 drill bit, placing a block in the corner being drilled to protect from splitting out the hole when you drill through the top panel of the bed frame.
Cut four lengths of 3/16 OD tubing to 2 3/16” long or just short. This will allow it to run from the very top surface of the top panel of the bed frame to even or just short of the bottom of the bed…to protect from sticking through and scratching anything. Slide a 2 3/16” length of tubing into each corner so it is even with the top of the bed frame top and does NOT stick out the bottom. Remove and trim if needed. These tubes are what accepts the corner post couplings for the canopy. NOTE: Both pictures below COULD be correct if the one that sticks out, sticks out the same on all four tubes. Making them flush just seems simpler to control.
|

|
These tubes should fit snuggly and not need any glue. If not, simply apply some glue to the outside of the tube or inside of hole when inserting. Wipe off excess.
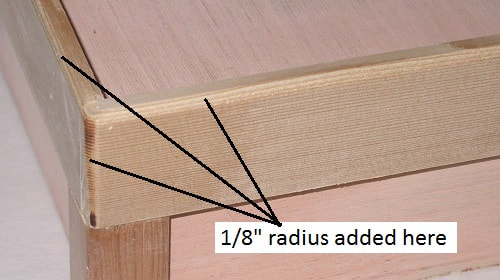
At this point, I set up my table router with my smallest radius bit to add a nice radius (1/8” radius bit) to the outer edges of the edge and side trim pieces, as well as their ends. This is not necessary but I think it gives the frame a cleaner, friendlier, finished look.
At this point, I set up my table router with my smallest radius bit to add a nice radius (1/8” radius bit) to the outer edges of the edge and side trim pieces, as well as their ends. This is not necessary but I think it gives the frame a cleaner, friendlier, finished look.
|
|
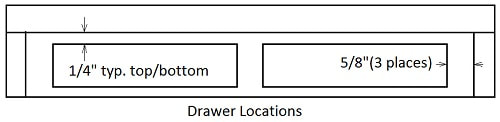
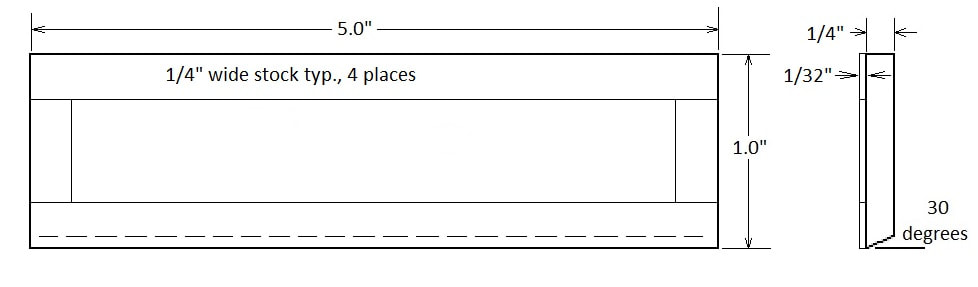
The recessed areas for the fake drawer fronts on the right and left side of the bed are approximately 12” x 1 ½” Mark the right and left side panels of the bed frame to show the position of the fake drawer fronts. I added a ¼” x 1/32 thick border around the face of each drawer front of hobby grade bass wood as well as an 1/8” radius to the tops and ends of these drawer fronts after adding a 30 degree angle to the bottom edge as shown in the sketch below. Glue in place. Mine are located on center of the recessed area with a 5/8” gap between and at ends. (SEE Sketch below.) Note the sketch of the drawer fronts are angled inward on the bottoms to pose as the drawer’s handle and should be on the bottom. Also note that I primed the bed frame and the drawer fronts separately, then glued them in place for the final painting due mainly to the small ¼” gap at the top of the drawers and I wanted to get good primer coverage. Again, personal preference here.
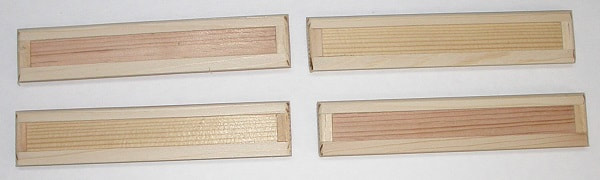
Finished drawer fronts ready for priming
THE CANOPY FRAME
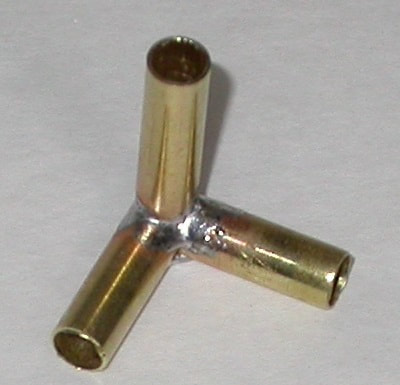
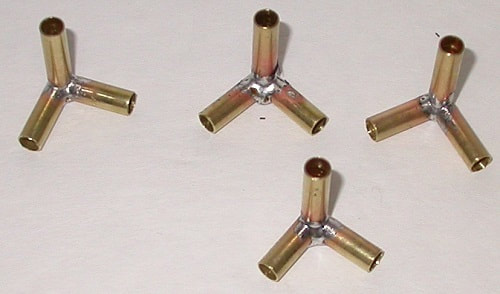
Basically, the canopy frame consists of 3/16” OD tubing held together at the four corners with soldered brass tubing brackets made from 7/32 OD (3/16 ID) brass tubing with 5/32 OD tubing at the bottom of each corner post to insert in the frame.
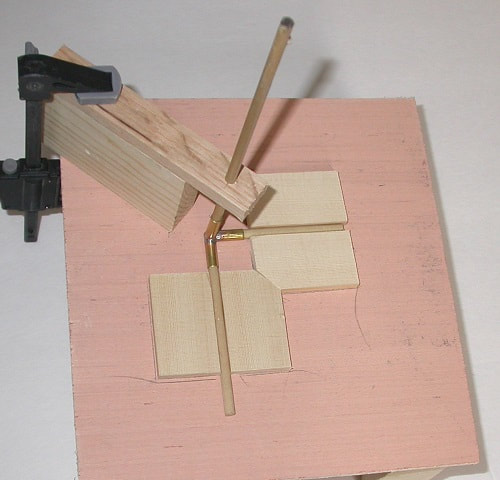
I made a jig to hold the three parts of the corner brackets during the soldering as shown below.
Basically, the canopy frame consists of 3/16” OD tubing held together at the four corners with soldered brass tubing brackets made from 7/32 OD (3/16 ID) brass tubing with 5/32 OD tubing at the bottom of each corner post to insert in the frame.
I made a jig to hold the three parts of the corner brackets during the soldering as shown below.
|
|
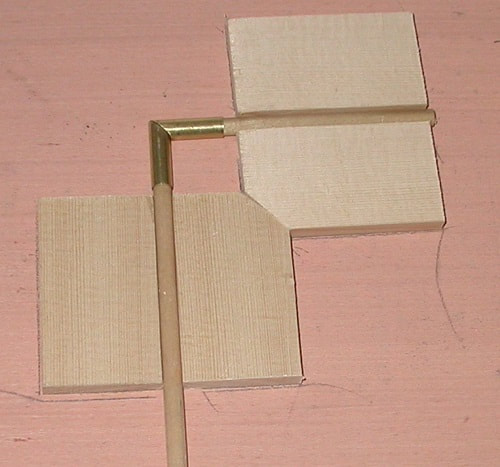
Not yet soldered soldered awaiting 3rd member
|
|
Complete jig for adding the third member
Scrap wood is glued to a piece of scrap Luon to hold two members at a 90 degree to each other while the third peg, in a separate block, holds the third member at 90 degrees to the first two. It sounds a bit complicated but these members MUST be reasonably accurately laid out to each other for tube alignment. For the first two tubes, I slipped the brass tubing onto a 3/16” wood dowel rod and, using a disc sander, I put a 45 degree angle on one end. Use sand paper to remove any burrs around where you sanded then fit them, with the wood dowel rods still inside into the jig. Solder this joint as best you can from the top. Let it cool then turn over the joint and solder the other side. Solder up all four joints now makes adding the third piece easier as you only have to position the last part of the jig once.
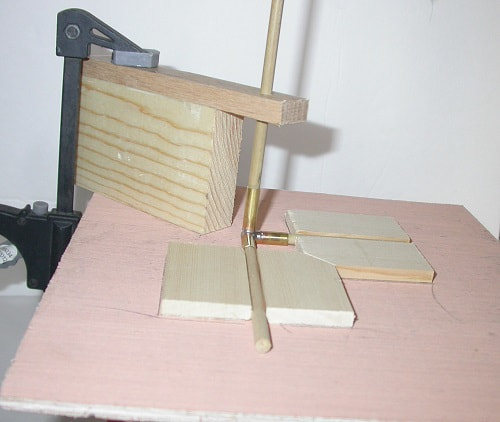
Position the last member in the jig, also on a length of 3/16” wood dowel and clamp the two jig parts together. Adjust if needed. Carefully, solder the third member to the first two. You will have to turn the jig or even prop it up on edge to get a good solder joint all around. Let cool before moving. Slide out the top dowel rod and remove the finished bracket from the jig. Repeat this for the remaining three bracket. At least now the third part should line up well without adjustment to the jig.
Position the last member in the jig, also on a length of 3/16” wood dowel and clamp the two jig parts together. Adjust if needed. Carefully, solder the third member to the first two. You will have to turn the jig or even prop it up on edge to get a good solder joint all around. Let cool before moving. Slide out the top dowel rod and remove the finished bracket from the jig. Repeat this for the remaining three bracket. At least now the third part should line up well without adjustment to the jig.
|
|
You should end up with four quite identical corner brackets. NOTE: One member is longer than the other two. This member accepts the corner post.
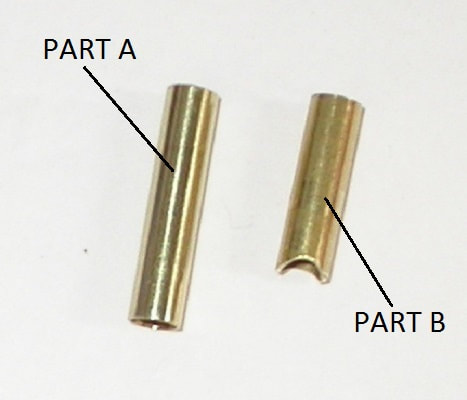
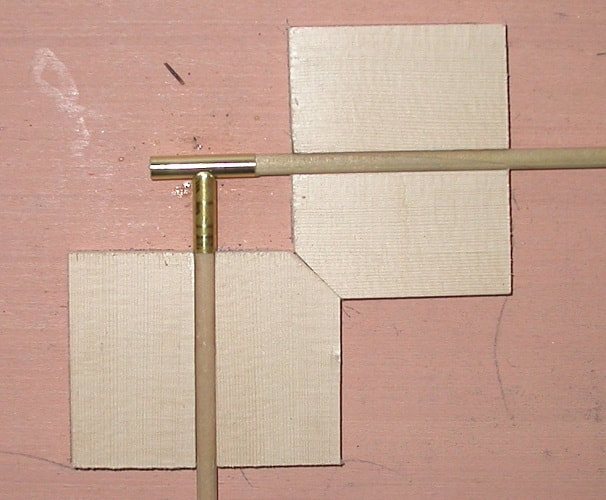
The same jig can be used for the top cross member as shown. These brackets amount to little more than a “T” made from the two pieces.
The same jig can be used for the top cross member as shown. These brackets amount to little more than a “T” made from the two pieces.
|
|
Cross member bracket parts Cross member parts ready for solder
The 1.0” member must slide easily over the 3/16” top side bars while the ¾” member needs modified on one end to make soldering easier…and stronger. I shoved a 3/16” wood dowel inside these before I clamped them in a vice and used a 3/16” endmill to make a nice centered pocket in one end to match the other member well enough, even though the mating tube is 7/32” in diameter. The solder will fill any void. Alternatively, for those without access to a mill, you can simply use the corner of a file to make a notch in these ends that will serve the same purpose. The solder should still fill even these voids making it look nice.
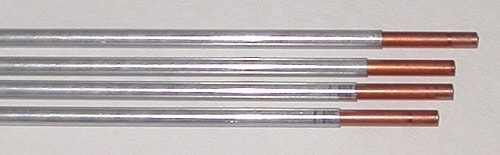
Once you have all four corner brackets and the top cross member brackets fabricated and painted, if using aluminum for posts and rails, install a 2.0” length of 5/32” tubing (again I used copper here) into the four corner posts with half exposed. Rather than trying to use a glue to hold them in place, I simply used a pair of wire cutters and made a dent on the copper tube about 5/8” – ¾” from one end on each 5/32” tube. Deep enough to cause a good amount of drag when inserted into the corner post but not so deep it could not be pushed in half way. Just use care pushing it in so as not to go too far.
Once you have all four corner brackets and the top cross member brackets fabricated and painted, if using aluminum for posts and rails, install a 2.0” length of 5/32” tubing (again I used copper here) into the four corner posts with half exposed. Rather than trying to use a glue to hold them in place, I simply used a pair of wire cutters and made a dent on the copper tube about 5/8” – ¾” from one end on each 5/32” tube. Deep enough to cause a good amount of drag when inserted into the corner post but not so deep it could not be pushed in half way. Just use care pushing it in so as not to go too far.
The four corner posts with the corner post bottom coupling installed.
This same method of gently crimping of the 3/16” tubing for holding this tubing inside the corner and cross member brackets can be applied here as well. You don’t want it falling apart but you still want to be able to repair it if needed.
A typical bed of this style should be 78” tall, or 13” in 1/6th scale. I went for 14” tall, which changed my overall height to 84” in full scale.
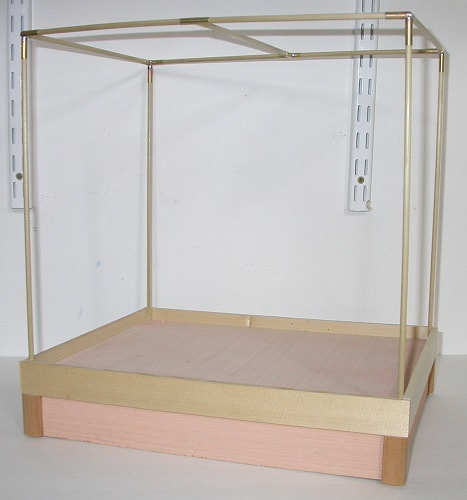
Assemble the top frame of the canopy as shown and carefully slip each corner bracket onto the corner posts.
|
|
The top, center cross member is simply centered on the top side bars.
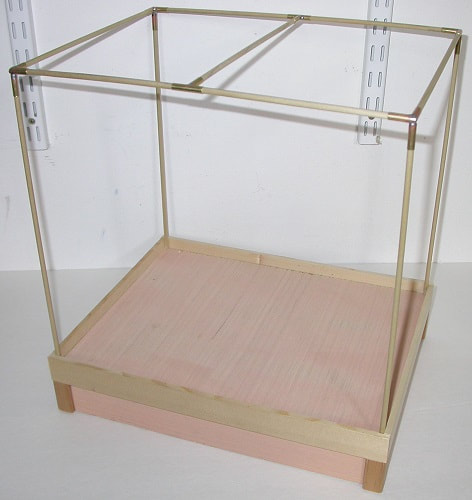
If you used wood dowels for the posts and rails, now is the time to remove the frame from the bed, double check that the center cross member is indeed in the center of the frame’s length and apply the spray paint. Silver, gold, black, white. You choose. Once painted you will still be able to remove it from the bed and take it apart at the corners but the center cross member bracket should be locked in by the paint.
If you used wood dowels for the posts and rails, now is the time to remove the frame from the bed, double check that the center cross member is indeed in the center of the frame’s length and apply the spray paint. Silver, gold, black, white. You choose. Once painted you will still be able to remove it from the bed and take it apart at the corners but the center cross member bracket should be locked in by the paint.
THE HEADBOARD
The headboard is optional but adds a great deal to the usability of the bed, particularly for a figure to sit up in bed leaning against it. Plus, you do not have curtains on the head end.
From a piece of Luon, 9 7/8” high and 10 ¾” wide, fashion the top you desire. Anything feminine and flowing will do. This is part #12 in the parts list. For guidance, the specs for mine are spelled out in the sketch below.
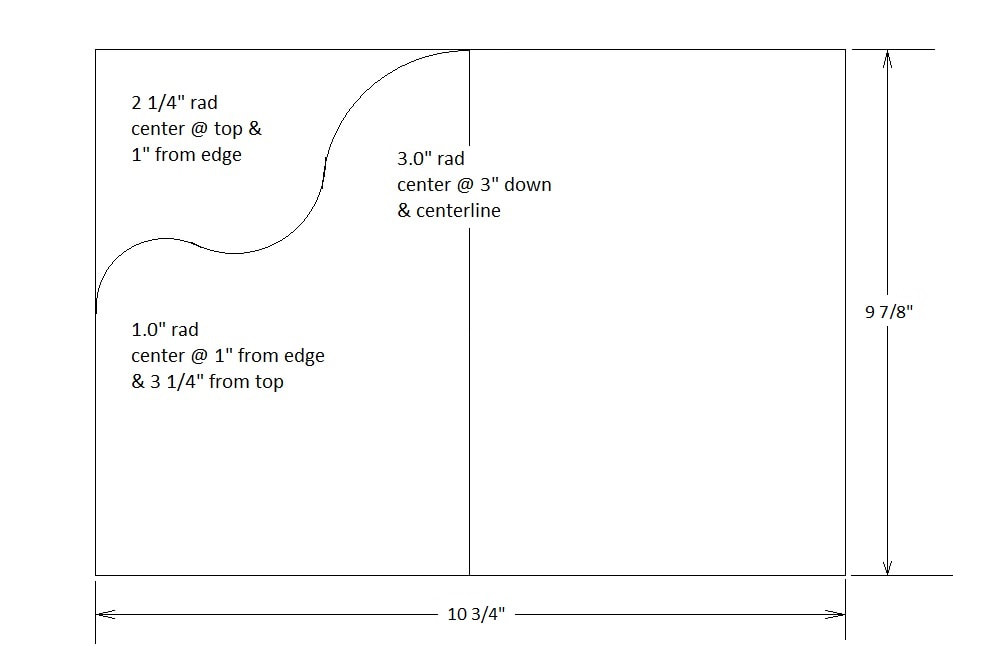
This is NOT to scale but gives the radii and their centers
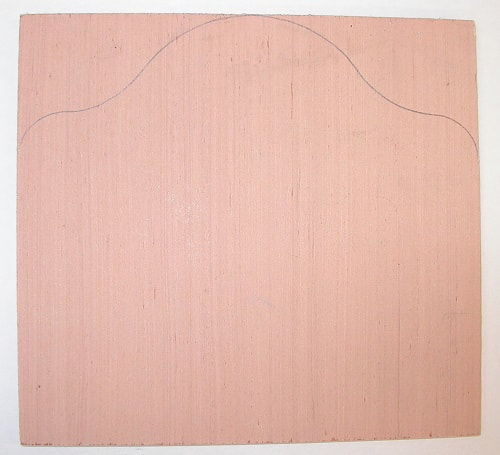
Single sheet marked
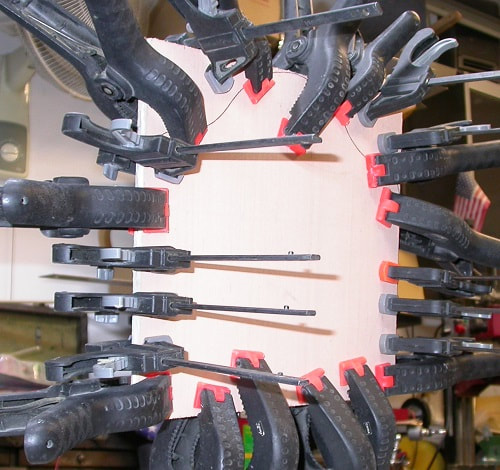
Once this piece is marked, glue the second piece from part #12 to it making it double thickness as shown.
|
|
Glued up to double thickness Cut, Sanded and edge routered
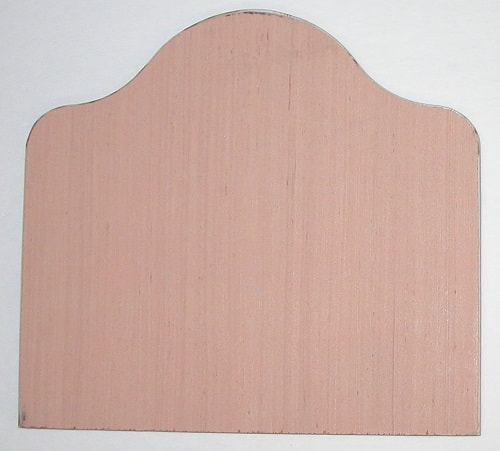
Cut out the shape applied to the headboard top and sand to suit. I added a 1/8” radius to the front side of my headboard to dress it up a bit.
When installed, there will be a 3/16” gap between the headboard and the corner posts to allow for the netting. The headboard will also protrude 1/8” on each side of the frame showing its thickness and the 1/8” radius.
When installed, there will be a 3/16” gap between the headboard and the corner posts to allow for the netting. The headboard will also protrude 1/8” on each side of the frame showing its thickness and the 1/8” radius.
ATTACHING THE HEADBOARD
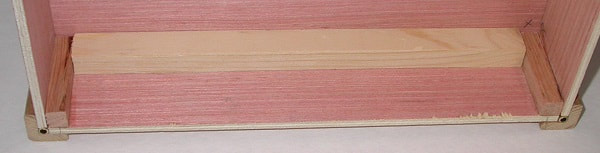
I added a scrap strip of wood ½” x 9/16” at the headboard end where the end piece (part #1) and the bed frame top (part #8) meet inside as shown to give the screw(s) something better to grip on.
I added a scrap strip of wood ½” x 9/16” at the headboard end where the end piece (part #1) and the bed frame top (part #8) meet inside as shown to give the screw(s) something better to grip on.
I only applied one screw into this strip as my headboard bowed slightly away from the bed frame at the center. If it had bowed the other way…I’d have used two near the ends. I used two screws at about a ½” from the bottom at the ends so they would grip into the corner braces. (part # 3) Drill proper sized pilot holes at these locations so as not to split the wood…especially the corner braces. I used the #4 flat head wood screws here, countersinking the holes on the back of the headboard. Remove the headboard before priming.
I waited to this point to start priming any of the wood so the final sanding and priming can be done at the same time. Apply a good primer to the bed frame and the headboard by spray or brush and let dry. I used a spray primer on all surfaces except for where the mattress sets as this will not be seen and brush primer is cheaper. Once you are content with the finish of the primer and it is quite dry, glue the fake drawer fronts in place. Apply the final paint. I chose a gloss white as it goes with any color curtains.
MATTRESS CONSTRUCTION
This is rather straight forward. I used 1” thick sheet foam rubber I had around from another project but 1/2” – ¾” would work just as well though you should adjust how much is covered by the side/end trim pieces. I cut my foam to just under 13” x 10” to insure it would not be pushed up in the middle once the cover was in place. If you are a better sewer than I, you may wish to make an actual 6 sided cover for the foam. But I simply laid the foam on a piece of cloth, 16” x 18”, and folded it over the foam, making the corners as nice as I could. Just like wrapping a gift. A few pins may be used to hold it in place while you turn it over and insert it into the frame. These pins are simply left in.
This is rather straight forward. I used 1” thick sheet foam rubber I had around from another project but 1/2” – ¾” would work just as well though you should adjust how much is covered by the side/end trim pieces. I cut my foam to just under 13” x 10” to insure it would not be pushed up in the middle once the cover was in place. If you are a better sewer than I, you may wish to make an actual 6 sided cover for the foam. But I simply laid the foam on a piece of cloth, 16” x 18”, and folded it over the foam, making the corners as nice as I could. Just like wrapping a gift. A few pins may be used to hold it in place while you turn it over and insert it into the frame. These pins are simply left in.
The top sheet is simply an 11 ½” x 16” piece of the material used for the fitted sheet. This size allows me to have enough to tuck under at the foot of the bed when the top comes even with the head of the bed. I then fold down about an inch and a half. The sides are long enough they may be tucked in between the mattress and the bed frame.
PILLOWS
Not too much to say here…other than the size. For this bed…being just over the width of a full sized bed but not the width of a queen…I wanted my pillows to be about 5” long and 3” wide with reasonable fill. I cut two a pieces of material, same as the mattress cover and sheet, 11” x 4”. After hemming both ends, fold them in half and sew up the two long sides. Turn these inside out and you have the pillow cases.
The pillows I made could be a bit longer but I simply used the pieces cut off the ends of the previous pieces for the pillow cases that were 18” long (The width of the material bought…1/2 yard). My pieces are 6 ½” x 4”. 7 ½” length would probably work better. Fold in half, as before but without hemming anything. Sew two adjacent sides closed. Turn these inside out. For filling, I used cotton balls. It took 5 per pillow of this size. Start by carefully pulling on each cotton ball until they are about as long as the pillow is wide and near even thickness throughout. Place one cotton ball in the pillow crosswise at the bottom. Add each cotton ball on top of this one until all 5 are in place. With needle and thread, simply loop stitch the end closed. This will not be seen as this end is put in the pillow case first.
MAKING OF THE CURTAINS
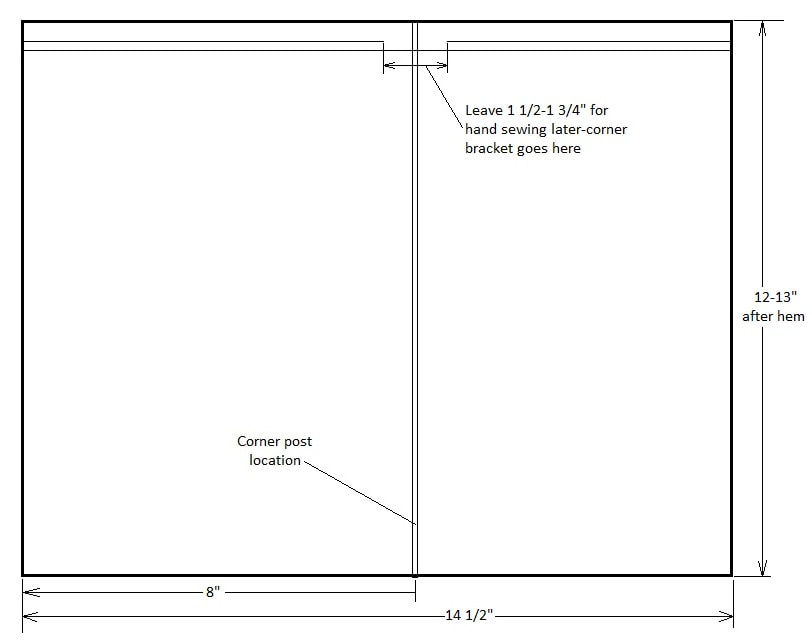
Look for the lightest weight, sheerest material you can find for a realistic look and hang to the material. I bought a yard of WYLA LP Micronet in lilac for my 14” tall bed. This stuff does not seem to fray or run so there is no need for hems. That’s nice. Depending on the height you used for the corner posts, the length of your curtains may vary. When fed onto the top bars of the canopy frame, they should NOT drag the floor. On the contrary, in 1/6th scale, most curtains should hang from JUST off the floor to about ½” below the top of the mattress. I split the difference and aimed for 1” off the floor. Also, the curtains should overlap by about three inches. That’s 1 ½” passed center for each side. As my bed (mattress size and outer edges of the canopy frame top) is 13” x 10”, I need four curtains 14 ½” long. That’s (13 + 10) / 2 + (1 ½ x 2) = 14 ½”. It took a bit of experimenting to get the top hem right to properly accept the tubes of the frame. You don’t want to fight to get it on but you don’t want it to fit like a saddle on a sow. I simply sewed a couple hems on a piece of scrap netting and got it on the second try.
See the sketch below.
One will be made like this and one will be made in reverse width dimensions with the 5 ½” dimension not hemmed from its end inward 3” to allow for the overlap and hand sewing to complete.
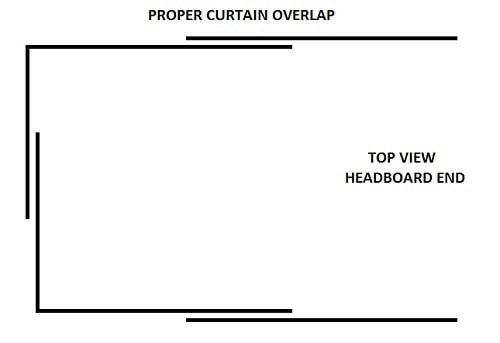
The curtains for the sides near the head of the bed are simply 8 ½” - 9” wide curtains that will be hand sewn the last 3” to form the overlap of the curtains at the foot of the bed. I did hem the headboard edge of these curtains and slid them onto the corner posts so you will need to add ½”-3/4” to your chosen width for this hem. Be careful in your sewing as it gets tricky at the top where the corner post frame mount is. The very TOP curtain is simply a section of netting 18” x 9 ¾” that is hemmed on one end, fed onto the headboard end cross rail and draped over the center and end cross rails. Once I had all curtains hung, I set about hand sewing them where they overlap as shown below.
CURTAIN TIE-BACKS
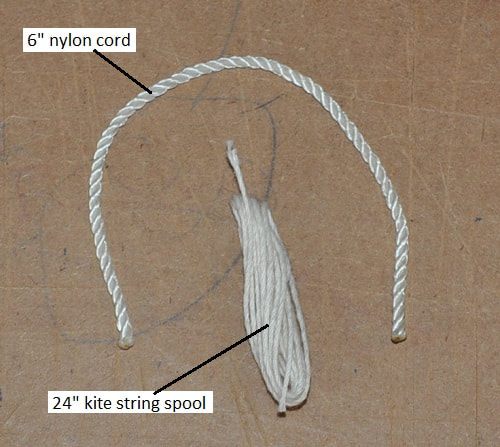
Since it would be near impossible to make “lavender” tie-backs, I chose to go with simple white which will match the bed. What you need amounts to a big loop of nylon cord…with a tassel where the ends meet.
Take 48” of kite string (mine was cotton) and wrap it around the ends of two fingers. Remove it from your fingers and flatten it out to look like uncut tassel cords. Take a length of 1/8” nylon cord, 6” long ( I guessed this right on the first try…wow ) and bring the ends together with one end on each side of the cotton string coil overlapping it by ½”. NOTE: When you cut the nylon cord, heat the ends to seal them and keep it from fraying. Also mind the amount of heat. Do your best to NOT burn the cord and make it brown or black. This may show when finished. With another length of kite string, 24” long, start wrapping the area where these two components overlap. This should be enough cord to give a nice uniform wrapping to the joint. Wrap this as tight as possible. Tie off the length of kite string. With a good scissor, insert one blade into the loops of kite string and cut to form the tassel.
Carefully, bunch up the two curtains at one of the posts at the foot of the bed. Wrap the looped cord around the post and curtains, inserting the tassel through the loop when they meet. Adjust until the tassel hangs straight down on the outside of the corner post and curtains and the curtains droop nicely from the top rail to the cord. Once both sets of curtains are tied back, do the same to the single curtains by the headboard. The tassel will simply hang to the side of the bed. Check that all cords and tassels are about the same height from the floor.
|

|
BED SPREAD/COMFORTER
Simple is good, so I opted to try using a plethora material here as it will not need hemmed and will still look finished. Not wanting to cover the drawer fronts, I cut a piece of white plethora, to match the bed frame and headboard, to 13” x 15”. I notched out two corners for the foot of the bed so that the top edge lines up well with the head of the bed (as shown below). It hangs over both sides and the foot of the bed equally and still just over the tops of the fake drawers.
Simple is good, so I opted to try using a plethora material here as it will not need hemmed and will still look finished. Not wanting to cover the drawer fronts, I cut a piece of white plethora, to match the bed frame and headboard, to 13” x 15”. I notched out two corners for the foot of the bed so that the top edge lines up well with the head of the bed (as shown below). It hangs over both sides and the foot of the bed equally and still just over the tops of the fake drawers.

Basic Bed Spread/Comforter Pattern
Here we again show the finished canopy bed on the set of our iCarly:Five Years Later story.