HOW TO MAKE AN EXTENSION LADDER

Per request, here is a tutorial on the extension ladder(s) seen in my stories.
Take your time. Remember, when you work in 1/6th scale, ANY error you make is multiplied by 6 in appearance. Some will not matter, or be seen, but some may.
Take your time. Remember, when you work in 1/6th scale, ANY error you make is multiplied by 6 in appearance. Some will not matter, or be seen, but some may.
Major Tools I used…
Table saw
Planer (optional) (if you do not have a planer-cut the sides with a new blade as best you can and sand accordingly)
Mill/Drill Press with a good cross-feed table (it is just harder to set up without fine adjustment)
Variable Speed Electric Drill
Metal Lathe (optional)(you can use an electric hand drill or drill press here)
Required materials…
A clean (knot free) length of wood(hard wood is best but I used simple pine)
3/16” dowels (a 28” ladder will require at least three 3’ dowels or two 4’)
Two ¼” – 5/16” metal straps for the scissor locks, .020-.030” thick and 2.0” min long ( 2.5” is nice to work with then just cut off the excess.) (I used an old aluminum license plate @ .025 tk.)
Two 3/4” x 1 1/4” metal pcs. for rung locks, .020-.030” thick. (Again I used an old aluminum license plate @ .025 tk.)
One 2 5/8 length (approximate) of 3/16” id hobby tubing (Brass or aluminum is fine. I used brass.
Approximately six 3/16” washers (number depends on thickness of washers used)
Two #0 round head wood screws 3/8” long
Determine the length of ladder you want and cut your board to this length. Stay in 2” increments.
I went with 28” length for this ladder.
My first ladder seen in some stories has only 15 ½” long sections which only makes the top ½” shorter than the bottom. This gives a maximum extended length of 23” with the rung locks on the second run from the top.
Plane the board(s) to .540 thick (just under 9/16”).
Rip these boards into strips thick enough to be planed to .280 thick x the original .540” wide. I chose about .330 thick to give plenty for cleaning up both sides. Using a planer means NO sanding should be required.
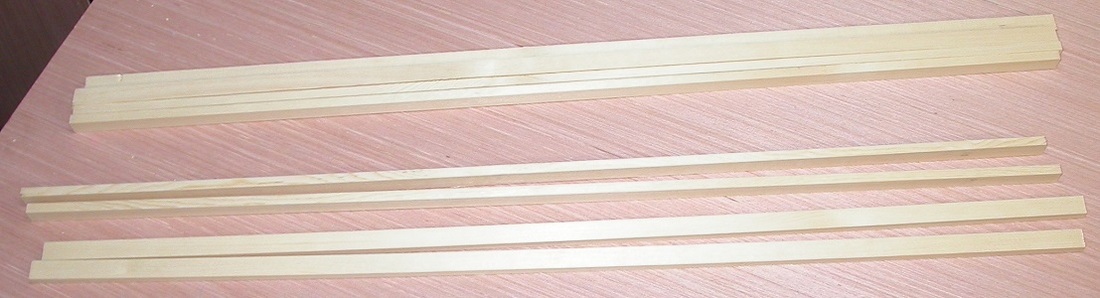
Anytime I do a project like this I will make at least one extra piece in case of accident as it would be a lot of extra work to replace one piece and I often make some shorter pieces of the correct width and thickness for setting up for boring the holes and such. In this case I cut up a complete 28” long piece of 1 x 6 that had a large knot near one side(using the area with the knot for shorter setup pieces) as I plan to use the left overs for another step ladder. I picked the four best for this ladder leaving the other five at the top of the picture for replacements or the step ladder.
Table saw
Planer (optional) (if you do not have a planer-cut the sides with a new blade as best you can and sand accordingly)
Mill/Drill Press with a good cross-feed table (it is just harder to set up without fine adjustment)
Variable Speed Electric Drill
Metal Lathe (optional)(you can use an electric hand drill or drill press here)
Required materials…
A clean (knot free) length of wood(hard wood is best but I used simple pine)
3/16” dowels (a 28” ladder will require at least three 3’ dowels or two 4’)
Two ¼” – 5/16” metal straps for the scissor locks, .020-.030” thick and 2.0” min long ( 2.5” is nice to work with then just cut off the excess.) (I used an old aluminum license plate @ .025 tk.)
Two 3/4” x 1 1/4” metal pcs. for rung locks, .020-.030” thick. (Again I used an old aluminum license plate @ .025 tk.)
One 2 5/8 length (approximate) of 3/16” id hobby tubing (Brass or aluminum is fine. I used brass.
Approximately six 3/16” washers (number depends on thickness of washers used)
Two #0 round head wood screws 3/8” long
Determine the length of ladder you want and cut your board to this length. Stay in 2” increments.
I went with 28” length for this ladder.
My first ladder seen in some stories has only 15 ½” long sections which only makes the top ½” shorter than the bottom. This gives a maximum extended length of 23” with the rung locks on the second run from the top.
Plane the board(s) to .540 thick (just under 9/16”).
Rip these boards into strips thick enough to be planed to .280 thick x the original .540” wide. I chose about .330 thick to give plenty for cleaning up both sides. Using a planer means NO sanding should be required.
Anytime I do a project like this I will make at least one extra piece in case of accident as it would be a lot of extra work to replace one piece and I often make some shorter pieces of the correct width and thickness for setting up for boring the holes and such. In this case I cut up a complete 28” long piece of 1 x 6 that had a large knot near one side(using the area with the knot for shorter setup pieces) as I plan to use the left overs for another step ladder. I picked the four best for this ladder leaving the other five at the top of the picture for replacements or the step ladder.
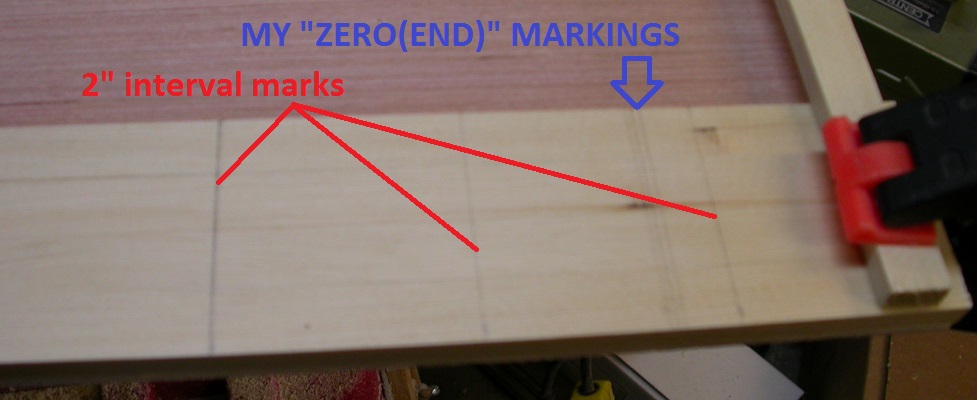
Mark these strips at every 2” interval from one end. I would mark one completely end to end then clamp them all to a table or sheet of plywood with the ends lined up and square to each other. Use a square to continue these markings across all four pieces.
Mark the end of each piece at the end you used as zero when making the original 2” spacing to indicate the bottom end. If one of these parts gets turned around it may look out of alignment.
Mark the end of each piece at the end you used as zero when making the original 2” spacing to indicate the bottom end. If one of these parts gets turned around it may look out of alignment.
Once all four parts are marked, separate them into pairs…and keep them as pairs throughout the construction.
RUNGS
A 28” ladder will require 13 rungs for each ladder section. (28 / 2 – 1 = 13)
You will need 13 rungs 3 13/16” long (3.812")
You will need 13 rungs 3 3/16” long (3.188”) (approximate-SEE next paragraph)
These are all made from 3/16” wood dowels.
If you cut them on a table saw using a stop you should get…
3 13/16” long rungs – 9 out of 3 ‘ and 12 out of 4’
3 3/16” long rungs(approx.) – 10 out of 3’ and 14 out of 4’ (How deep you drill the holes will determine their final exact length)
I find that wooden dowels, while they may look great are not very uniform in diameter. To correct this, making assembly easier as well as give the rungs a very smooth finish, I would suggest taking a scrap of ¾” wood (not plywood), drill a 3/16” hole in it as a former. This next part is easier with two people though it can be done by one person and a vise if you are careful. Put each dowel in its full length in a variable speed electric drill and, with the predrilled block of scrap wood in the vise or held by a second person, turn on the drill slowly at first and feed the rotating dowel through the hole the length of the dowel and then back out. The faster, within reason, you run the drill, the smoother the dowels will become. WARNING: It may get hot at times. The diameter should now be uniform and burnished to a nice shine. WARNING: Feed the dowel in straight and perpendicular to the hole or you may get what looks like coarse screw threads down the dowel’s length.
I set a stop on the cross feed of my table saw to the length of each rung length and cut 13 of each. It is best if these are close to all the same length. If you cut these lengths by rolling the dowel under a single edge razor blade, you should pick the two longest (of equal length) of each set for the end rungs to keep the sides parallel but the rest should be at least close in length. (Razor blade cut rungs should not need the ends sanded as the blade rolls the ends as it cuts.) You can smooth each end of these saw cut rungs by hand with sand paper to make it easier to get them in the holes but I prefer to simply stick them, one end at a time in my metal lathe and hit each end with a scrap of sandpaper. Your choice. You can do the same thing with a hand drill or drill press and a piece of sand paper. Just do not tighten the chuck too tight…just passed finger tight should do…so you do not leave chuck jaw marks on the rungs.
|
|
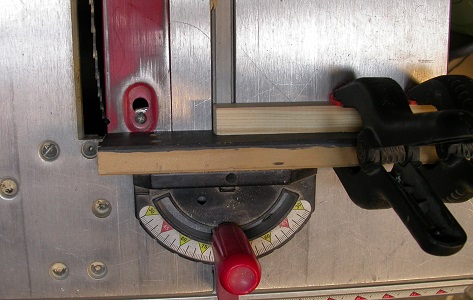
I set a stop fence on the wood table I use on my small mill so that every hole, once set up, would drill in the center of the side pieces. All I had to really watch then was that I was drilling on the line. This can be done on a drill press but, without a cross-feed vice on the table, small adjustments are very difficult. I also set the depth of the drill so it would NOT go through the other side making a blind hole.
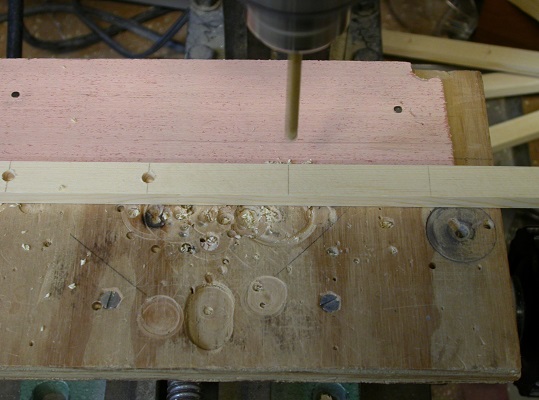
With the holes drilled in one pair of sides I placed a ZERO mark on the very end then ran the sides though the planer again for a minimal cut to remove the pencil marks rather than sanding them off.
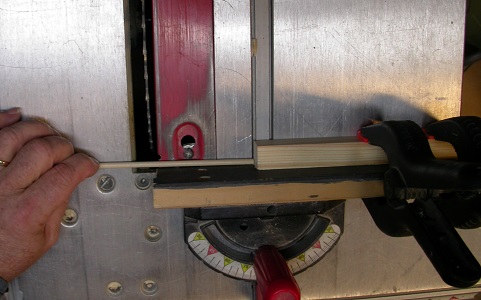
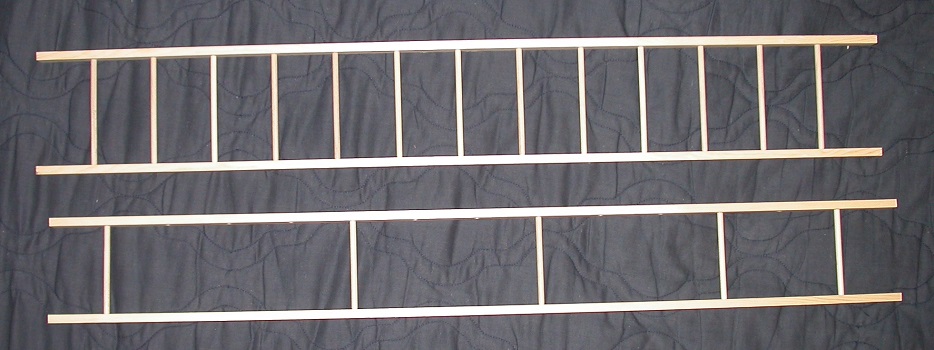
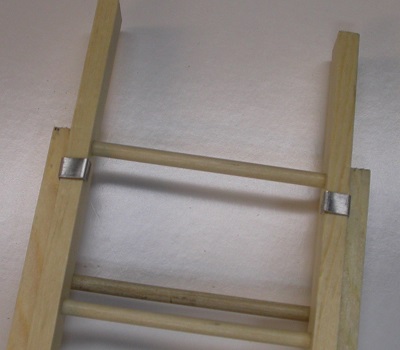
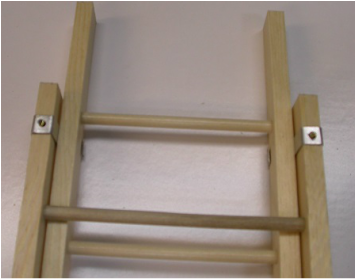
With one set of sides done for the outer section (wider), I installed 13 longer rungs into one side. Matching up the dowels to the holes, I started at one end and worked all the rungs just into the proper holes. I used NUMBER drill bits for the holes which is a drill bit set where the drill bits vary only a few thousandth from the ones next to them. Find the bit that will give you a snug fit but NOT overly tight. Once I had all the rungs started into both sides, I carefully used my bench vise, with protector pads on the jaws to not mark the wood, to press the sides together until it seemed the rungs had bottomed out. The side should now be VERY parallel. Now you need 4-5 shorter rungs installed as shown below to ensure that the inner ladder was narrow enough but not too narrow when placed on the outer ladder. You need at least enough gap between the inner and outer ladder to allow for the metal bracket that holds and guides the two ladders when in use. The metal I used, as I mentioned, is .025 thick so I need to double this value (one on each side) plus add a little for clearance and ease of sliding. My inner rungs ended up being just over 3 ¼” long rather than the 3 3/16” I guessed. I must have drilled .030 deeper than I thought.
With one set of sides done for the outer section (wider), I installed 13 longer rungs into one side. Matching up the dowels to the holes, I started at one end and worked all the rungs just into the proper holes. I used NUMBER drill bits for the holes which is a drill bit set where the drill bits vary only a few thousandth from the ones next to them. Find the bit that will give you a snug fit but NOT overly tight. Once I had all the rungs started into both sides, I carefully used my bench vise, with protector pads on the jaws to not mark the wood, to press the sides together until it seemed the rungs had bottomed out. The side should now be VERY parallel. Now you need 4-5 shorter rungs installed as shown below to ensure that the inner ladder was narrow enough but not too narrow when placed on the outer ladder. You need at least enough gap between the inner and outer ladder to allow for the metal bracket that holds and guides the two ladders when in use. The metal I used, as I mentioned, is .025 thick so I need to double this value (one on each side) plus add a little for clearance and ease of sliding. My inner rungs ended up being just over 3 ¼” long rather than the 3 3/16” I guessed. I must have drilled .030 deeper than I thought.
Now to make the rung locks.
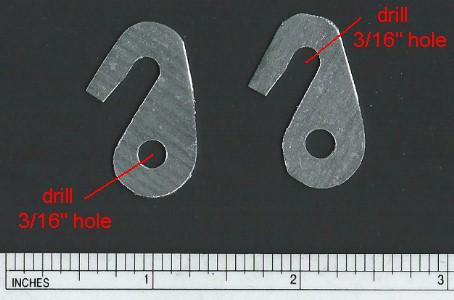
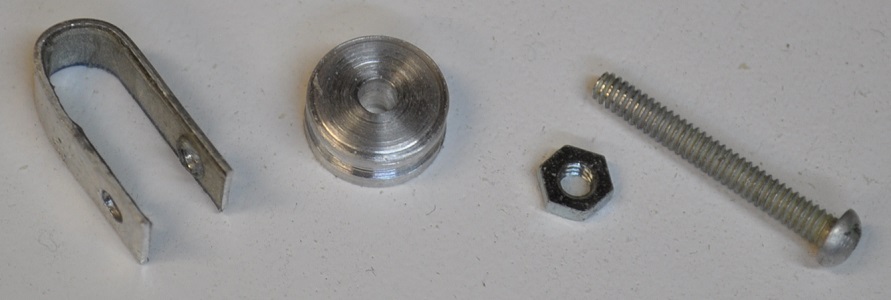
The rung locks are made from the same scrap license plate material. (.025" thick aluminum) The hole and the bottom of the slot are both made with a 3/16" drill bit. Once you have two of these cut from the aluminum stock to very near the final size and shape, tape them together with masking tape. Mark the location of the pivot hole and the location of the bottom of the slot and drill through with a 3/16” drill bit. With the two holes drilled, remove the tape and cut out the slot in each. File and sand as needed. As the two pictured are from my first ladder, in order to duplicate them near enough, I worked out the dpi setting on my printer to get the ruler to read accurately when printed and simply printed this picture onto a mailing label…cut them out and stuck them to the stock. This gave me proper locations for drilling the holes and where to cut the slot.
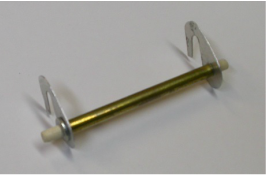
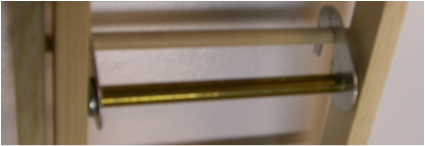
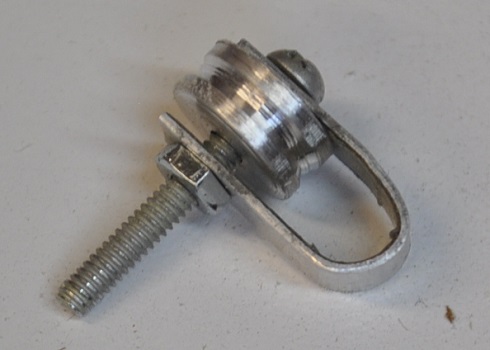
With the rung locks cut out, measure the 3/16" washers for thickness. Accurately measure the distance between the sides of the inner section of the ladder. You need to cut a section of 3/16” id tubing to this length minus the thickness of the two rung locks and whatever washers you chose to use plus .020-.040” for clearance so the assembly doesn’t bind. On my first ladder, I used three washers per side while on this one I used 2 total as they were thicker. I used one washers on each side equaling .060” total plus the .050” total for the two rung locks. My tube, with a distance of 2.870” between the sides of the inner section, needs to be NO longer than 2.740 to leave .020” slop in the assembly so the locks turn freely. My tube is 2.700”. On the third rung from the bottom slide on your washers, rung locks and tube as shown. Install the other 12 rungs into this side. Line up and press on the other side of this ladder section. Be careful that both rung locks face the same direction.
|
|
Rung Lock Assembly Rung Lock Assembly installed
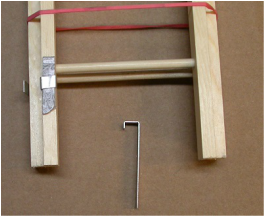
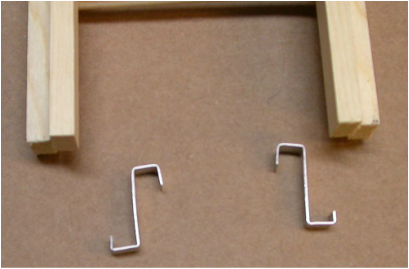
Once you have the inner section fully assembled, check the clearance again. Then bend the slide brackets from the metal strips. The first 90 degree bend MUST be short enough to allow the rungs to slide freely under it. Aim for at least 1/8” to 3/16" long on the end. It can be trimmed later but this is a good starting spot. Hold it against the side of the ladder or one of the extra pieces you have of the same size with a double layer of cereal box cardboard between the first bent section and the wood. This will give adequate clearance for it to slide through. Now bent the strap into a “J” shape as in the first picture below. Bend the second strap like this one. For handling purposes I placed a rubber band around each end of the ladder to hold it together as you can see. Now slide one bracket between the inner and outer sections so it cups over the inner section. Place two layers of cereal box cardboard between the bottom of the “J” and the edge of the inner section as shown. Again, this adds clearance for the ladder to slide through. Holding is securely, bend the next two bends in turn until you end up with the two brackets shown in the second picture below. You can trim the last end to approximately ¼” and smooth up with a file or sandpaper if you like.
|
|
Drill 1/16” holes in these slide brackets through the section of the slide bracket that goes over the outer section for the two #0 wood screws. Slide the slide brackets back onto the two sections so they are ½” from the end of the ladder and the drilled hole is over the outer section. This distance is relative and can be any place from at the end of the ladder to resting on the top of the top rung. If you used hardwood drill a pilot hole in the wood for the #0 wood screw and install the screw. If you used pine or other soft woods, simply pierce the surface of the wood through the bracket with a small awl or nail and install the screws. #0 round head wood screws should not split soft wood.
|
|
WORKING SIDE OF LADDER SIDE OF LADDER AWAY FROM USER
DOES IT NEED A ROPE?
Typically a 16 foot ladder or shorter does not have a pulley and rope while any ladder over 20 foot does. Obviously you do not have to have a functioning pulley. It should at least look functional.
The rope will attach to the bottom rung of the inner ladder and the pulley will be attached to the second rung from the top of the outer ladder.
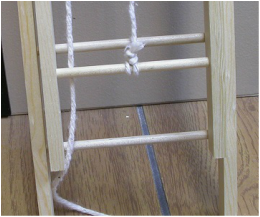
The simplest, and accepted, way to attach the rope to the inner ladder is with a simple knot as shown below.
The pulley is a different matter. This needs made or salvaged off a toy.
Materials Needed...
¼” wide x .020-.030” thick x 1.250” min length aluminum (preferred)
Pulley wheel from a toy or, as I did, turned on a lathe - I made mine .375" in diameter x .164" thick with a groove in the OD for the rope and a .094” hole in the center for what I take to be a #3 nut and bolt. The bolt size is immaterial…just use a #2 thru #4 bolt so it does not look TOO big.
Typically a 16 foot ladder or shorter does not have a pulley and rope while any ladder over 20 foot does. Obviously you do not have to have a functioning pulley. It should at least look functional.
The rope will attach to the bottom rung of the inner ladder and the pulley will be attached to the second rung from the top of the outer ladder.
The simplest, and accepted, way to attach the rope to the inner ladder is with a simple knot as shown below.
The pulley is a different matter. This needs made or salvaged off a toy.
Materials Needed...
¼” wide x .020-.030” thick x 1.250” min length aluminum (preferred)
Pulley wheel from a toy or, as I did, turned on a lathe - I made mine .375" in diameter x .164" thick with a groove in the OD for the rope and a .094” hole in the center for what I take to be a #3 nut and bolt. The bolt size is immaterial…just use a #2 thru #4 bolt so it does not look TOO big.
|
|
PULLEY PARTS PULLEY ASSEMBLED
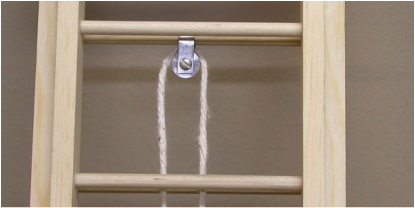
Bend the ¼” wide strap over a ladder rung evenly in the center to make a nice “U”. Mark the location for the axle bolt so the pulley wheel will clear the rung with room for the rope and drill these holes. Place the “U” bracket over the second rung from the top of the outer ladder and assemble the wheel and axle bolt. Cut off any excess bolt length.
Feed the rope, tied to the bottom rung of the inner ladder, between all two ladder’s rungs until you reach the pulley. Feed it though the pulley and back down between the rungs as before.
I expect I'll look around for some cord that looks more like 1/4" nylon rope to replace this string but this will work for now.
|
|
ROPE TIED TO FIRST RUNG PULLEY IMSTALLED WITH ROPE
I thought about putting those adjustable feet on the bottom but decided it was not worth it. It can be done, mind you, but I am moving on…maybe later. If you REALLY want them now, please let me know.

|

|

|

|