HOW TO MAKE Wood Doors
|
|
Standard four panel Wood Door
PARTS LIST per door
.400 thick wood
(2) 13 7/16 (min) long and .800 wide (grooves to fit luon)
(1) 4 7/16 long (grooved one side only) and .800 wide (grooves to fit luon)
(3) 4 7/16 long (grooved both sides) and .800 wide (grooves to fit luon)
(3) 4 7/16 long (grooved one side only) 3.000 wide (grooves to fit luon)
(4) from luon – 4 11/16 x 2 1/16(approx.)(Cut to fit when assembling the door)
(6) 6 x 1 ½ FH wood screws (#46 & #32 drills)
(1) 6-32 threaded stock about ¾” - 1” long
Cut enough material to these widths and thicknesses but leave the 4 7/16” lengths double or triple length to make adding the groove safer, quicker and easier. Even the 13 7/16” lengths can be left double length for putting the groove in. If you are only making one door, with the possibility of making more someday, I’d still suggest making the 3” wide piece and the .800” piece, to be grooved one side only, at least long enough for two…make the two, use the one and simply save the other for next time. Don’t get your fingers too near the saw blade when putting in the grooves. That’s the trick.
With enough material cut to the proper thickness and width, I set up a stop on the table of my table top mill (a drill press will work too) and, using a micro saw blade of approximately 1/32” thick and aiming for 1/8” deep, I set the height to approximately the center of the .400” side.
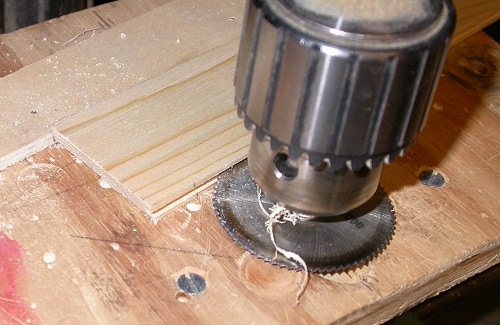
With the blade turning moderately slow, I hand fed the pieces of a group into the blade. Lowering the blade (do NOT raise the blade here) .010-.020” at a time, feed each piece through the blade…flip it over and feed it through again. This keeps the groove in the center of each piece. Continue lowering the blade and double feeding the pieces until you get a groove that allows easy insertion of the panel materiel. NOTE: I use this same process when making the changing screen (Modesty Screen) shown in another tutorial and seen in my stories.
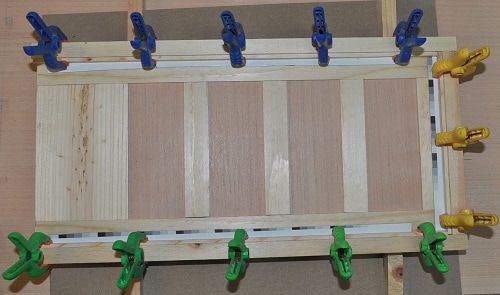
CUTTING PARTS TO LENGTH/SIZE
In order for ALL groups of parts to be the same size/length, I highly recommend adding a board to your table saw cross feed and clamp a piece of scrap wood stop to it to ensure each cut on each group is as near identical as you can get with wood. See the picture below.
CUTTING PARTS TO LENGTH/SIZE
In order for ALL groups of parts to be the same size/length, I highly recommend adding a board to your table saw cross feed and clamp a piece of scrap wood stop to it to ensure each cut on each group is as near identical as you can get with wood. See the picture below.
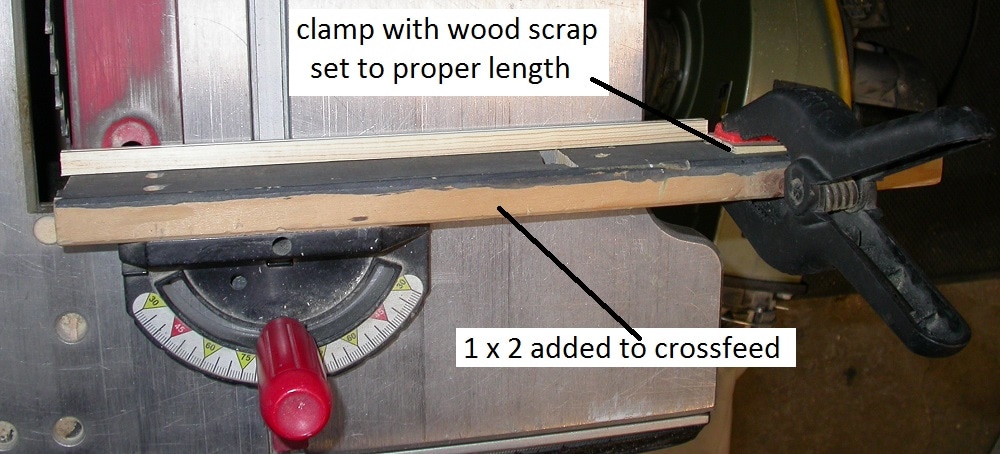
Here’s a view from above for the simple stop I used for cutting all lengths to same.
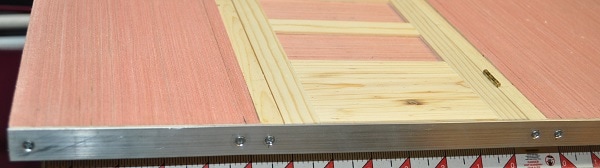
With all the required cross pieces now cut to length, I use 90 degree framing clamps to hold each corner properly then drill the needed pilot holes, through holes, as well as adding the countersink to each screw location. I use a #35 drill bit for the pilot hole and a #28 drill bit for the thru holes.
With all the required cross pieces now cut to length, I use 90 degree framing clamps to hold each corner properly then drill the needed pilot holes, through holes, as well as adding the countersink to each screw location. I use a #35 drill bit for the pilot hole and a #28 drill bit for the thru holes.
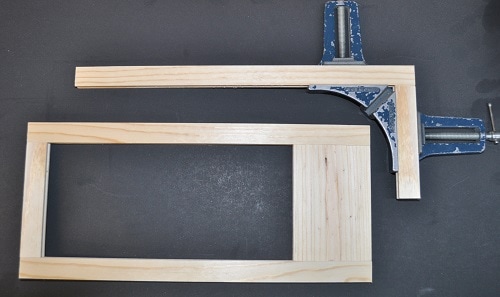
Showing first to parts clamped and all four parts of frame assembled.
In the next couple weeks we are building the iCarly Master bedroom…requiring TWO new doors. These will be them.
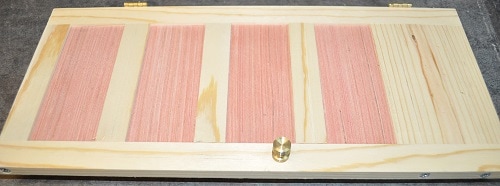
Once you have the door completely assembled to this point, remove the two screws holding the top member in place. I would suggest putting a small pencil mark on BOTH parts where they meet so you can easily know the orientation of the part for reassembly. After all, you have a 50/50 chance of getting it right the first try.
With the top member removed, slide in one of the Luon panels, then a double grooved cross member, then another panel and so on. If the first panel does NOT slide into the groove on the bottom piece, they may be still too wide and will need trimmed to fit. Lightly sanding all corners of these panels can aid in getting them started in their grooves. The top piece SHOULD fit flush with the top as before. If not, adjust the width of your panels. Remember to remove ¼ of the error off each panel to keep them uniform. When the top member fits flush…or JUST short of flush, replace the two removed screws.
The door slab is now complete. I used no nails or glue on mine. Just the 6 screws.
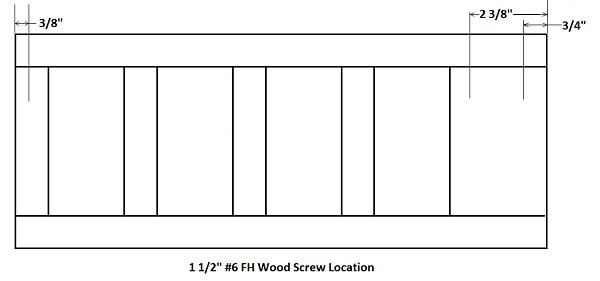
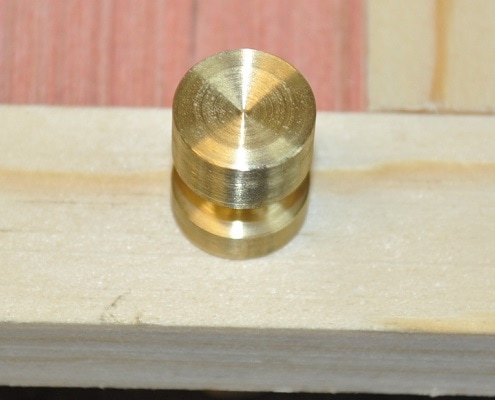
DOORKNOB LOCATION
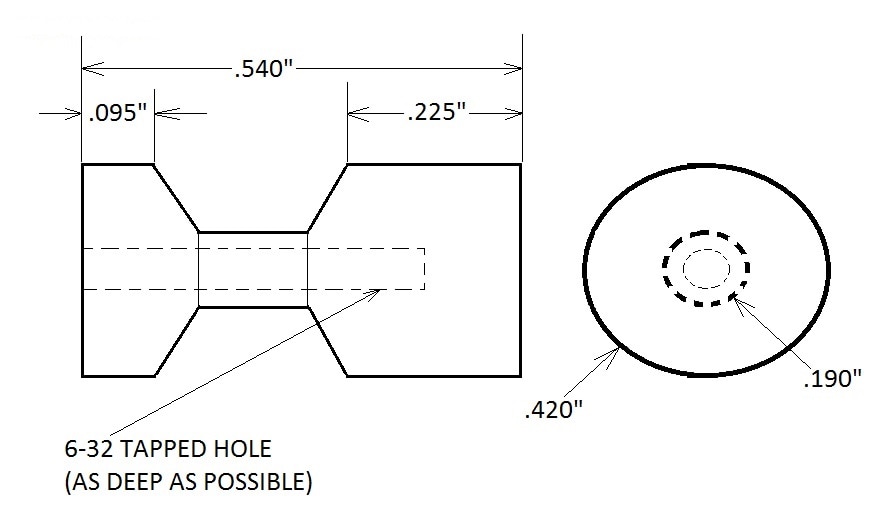
I made my own doorknobs from 7/16 solid brass stock. Please see the sketch at the end of this tutorial for the rough specs I used as I have made about a dozen of these so far…and made mistakes along the way.
As my doorknobs are drilled and tapped to accept a 6-32 bolt thread, all that is needed is to drill a .136” hole( a #29 drill bit) 6” up from the bottom and 7/16”-1/2” from the edge. Mine are more to the 7/16” distance. Screw the threaded stock into one doorknob, feed it through the hole in the door and screw on the second doorknob. Snug up only.
In the next couple weeks we are building the iCarly Master bedroom…requiring TWO new doors. These will be them.
Once you have the door completely assembled to this point, remove the two screws holding the top member in place. I would suggest putting a small pencil mark on BOTH parts where they meet so you can easily know the orientation of the part for reassembly. After all, you have a 50/50 chance of getting it right the first try.
With the top member removed, slide in one of the Luon panels, then a double grooved cross member, then another panel and so on. If the first panel does NOT slide into the groove on the bottom piece, they may be still too wide and will need trimmed to fit. Lightly sanding all corners of these panels can aid in getting them started in their grooves. The top piece SHOULD fit flush with the top as before. If not, adjust the width of your panels. Remember to remove ¼ of the error off each panel to keep them uniform. When the top member fits flush…or JUST short of flush, replace the two removed screws.
The door slab is now complete. I used no nails or glue on mine. Just the 6 screws.
DOORKNOB LOCATION
I made my own doorknobs from 7/16 solid brass stock. Please see the sketch at the end of this tutorial for the rough specs I used as I have made about a dozen of these so far…and made mistakes along the way.
As my doorknobs are drilled and tapped to accept a 6-32 bolt thread, all that is needed is to drill a .136” hole( a #29 drill bit) 6” up from the bottom and 7/16”-1/2” from the edge. Mine are more to the 7/16” distance. Screw the threaded stock into one doorknob, feed it through the hole in the door and screw on the second doorknob. Snug up only.
|
|
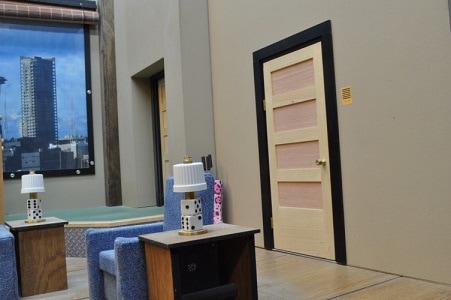
Door knob mounted Doorknob close-up
DOOR JAMB
PARTS LIST
(2) ½” thick X (wall tk (normally .750 for my walls) x 14 1/16
(1) ½” thick X (wall tk (normally .750 for my walls) x 6 1/8 long (header)
(4) 7/8 – 1.0 wire brads *(attach with 2 each side-drill #57 pilot hole)
(1) 3/4“ x 1/16” Aluminum strip for threshold (length varies upon wall style)
(2) - ¾” x #4 FH wood screws for fastening to threshold
Door Stops
.210 x .120 (2) 13 7/16” long
(1)6 1/8” long
Door Jamb Trim (2) 13 7/8” x ¾” x 1/8” (sides)
(1) 8” x ¾” x 1/8” (header)
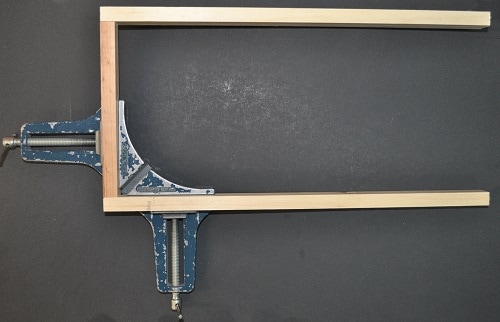
From the materials cut to ½” x (your wall thickness), take a 14 1/16” piece and a 6 1/8” piece and clamp them together as shown and affix together with two 7/8”-1.0” brads*. Be sure to drill pilot holes for these brads to they are not diverted by the grain of the wood.
Move the clamp to the other corner and use another two nails to secure this corner as shown below. DO NOT GLUE.
DOOR JAMB
PARTS LIST
(2) ½” thick X (wall tk (normally .750 for my walls) x 14 1/16
(1) ½” thick X (wall tk (normally .750 for my walls) x 6 1/8 long (header)
(4) 7/8 – 1.0 wire brads *(attach with 2 each side-drill #57 pilot hole)
(1) 3/4“ x 1/16” Aluminum strip for threshold (length varies upon wall style)
(2) - ¾” x #4 FH wood screws for fastening to threshold
Door Stops
.210 x .120 (2) 13 7/16” long
(1)6 1/8” long
Door Jamb Trim (2) 13 7/8” x ¾” x 1/8” (sides)
(1) 8” x ¾” x 1/8” (header)
From the materials cut to ½” x (your wall thickness), take a 14 1/16” piece and a 6 1/8” piece and clamp them together as shown and affix together with two 7/8”-1.0” brads*. Be sure to drill pilot holes for these brads to they are not diverted by the grain of the wood.
Move the clamp to the other corner and use another two nails to secure this corner as shown below. DO NOT GLUE.
|
|
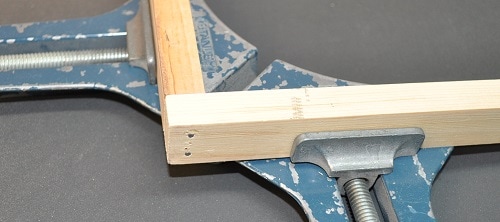
Second corner clamped Close up of corner
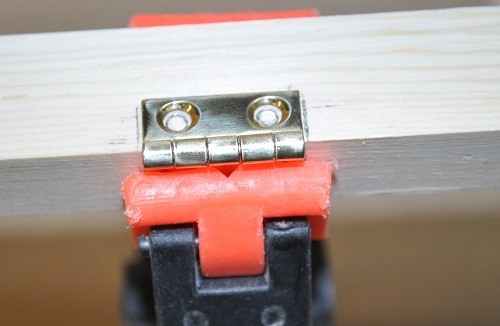
ADDING THE HINGES
I use 3/4” x 5/8” brass hinges for my doors as they are very near 1/6th scale of real ones and are reasonably priced.
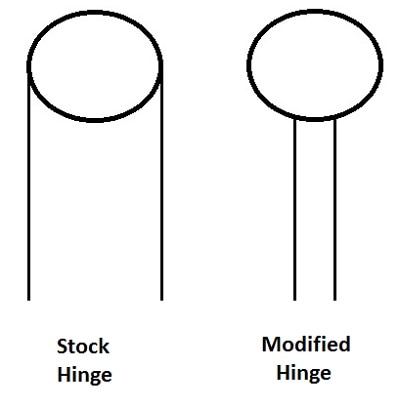
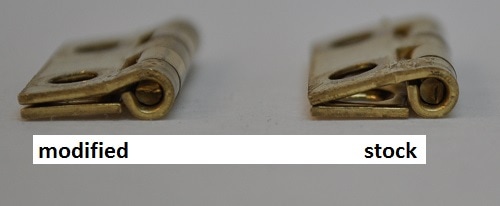
Hinge Modification
ADDING THE HINGES
I use 3/4” x 5/8” brass hinges for my doors as they are very near 1/6th scale of real ones and are reasonably priced.
Hinge Modification
|
Stock hinges just do not look right as they come from the package.
Using most any smooth jaw bench vice, place them carefully so the pin part of the hinge is JUST above the jaws and slowly tighten to make the adjustment shown to the right. |
|
|
If the hinge seems to not be aligned evenly, while still in the vice, take a block of wood and a mallet to persuade the pin area back to center.
|

|
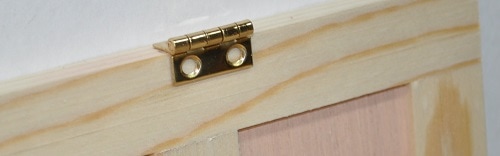
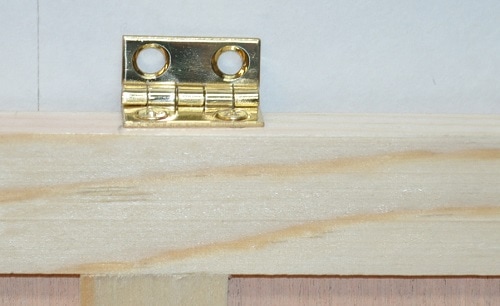
HINGE INSTALL
Pay close attention to which way the door is intended to swing when installing the hinges. Place one hinge on the correct edge of the door so the bottom edge is 1 ½” from the bottom and the bottom of the other’s bottom edge is 10 ¼” from the bottom of the door. The end of the hinge away from the pin should be flush with the other side of the door. Mark the screw location of each hinge and drill pilot holes for the screws. A #51 drill will give a .066 hole that works nice. Install the two hinges to the door.
Pay close attention to which way the door is intended to swing when installing the hinges. Place one hinge on the correct edge of the door so the bottom edge is 1 ½” from the bottom and the bottom of the other’s bottom edge is 10 ¼” from the bottom of the door. The end of the hinge away from the pin should be flush with the other side of the door. Mark the screw location of each hinge and drill pilot holes for the screws. A #51 drill will give a .066 hole that works nice. Install the two hinges to the door.
|
|
Getting the door to hang correctly in the jamb is a lot of fun. The first step is determining the hinge location. Place the door jamb on the table. Use scrap wood to support the non-hinge edge of the door and hold the hinges on the outer surface of the jamb for now.
Adjust the door in the jamb until you have about 1/16 (or a little less) clearance at the top between the door and the jamb. Mark the top and bottom of the hinges on the jamb. Set the door aside.
Place a hinge on the jamb so the pin section is resting on the jamb, as shown, and the hinge is centered between your markings.
Place a hinge on the jamb so the pin section is resting on the jamb, as shown, and the hinge is centered between your markings.
Mark the screw holes, drill the pilot holes and secure the hinges and the door to the jamb. You are NOT done yet. The door should now hang in the jamb with the proper gap at the top on the hinge side. The rest will be evened up later when mounting in a wall. Having all the screw holes drilled makes adding the recess to the jamb a lot easier. Trace around the hinge on the jamb. Remove the screws in the jamb holding the hinges in place. Adding these recesses CAN be done by hand or on a table mounted router with a lot of care. Either way, you need to take it apart. Grab the jamb header in one hand and the hinge side of the jamb in the other and slowly pull them straight apart. This is another reason to NOT use glue. For me, I prefer to add these recesses by putting the jamb in a vice on my small mill and use a 1/8” or 3/16” endmill to remove the material inside the tracing of the hinge to .045 deep.
Once the recesses are complete, and before reassembling the jamb, secure the hinges back to the single piece of the jamb to test swing. It should swing to the closed position and not bounce back open. You may have to adjust the hinges a bit. I’ve even had to shim the outer edge of a hinge set with tiny strips of cereal box to get it to hang in the close position. Whatever works. When the door is operating properly insert the nails in the jamb back into the jamb header.
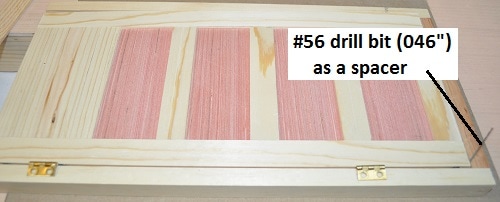
Now for the door stop.
If you cannot cut these pieces on your table saw, most hobby stores carry a nice selection of precut basswood. I use .210” x .120” so 1/8” x 1/4” would work well too. Cut the trim pieces to length. Lay the door on the opening side across two pieces of scrap wood to hold the door in the proper closed position. I cut more strips of cereal box and laid them around the edge of the jamb on the door to act as a temporary spacer while gluing in the stops. Add the top piece first and clamp in place as shown. Add the two side strips.
Once the recesses are complete, and before reassembling the jamb, secure the hinges back to the single piece of the jamb to test swing. It should swing to the closed position and not bounce back open. You may have to adjust the hinges a bit. I’ve even had to shim the outer edge of a hinge set with tiny strips of cereal box to get it to hang in the close position. Whatever works. When the door is operating properly insert the nails in the jamb back into the jamb header.
Now for the door stop.
If you cannot cut these pieces on your table saw, most hobby stores carry a nice selection of precut basswood. I use .210” x .120” so 1/8” x 1/4” would work well too. Cut the trim pieces to length. Lay the door on the opening side across two pieces of scrap wood to hold the door in the proper closed position. I cut more strips of cereal box and laid them around the edge of the jamb on the door to act as a temporary spacer while gluing in the stops. Add the top piece first and clamp in place as shown. Add the two side strips.
Do not push hard against the door. You do not want a tight fit here or it may not close properly. With all the clamps in place, pick up the door assembly and remove the cardboard spacers and check for glue ooze. Once dry, the door and jamb is ready for install into a wall…
INSTALLING THE DOOR AND JAMB IN A WALL
In all my walls that have a door in them I placed a ¾” x 1/16” thick strip of aluminum along the bottom surface to keep the wall bottoms in line with each other and give something to secure the bottom of the jamb.
INSTALLING THE DOOR AND JAMB IN A WALL
In all my walls that have a door in them I placed a ¾” x 1/16” thick strip of aluminum along the bottom surface to keep the wall bottoms in line with each other and give something to secure the bottom of the jamb.
With the two screws in the bottom of the door jamb, it takes little to hold it in place. The jamb trim is enough to hold it in if you like. Or you can drill a single through hole in the header of the jamb and install a single brad prior to adding the trim molding. If you DO drill a hole for a brad, be sure to drill a larger diameter at the start of the hole for the brad head…or nip off the head altogether.
For door trim around the jamb, I simply use 1/8” thick strips of ¾” wide wood. Again, I cut these thick and run them through my planer to eliminate the need for sanding. Once the door and jamb is installed in a wall, just glue the trim pieces in place. There should be about 3/16” exposed of the jamb. Glue the header in place first and when it is dry, add the two side pieces. The header should need to be 8” long and the side pieces, 13 7/8” long. You may wish to remove the door from the jamb in order to use clamps all around. When this is dry, flip the wall over and do the same to this side. Remount the door and check function.
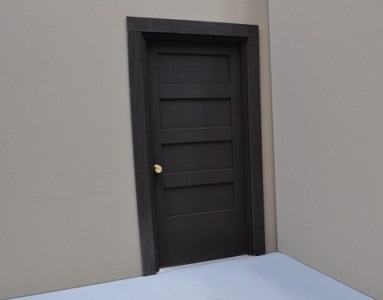
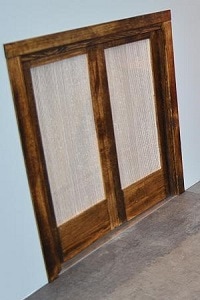
Near Full Glass Panel Wood Door (SEE iCarly:Five Years Later kitchen back door)
For door trim around the jamb, I simply use 1/8” thick strips of ¾” wide wood. Again, I cut these thick and run them through my planer to eliminate the need for sanding. Once the door and jamb is installed in a wall, just glue the trim pieces in place. There should be about 3/16” exposed of the jamb. Glue the header in place first and when it is dry, add the two side pieces. The header should need to be 8” long and the side pieces, 13 7/8” long. You may wish to remove the door from the jamb in order to use clamps all around. When this is dry, flip the wall over and do the same to this side. Remount the door and check function.
Near Full Glass Panel Wood Door (SEE iCarly:Five Years Later kitchen back door)

.400 thick wood
(2) 13 7/16 (min) long and .800 wide (grooves to fit plastic sheet)
(1) 4 7/16 long (grooved one side only) and .800 wide (grooves to fit plastic sheet)
(3) 4 7/16 long (grooved one side only) 3.000 wide (grooves to fit plastic sheet)
(1) Plastic Sheet – 4 11/16 x based on depth of grooves cut
(4) 6 x 1 ½ FH wood screws (#46 & #32 drills)
Construction is very similar to the first door…just the groove width is different.
DOUBLE-WIDE DOORS
The main difference in construction is the length of the jamb header which needs to be 12 1/8” instead of 6 1/8”. And you will have to adjust the trim pieces for the header and door stop as well. Otherwise, construction is the same.
BRASS DOOR KNOB
.400 dia stock drilled and tapped to 6-32 thread as deep as possible.
BRASS DOOR KNOB
.400 dia stock drilled and tapped to 6-32 thread as deep as possible.