HOW TO MAKE WOODEN MAKE-UP VANITY
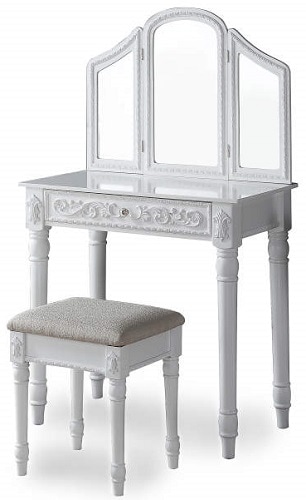
Above is a picture I used for guidance as this was bought for our granddaughter two Christmases ago. Mine will have a single mirror and the legs will not be turned stock but the size will be similar.
TABLE PARTS LIST
5 5/8” x 2 5/8” x 1/8” (1) hobby plywood cabinet top
5 3/8” x 2 ½” x ¾” (1) wood block(notch corners 3/8” x 3/8”) cabinet
5” x 7/16” x 7/16” (4) wood(Tapered two adjacent sides) legs
4” x 5/8” x 1/16”-1/8” (1) wood fake drawer front(optional but nice)
Drawer pulls (2) I found some in the 1/12 scale dollhouse stuff for this(optional but nice)
5 ½” x 5 ¼” (1) 1/8” hobby plywood panel to hold mirror
4” round mirror
Building the cabinet
This is simply a block of wood cut to size and the corners notched 3/8” x 3/8” to accept the tops of the legs so that 1/16” of the leg size sticks out, except for the back ones which should be notched deeper from the back so the legs set flush with the back while still sticking out the 1/16” on the table ends only. The drawer is again a fake. It is simply a piece of wood glued to the cabinet front. Sand and prime the cabinet, fake drawer front and the cabinet top. Use care NOT to prime the areas where you will be gluing in the legs. Once you are content with the primed surface finish, these parts may be glued together. Please note that the back of the cabinet top and the back of the cabinet should be flush. NO OVERHANG like the other three sides which should overhang about 1/8”. This will be covered again in “FINAL ASSEMBLY” near the end.

FABRICATING THE LEGS
Anytime I do a project that involves a process as “iffy” as this, I tend to make a couple extras so I do not have to start over to replace one bad leg. That being said, cut the leg blanks to the required 3/8” x 3/8”, or buy prefinished square stock from a lumberyard. As for length, leave them long. Mine started out as 7” only because the stock I used was 14 ¼” long but 6” would have been plenty for clamping into the jig.
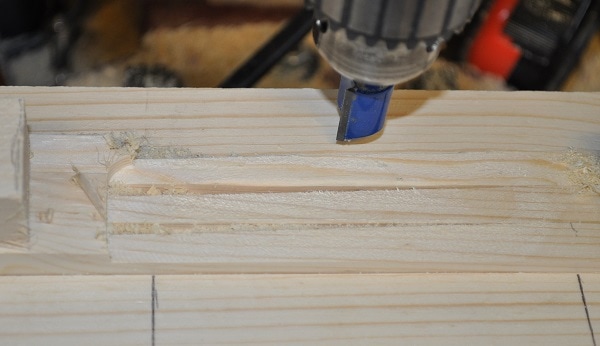
Speaking of a jig…you need to make a jig to make tapering these simpler. From a scrap piece of 2 x 4, that I had previously planed both sides on, I glued a tapered wooden shim left over from installing a new attic ladder. These shims tend to taper about ¼” in 7”, which is the working length of my table legs. At least this one did. With the shim in place, this would give the legs this much taper when machined. On each side of this shim I glued two thin strips of wood so I could clamp three legs at a time into the fixture. A stop is then glued squarely across the low end of the shim. This will be the top of the legs. Since the legs are currently cut long, either mark the jig at 5” or mark the legs so you know you tapered them far enough. Clamping each end is simple enough with some scrap blocks of wood and a few screws as shown. Each leg will run through the jig twice to taper only what will be the OUTER two surfaces of each leg.
This certainly CAN be done on a disk sander, as I would have done 10-15 years ago, but I would still make a jig of some type to hold the legs and give some better control of the amount removed.
Anytime I do a project that involves a process as “iffy” as this, I tend to make a couple extras so I do not have to start over to replace one bad leg. That being said, cut the leg blanks to the required 3/8” x 3/8”, or buy prefinished square stock from a lumberyard. As for length, leave them long. Mine started out as 7” only because the stock I used was 14 ¼” long but 6” would have been plenty for clamping into the jig.
Speaking of a jig…you need to make a jig to make tapering these simpler. From a scrap piece of 2 x 4, that I had previously planed both sides on, I glued a tapered wooden shim left over from installing a new attic ladder. These shims tend to taper about ¼” in 7”, which is the working length of my table legs. At least this one did. With the shim in place, this would give the legs this much taper when machined. On each side of this shim I glued two thin strips of wood so I could clamp three legs at a time into the fixture. A stop is then glued squarely across the low end of the shim. This will be the top of the legs. Since the legs are currently cut long, either mark the jig at 5” or mark the legs so you know you tapered them far enough. Clamping each end is simple enough with some scrap blocks of wood and a few screws as shown. Each leg will run through the jig twice to taper only what will be the OUTER two surfaces of each leg.
This certainly CAN be done on a disk sander, as I would have done 10-15 years ago, but I would still make a jig of some type to hold the legs and give some better control of the amount removed.

With legs clamped into the jig (my jig, by chance, worked out to hold three legs very nicely), set up a mill or drill press with a mill cutter or straight end (blind) router bit for cutting grooves. If you are using a drill press, you will still need a cross-feed table to hold the jig. My jig worked out, again by chance, to be just short enough that I could anchor it to the stripped down table with the T-nuts that came with the table. Crank up the RPMs of the motor and start removing material to create the needed taper on two adjacent sides from passed the 5” mark to the 1” mark from the low end near the stop. Once you are happy with the first side, WHICH SHOULD LEAVE ABOUT 3/4" STILL FULL SIZE, DO NOT adjust the bit height for any additional cuts. Lock it in place if possible.
Remove the legs and reposition them for the second cut. Repeat the process, as stated above.
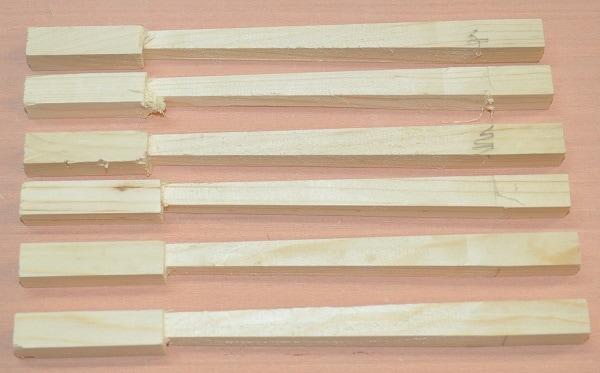
Here are the SIX legs I made although I only need four.
Repeat the above process again to produce the last leg. I still filled the jig with three just to NOT have to repeat this if there was an issue with any of the legs. Cut the legs to the required 4 ¾” long. Sand and prime the legs using care NOT to prime the surfaces that will be glued to the cabinet.
Repeat the above process again to produce the last leg. I still filled the jig with three just to NOT have to repeat this if there was an issue with any of the legs. Cut the legs to the required 4 ¾” long. Sand and prime the legs using care NOT to prime the surfaces that will be glued to the cabinet.
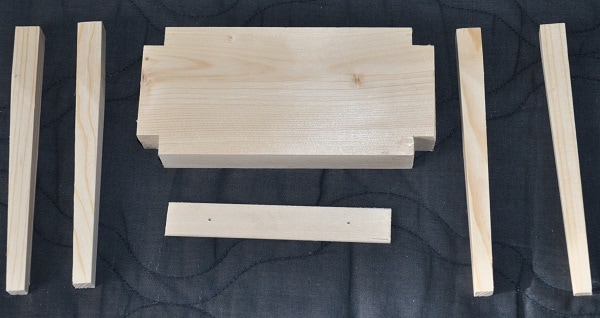
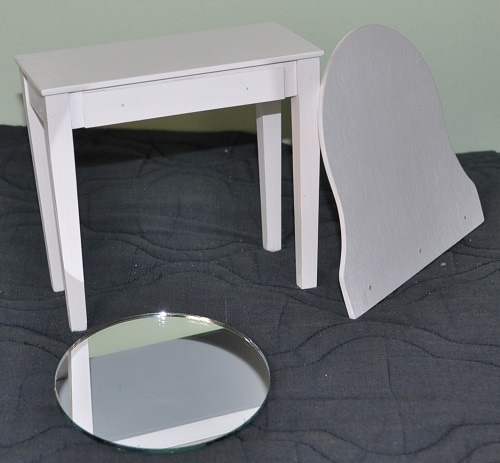
Here are the basic finished parts minus the back to hold the mirror.
This picture above gives the basic appearance I am going for without the cabinet top, drawer front and back panel.
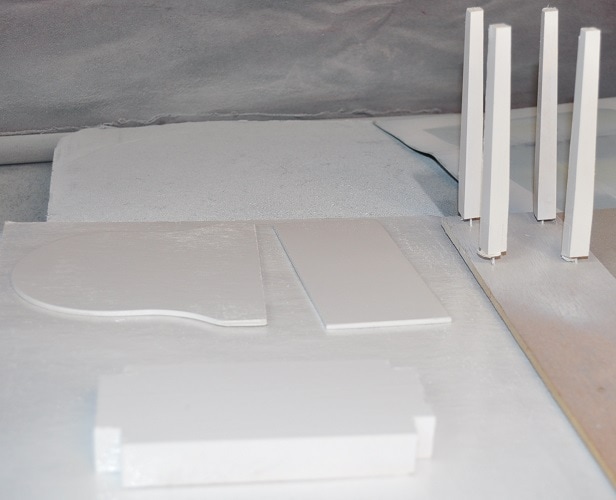
Here I have all the parts primed. I will still have to prime the other side of the back panel. I simply drove four ¾” brads through a scrap of Luon then tapped the top of the legs onto each brad to hold them so I could prime all four sides. I also used masking tape on the legs and cabinet where they will touch to help the glue hold better.
FINAL ASSEMBLY
Once the primed parts are dry, if you haven’t already glued the top to the cabinet so it is centered left and right and flush on the back, do that now. When this is dry, add the fake drawer front (optional), centering it on the front of the cabinet and flush with the bottom edge.
FINAL ASSEMBLY
Once the primed parts are dry, if you haven’t already glued the top to the cabinet so it is centered left and right and flush on the back, do that now. When this is dry, add the fake drawer front (optional), centering it on the front of the cabinet and flush with the bottom edge.
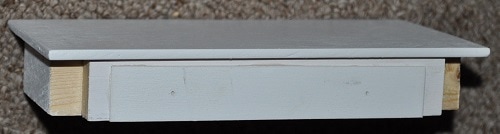
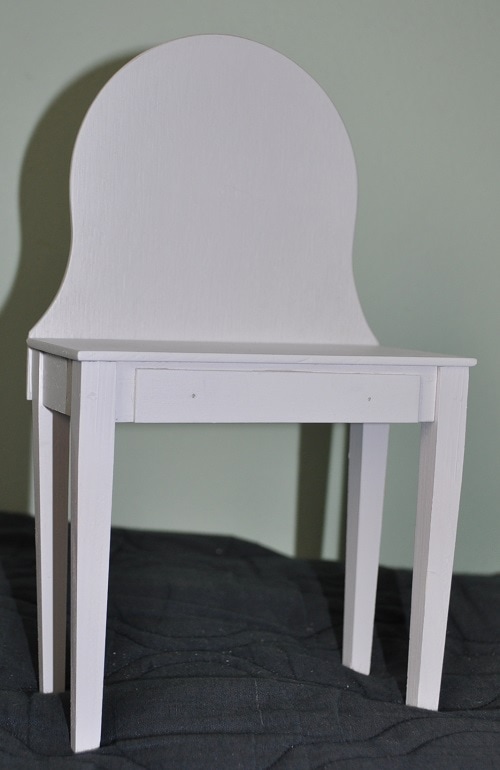
Assembled cabinet with top and fake drawer front.
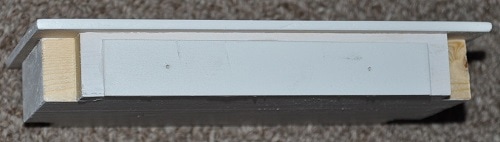
NOTE predrilled holes for drawer pulls and no primer where the legs will be secured.
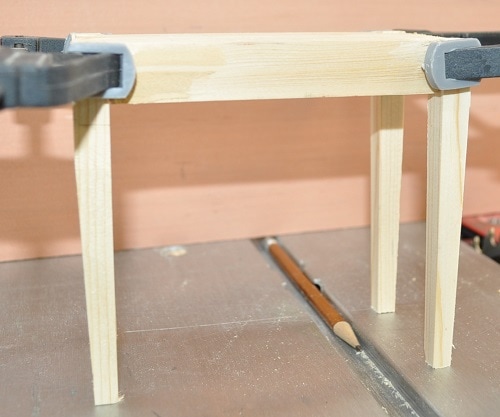
Carefully glue each leg in place ensuring they stay perpendicular to the cabinet and the back two are flush with the back of the cabinet.
NOTE predrilled holes for drawer pulls and no primer where the legs will be secured.
Carefully glue each leg in place ensuring they stay perpendicular to the cabinet and the back two are flush with the back of the cabinet.
Here’s the three main parts of the table fully primed.
Position the back panel on the back of the cabinet centered right and left and flush with the bottom of the cabinet. Clamp it in place and add three ½” – ¾” #4, or smaller, flat head wood screws to hold the panel in place. I placed one on center and one ¾” from each end.
Position the back panel on the back of the cabinet centered right and left and flush with the bottom of the cabinet. Clamp it in place and add three ½” – ¾” #4, or smaller, flat head wood screws to hold the panel in place. I placed one on center and one ¾” from each end.
Now fully primed, assembled, and ready for final paint.
Once the final paint is fully dry, install the drawer pulls of your choosing. SEE picture below.
Glue would probably work for the mirror but I like 2-sided carpet tape for this application. It is more temporarily permanent than glue…which is quite permanent. Either way, position the mirror on center of the back panel and install.
New table with kitchen chair.
See below for finished table and stool together.
See below for finished table and stool together.
A MATCHING STOOL???
I was actually so pleased at how well this table came out…especially during subzero temps in Indiana…that I decided to make a matching stool instead of repurposing one of the white plastic chairs from the kitchen, shown above. The construction, including the legs, is rather identical to making the table above only without the back panel or the fake drawer front. So I am not going into as much detail other than the part dimensions.
PARTS LIST
2 ½” x 2 3/16” x ½” wood stool frame
2 ¾” x 2 7/16 x 1/8 plywood for stool padded top
5/16” x 5/16” x 2 ¾” wood legs (4)
#6 or #8 T-nuts (I had #8 on hand) to secure padded top
#6 or #8 x 32pitch 5/8” long FH bolts to secure padded top
4” x 3 ½” material to cover padded top
2 3/4" x 2 7/16” thin foam or cotton balls for padded top
I made the frame of the stool first. Cutting it to size then notching each corner, as on the table, to ¼” x ¼” so the 5/16” square of the leg tops stick out 1/16” on each side.
I was able to reuse the jig I used for the table legs by simply relocating one of the clamps. The stock I used for the legs was long, as before. Starting at 4 ½” long, there was plenty to clamp onto in the jig. Once two adjacent sides were tapered, I cut them to their final length of 2 ¾”.
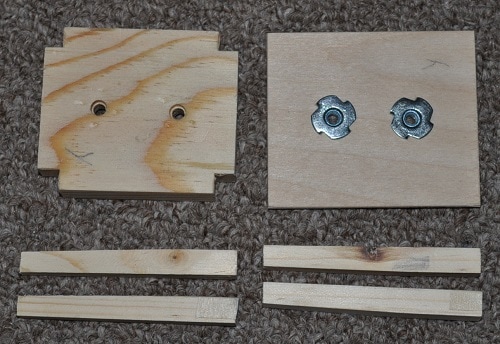
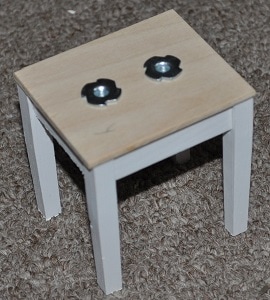
ATTACHING THE PADDED TOP TO THE BASE
I suppose you could simply glue this but I made it to be easily serviced, if you ever wanted to change the fabric, by locating two T-nuts on the centerline of the top and ¾” from each end as shown in the picture below.
I was actually so pleased at how well this table came out…especially during subzero temps in Indiana…that I decided to make a matching stool instead of repurposing one of the white plastic chairs from the kitchen, shown above. The construction, including the legs, is rather identical to making the table above only without the back panel or the fake drawer front. So I am not going into as much detail other than the part dimensions.
PARTS LIST
2 ½” x 2 3/16” x ½” wood stool frame
2 ¾” x 2 7/16 x 1/8 plywood for stool padded top
5/16” x 5/16” x 2 ¾” wood legs (4)
#6 or #8 T-nuts (I had #8 on hand) to secure padded top
#6 or #8 x 32pitch 5/8” long FH bolts to secure padded top
4” x 3 ½” material to cover padded top
2 3/4" x 2 7/16” thin foam or cotton balls for padded top
I made the frame of the stool first. Cutting it to size then notching each corner, as on the table, to ¼” x ¼” so the 5/16” square of the leg tops stick out 1/16” on each side.
I was able to reuse the jig I used for the table legs by simply relocating one of the clamps. The stock I used for the legs was long, as before. Starting at 4 ½” long, there was plenty to clamp onto in the jig. Once two adjacent sides were tapered, I cut them to their final length of 2 ¾”.
ATTACHING THE PADDED TOP TO THE BASE
I suppose you could simply glue this but I made it to be easily serviced, if you ever wanted to change the fabric, by locating two T-nuts on the centerline of the top and ¾” from each end as shown in the picture below.
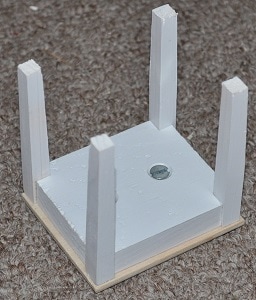
Time to prime all the legs and the base. Remember to not prime the areas where the legs will be glued to the base. If you look close, you can see where I place masking take over these locations. Once the primer is dry, attach the unpadded top to the base and glue the legs in place, again using care that they stay perpendicular to the base. Either place a small piece of wax paper between the frame and the top or be VERY careful with the glue NOT to glue the unpadded top to the ends of the legs. It can happen. A single edged razor blade should help separate the parts if this happens.
|
|
Once this assembly is dry, remove the unpadded top and paint the base and legs of the stool.
Lay the fabric on a table. Position a thin section of foam rubber, or even a few cotton balls stretched out of shape, in the center of it. Place the top of the stool on this and pull the fabric over it, like wrapping a gift, and secure with glue, trimming as needed.
When the glue is dry, position the now padded top on the stool and secure with the two flat head screws.
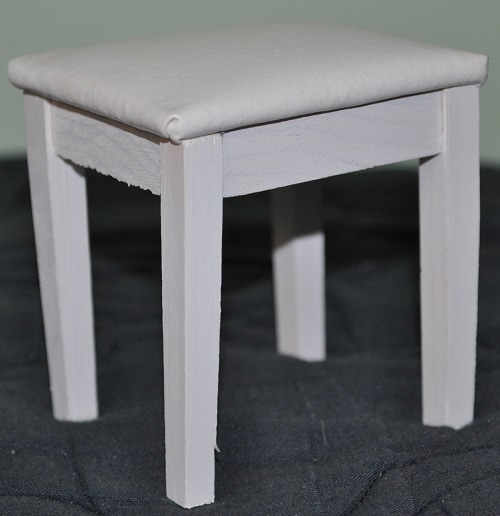
Here is the stool-primed only-awaiting some touch-up sanding and the final paint. Note some fuzz on a few corners that the primer made quite visible.
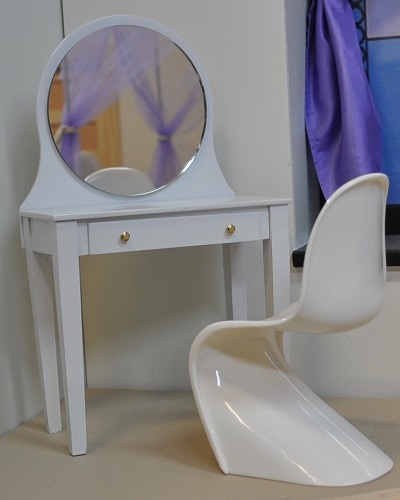
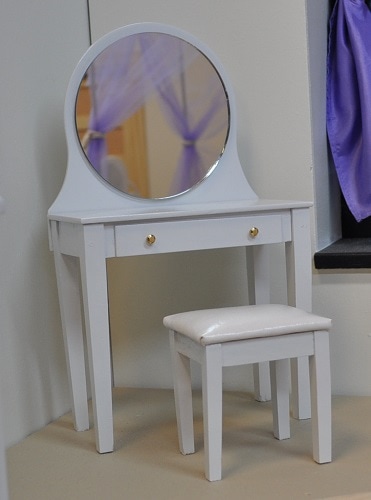
And here we have the completed table and stool in Carly’s new bedroom.
And here we have the completed table and stool in Carly’s new bedroom.
|

|