HOW TO MAKE WOODEN LAWN FURNITURE

Again, several requests have been received regarding a tutorial for this furniture set and, with this pandemic going on, this seems yet another way to occupy myself for a few days.
This set consists of a lounger, a chair and a table.
Materials needed…
3/16” Luan (or similar wood sheet)
¼” wood dowel
pine board for 5/16" x 3/16" slats - covered in their own section later
Glue
Paint (I suggest spray paint for a thinner finish)
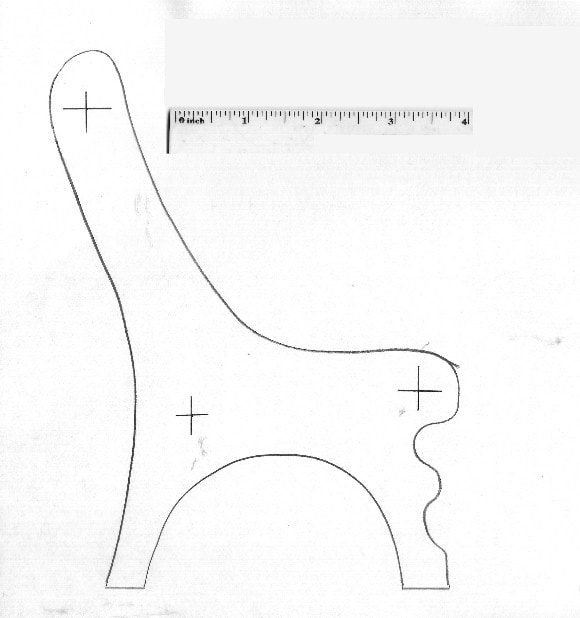
Download and printout the scans below so that the pictured rulers matches 1 to 1 size.
Once you establish the size on your printer, I’d suggest printing it out on card stock so it may be cut out and traced around.
This set consists of a lounger, a chair and a table.
Materials needed…
3/16” Luan (or similar wood sheet)
¼” wood dowel
pine board for 5/16" x 3/16" slats - covered in their own section later
Glue
Paint (I suggest spray paint for a thinner finish)
Download and printout the scans below so that the pictured rulers matches 1 to 1 size.
Once you establish the size on your printer, I’d suggest printing it out on card stock so it may be cut out and traced around.
|
|

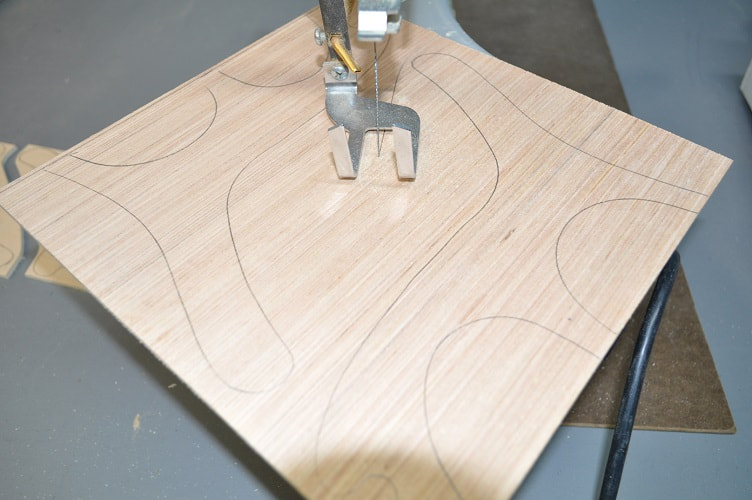
Also, regarding the Luan…FIRST, mark out the two sides for each item, cut them out oversized then stack the two pieces together so you can cut both sides to their final size at the same time. Since these pieces will be cut as one…only the TOP marked piece of the two will be your guide cutting. Just make sure that the bottom piece does NOT fall short of the top piece at any point.
If you are as “material conscious” as I am, the minimum size of Luan for the chair is 10 ¾” x 5 ¾” and for the lounger is 10 ¼” x 11” as shown below. No, there is NOT a lot to be called “oversized” but…with BOTH pieces traced onto the wood, I can cut a LITTLE closer to one than the other and when I stack and nail them together, I will place the smaller one on top eliminating and chance of cutting error. Trust me…this works fine. I will cut a simple, lazy line between the two sides.
If you are as “material conscious” as I am, the minimum size of Luan for the chair is 10 ¾” x 5 ¾” and for the lounger is 10 ¼” x 11” as shown below. No, there is NOT a lot to be called “oversized” but…with BOTH pieces traced onto the wood, I can cut a LITTLE closer to one than the other and when I stack and nail them together, I will place the smaller one on top eliminating and chance of cutting error. Trust me…this works fine. I will cut a simple, lazy line between the two sides.
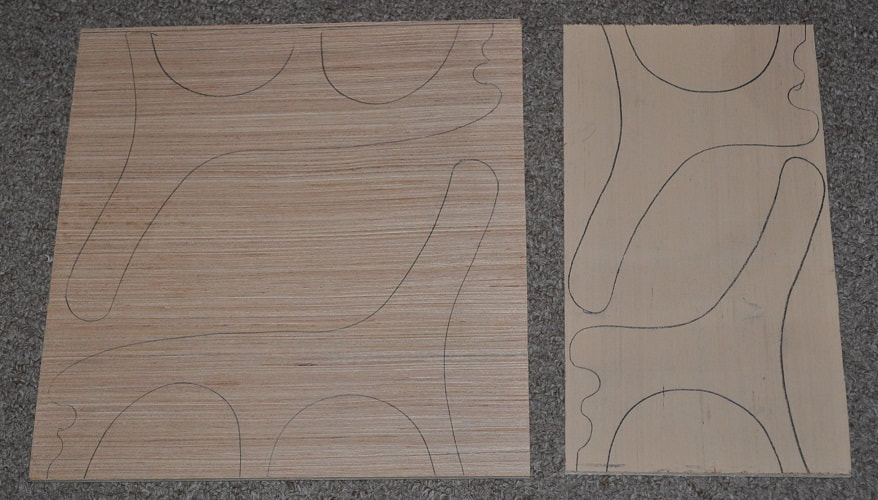
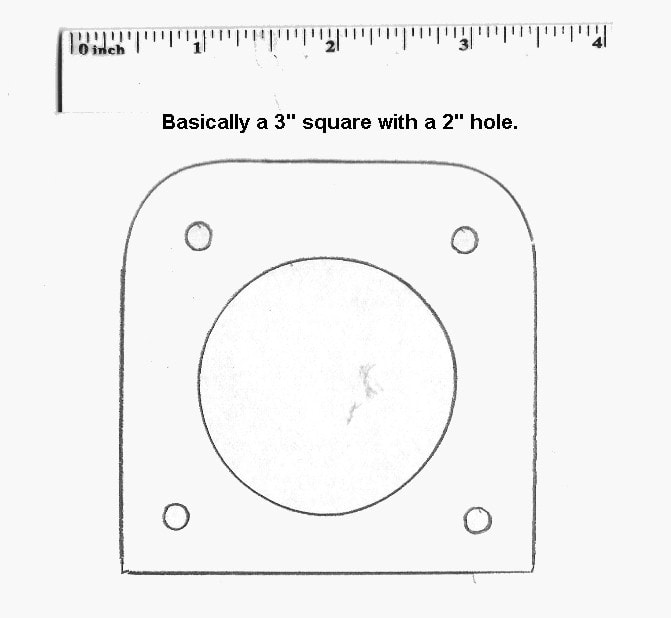
For the table, I simply found two pieces of scrap Luan that were barely over the needed 3” square. After nailing them together, I cut down two adjacent sides to just over 3 1/8”…reset my table saw to 3” and cut the remaining two sides. Notice I have the grain going up and down on the chair and ruining right and left on the lounge. The grain for the table typically runs up and down.
Above is two table sides ready for plotting the five holes and the top corner radii.
Here I separate the two sides cutting a little closer to the right one than the left one.
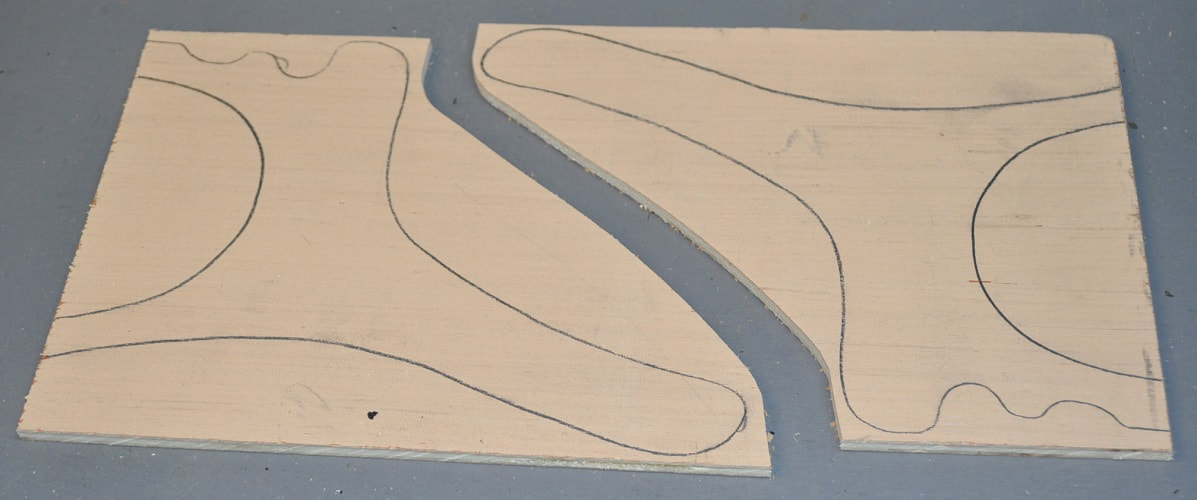
Now the two sides of the chair are ready to be stacked and nailed together. The one on the right is a little smaller than the one on the left. The piece on the right will go on top when stacked.
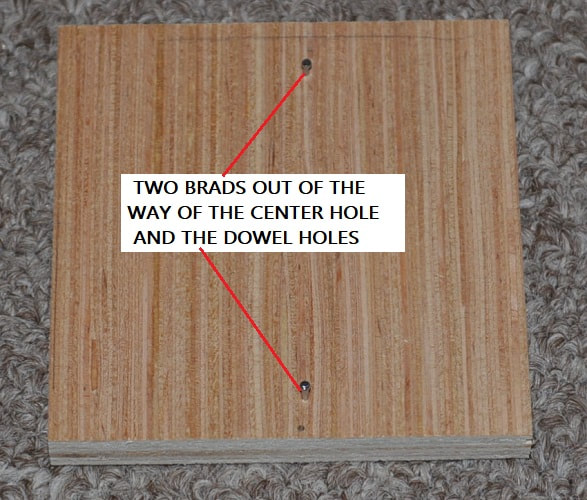
With the top pieces properly marked for the chair and lounger and the two pieces stacked, I use at least three ½” brads to nail them together. I then use a scroll saw, or even my band saw, to cut them out as it gives a smooth, controlled cut but this can be done with a hand scroll saw if that is all you have. Just use a FINE saw blade. If you have a good drum sander, cut just outside the line and sand to size with it. Otherwise, cut as close to, or on, the line to minimize hand sanding.
Before stacking and nailing the sides together, mark out the dowel locations on the one that is to be on top. The simplest way I know to do this is to place your pattern back on the piece and use an awl at the dowel locations to dent the wood.
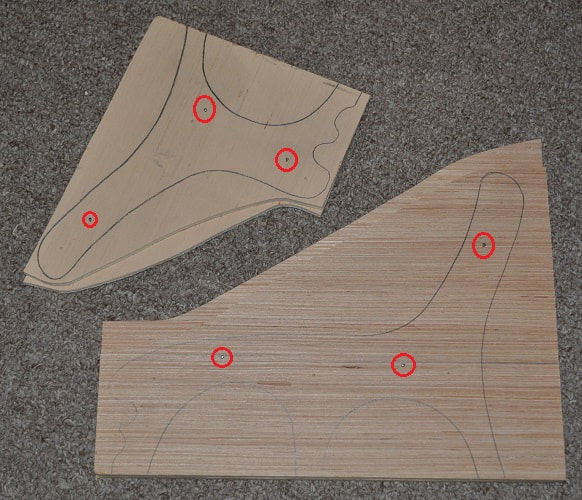
Here the chair and lounger sides are stacked with the smaller piece on the top and the bottom edges flush with each other. Three ½” brads are driven into each set as far as possible without poking through the other side. I don’t want to scratch up my scroll saw table. The reason for three brads is you may find you have to temporarily remove one or even relocate one or more while cutting them out. This should NOT be an issue with a band saw but will most definitely be an issue with a typical scroll saw.
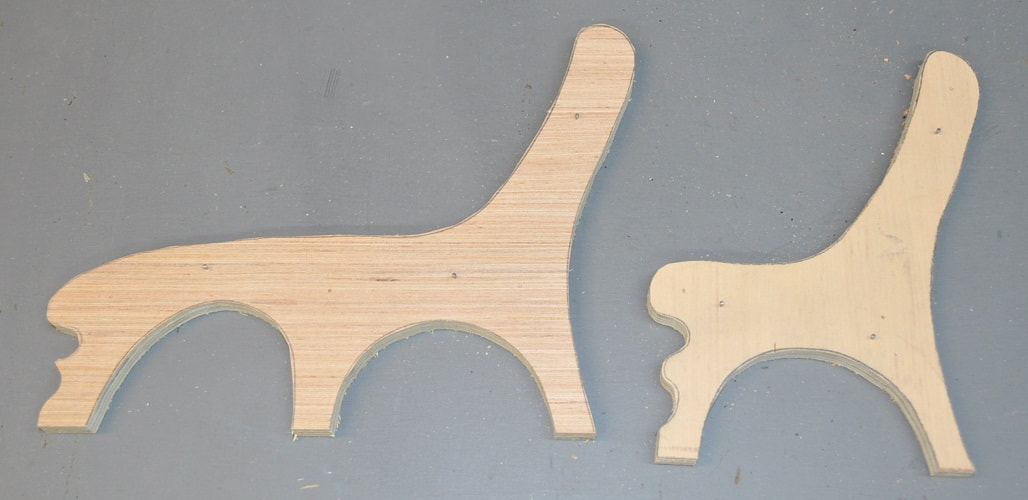
Lounger and chair sides cut out and ready for edge sanding
Once all the side pieces are cut out…DO NOT remove the brads until after sanding the edges and drilling the holes for the dowels and center hole on table are done. I use an oscillating drum sander for sanding of these edges but a variety of different drum sanding attachments in a drill press can do nearly as good. If you do not have a drill press, try holding the pieces in a vice and use an electric drill with a drum sanding arbor in it. Just use care.
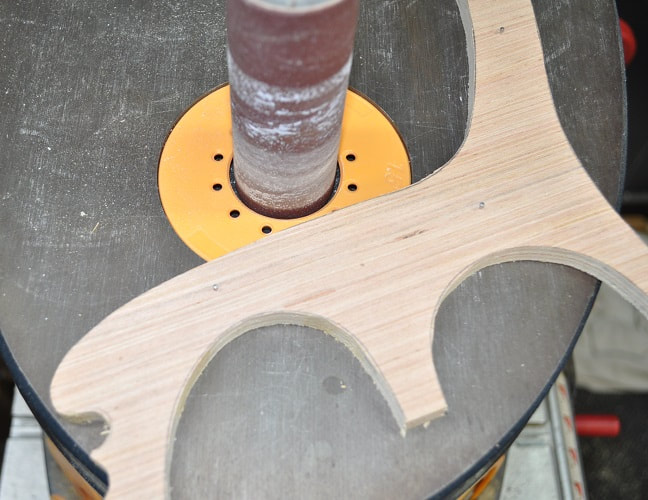
LOUNGER SIDES ON MY OSCILATING DRUM SANDER
Again DO NOT REMOVE THE BRADS YET!!!
If you didn’t yet mark out the locations for the ¼” dowel rods, do so now. You really should have a drill press for drilling these holes to ensure they are perpendicular to the surfaces.
I use a Forstner Bit to drill these holes as Forstner Bits give a cleaner, more precise hole than standard drill bits. And a small set, from ¼” thru 1”, is not expensive at all from Harbor Freight Tools.
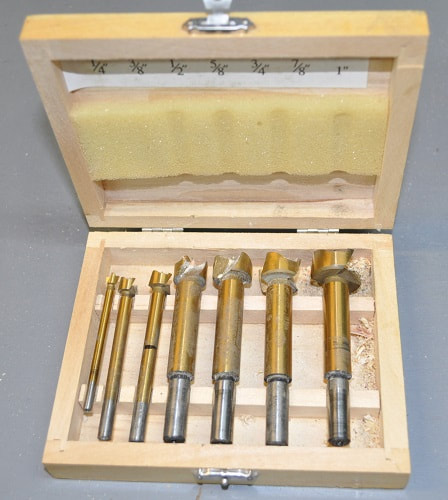
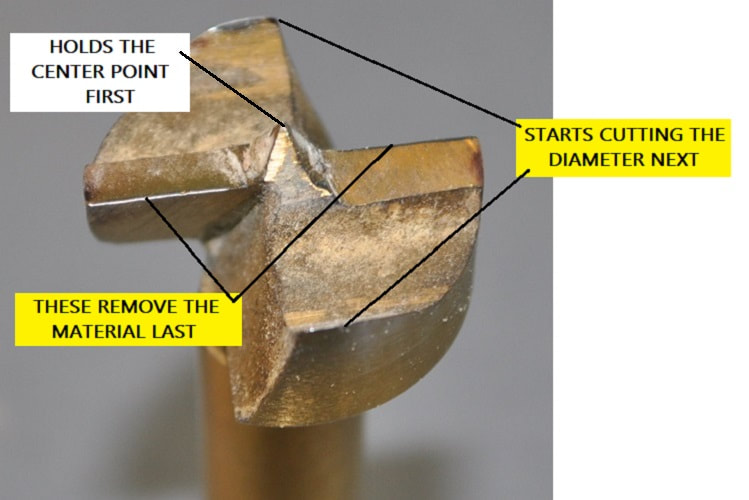
If you look close at the pictured Forstner Bit, you will see that the bit first establishes its center with the point in its center then starts cutting the diameter with the blade at the bit’s outer diameter before removing material as a standard bit does. Bear in mind that Forstner Bits are made to run at much slower speeds than standard bits.
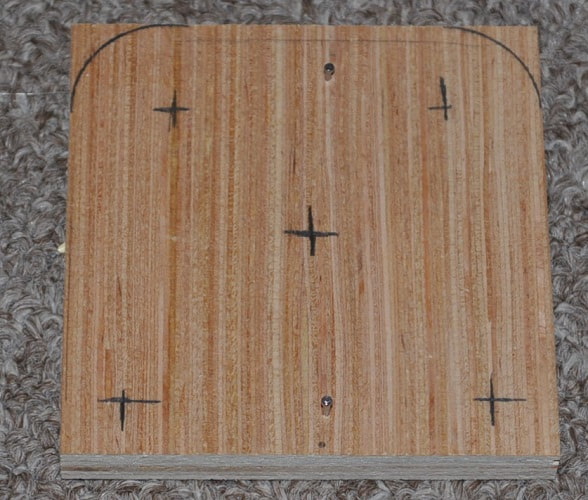
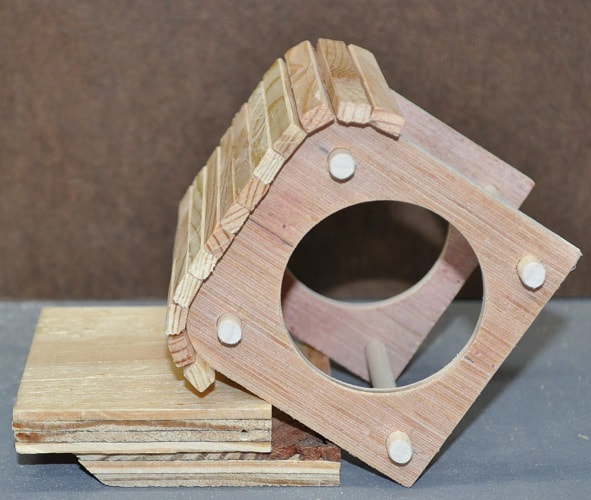
Back to the table for a moment. The top, corner radius is 1”. If you mark these using a compass, you just plotted the upper two dowel holes with the point. Otherwise mark them at ½” in and ½” down. The bottom two are located 3/8” in from the side and 3/8” up from the bottom. Go ahead and mark the dowel locations then finish cutting/sanding the two top radii. This is now ready for the center hole and dowel holes.
Drill out the center to approximately 2” in diameter (I used a good 2” hole saw in my drill press) with the center located 1 5/8” from the top and on center sideways, then clean it up with a drum sander and round over the two top corners on a disk sander.
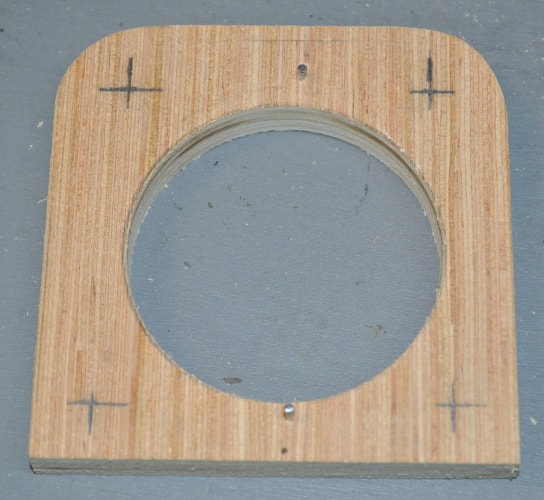
TABLE SIDES WITH CENTER HOLE AND TOP CORNERS ROUNDED
Now drill all the required holes for the dowels. If you are NOT using a Forstner bit, check the hole size on a piece of scrap Luan to see how loose it may be. If they are truly sloppy, it will be necessary to pay particular attention that the assembly stands perpendicular to the floor when gluing the dowels in place. This will be covered in detail later.
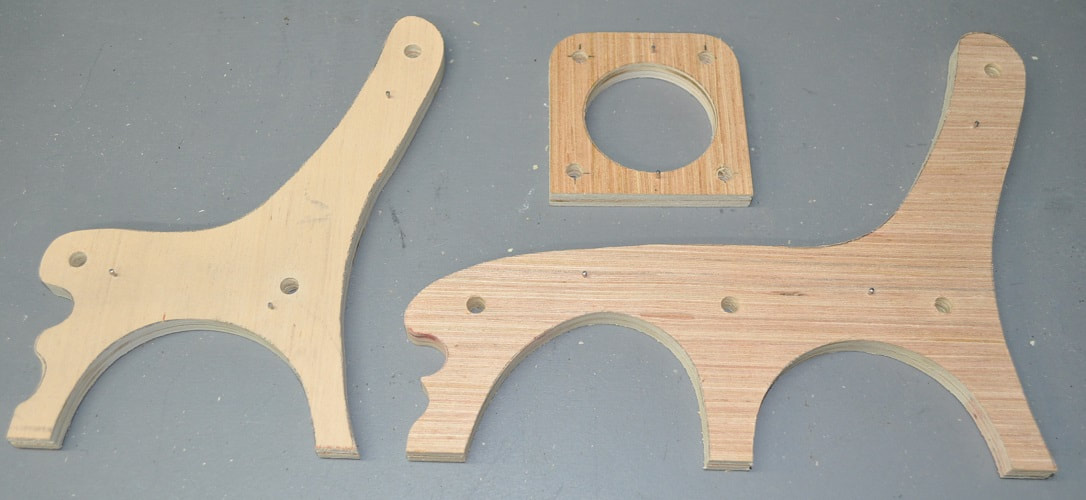
ONE FULL SET OF SIDES DRILLED FOR DOWELS
Now you can remove the brads and fill any holes with plastic wood or spotting putty and sand smooth when dry. WARNING: If you are making more than one of any item, mark the pairs of sides so as not to mix them up. The differences should be slight but should also be enough to really mess with the dowel holes working properly.
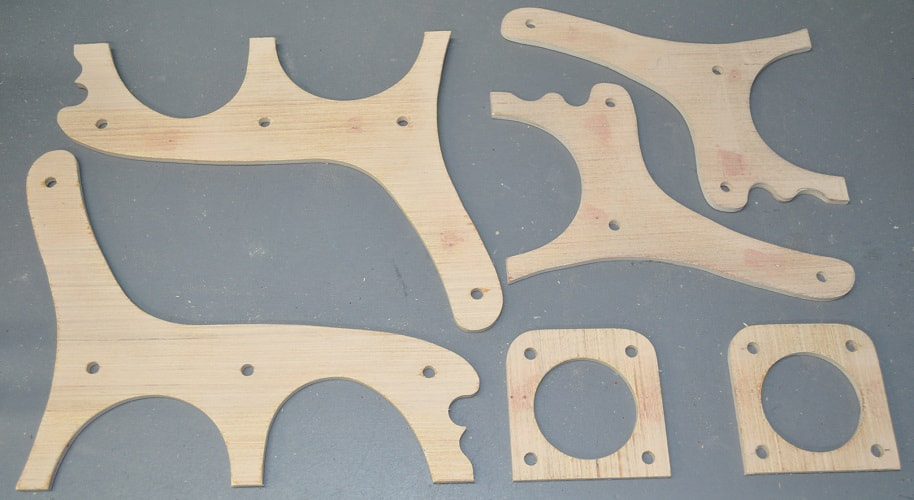
ALL SIDES FOR ONE SET-CHAIR, LOUNGER AND TABLE WITH BRAD HOLES FILLED
NOTE: you can see that the spot putty I used has a RED tint which is fine if you are painting these.
Obviously, if you plan to stain these then add a clear finish, you must be VERY careful with the glue and use the properly tinted plastic wood to fill the brad holes so they stain fully and properly. But as I prime and paint all the sets I’ve made, you can save a little grief by using Glazing and Spot Putty found in a small tube at most any store that sells auto body touch-up supplies. It’s like ready to use Bondo body filler in a tube. It dries faster than plastic wood and is simply easier to apply and sand.
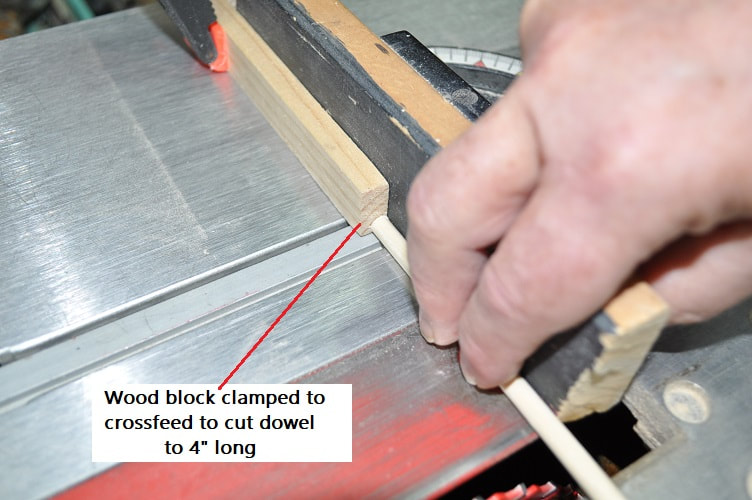
Cut the required number of ¼” dowels to 4 inches” long for the chair and lounger and 3 ½” long for the table.
4 to build a lounger
3 to build the chair
4 to build the table
I like to cut these a bit long then hit both ends on my disc sander held against a square to clean them up and make the ends crisp and sharp. Though, the last time I cut these I had a brand new blade on my table saw and the cut was SO clean I cut them to length using a stop on my cross feed guide.
Obviously, if you plan to stain these then add a clear finish, you must be VERY careful with the glue and use the properly tinted plastic wood to fill the brad holes so they stain fully and properly. But as I prime and paint all the sets I’ve made, you can save a little grief by using Glazing and Spot Putty found in a small tube at most any store that sells auto body touch-up supplies. It’s like ready to use Bondo body filler in a tube. It dries faster than plastic wood and is simply easier to apply and sand.
Cut the required number of ¼” dowels to 4 inches” long for the chair and lounger and 3 ½” long for the table.
4 to build a lounger
3 to build the chair
4 to build the table
I like to cut these a bit long then hit both ends on my disc sander held against a square to clean them up and make the ends crisp and sharp. Though, the last time I cut these I had a brand new blade on my table saw and the cut was SO clean I cut them to length using a stop on my cross feed guide.
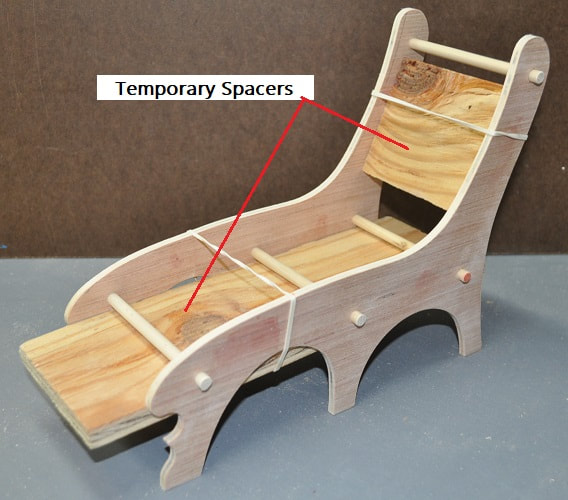
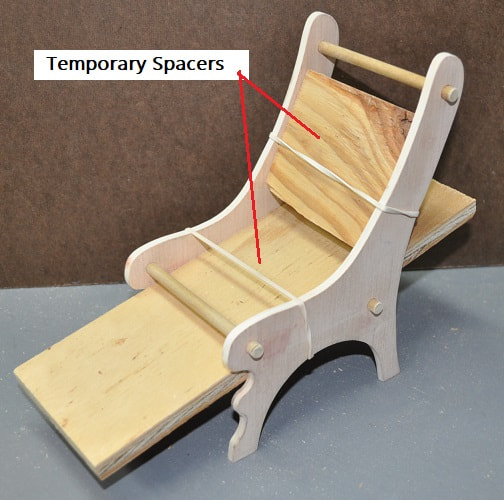
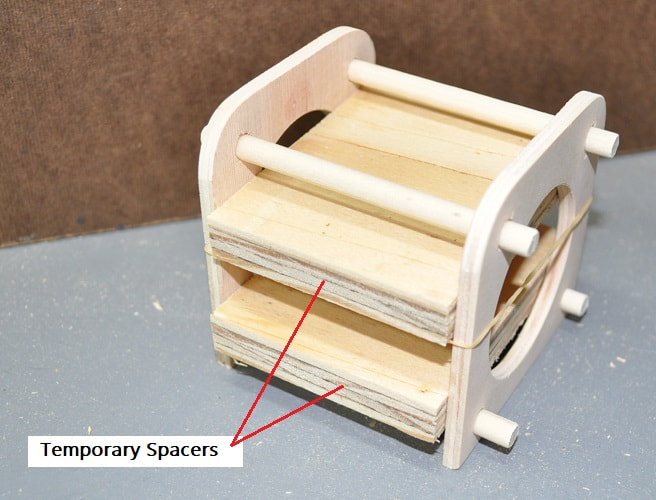
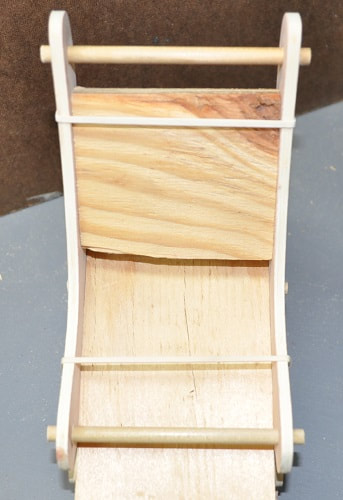
In order to assemble the chair, lounger and table and keep the sides parallel, I find it easier to cut pieces of scrap 7/16” plywood (but anything this thick up to 1” would work fine) to 3 5/16” wide to use as a spacer for the chair and lounger and 2 5/8” wide for the table while the glue dries where the dowels meet the sides. In my kit for building these I have two pieces about 10” long (more for the lounger than the chair), two pieces about 3 ¼” long (for the chair as well as the short part of the lounger) and two pieces about 3 ¼” long and 2 5/8” wide for the table. Notice their placement in the pictures below.
|
|
NOTE: Use care NOT to get glue on the spacers.
With the spacers in place and the dowels all offset about ¼” to one side, I carefully apply glue to the dowels then twist (to help spread the glue) and slide them into place with equal amount sticking out on each side. About ¼” should be exposed on each side. Wipe off any excess glue.
CHAIR WITH SPACERS AND DOWELS OFFSET READY TO GLUE
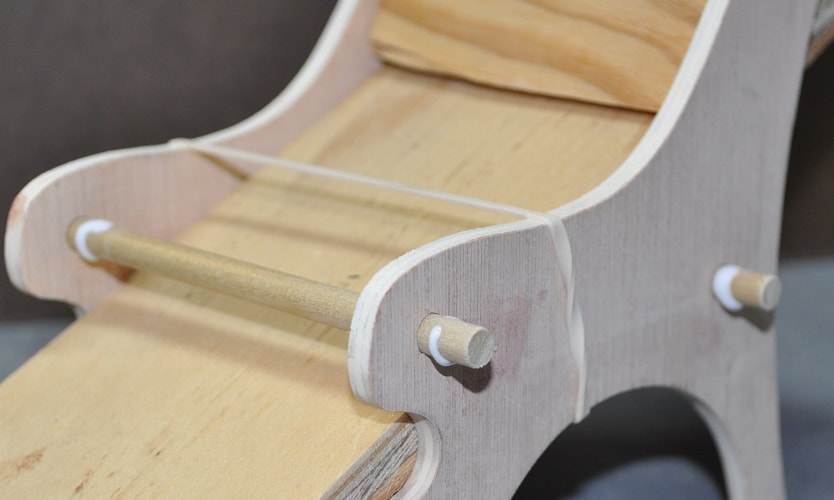
GLUE APPLIED AROUND ALL THREE DOWELS
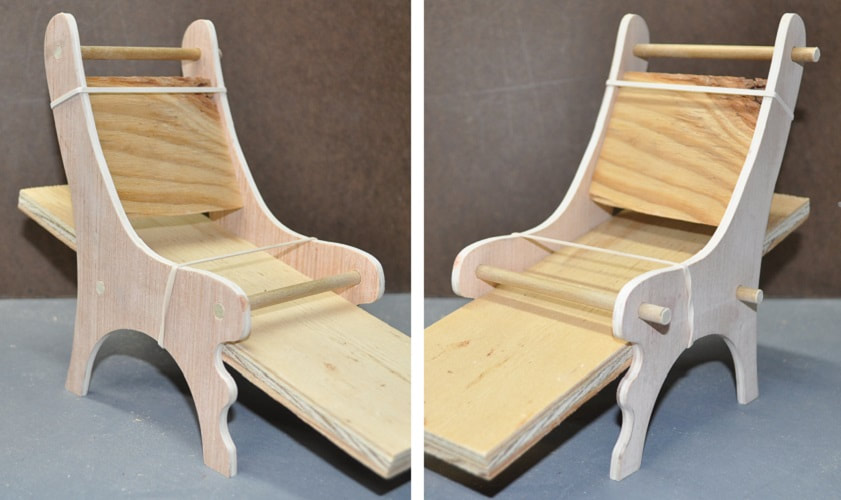
CHAIR WITH SPACER AND DOWELS PROPERLY CENTERED
It should NOT be an issue if the dowel holes are snug to the dowels and you used a drill press but it would not hurt, before the glue dries, if you check at least one side to see that it IS perpendicular to the table they are setting on. Brace it if you have to in order to hold it square to the surface it is setting on as the glue dries.
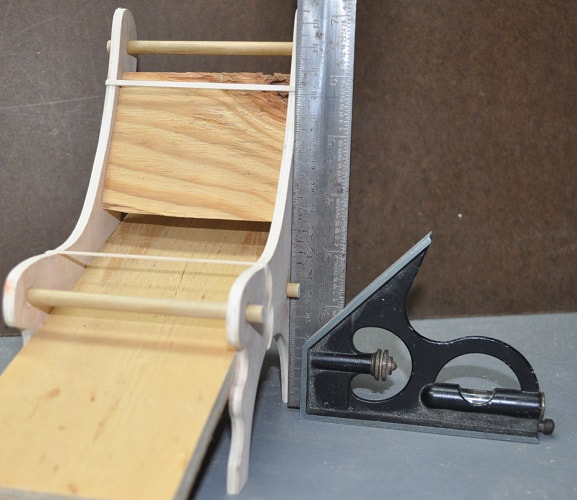
CHECKING SQUARE
Let these assemblies fully dry before removing the spacers.
FABRICATING THE NEEDED SLATS
Now is a good time to start cutting the slats.
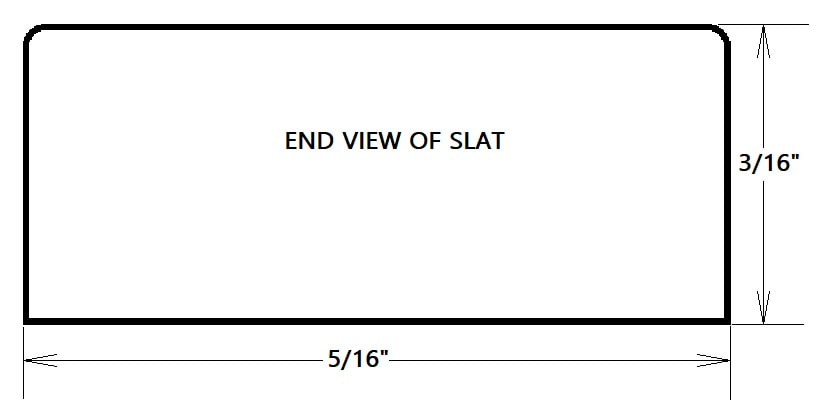
All the slats are the same size for width and thickness. I aimed for 5/16” wide by 3/16” thick
The chair requires 25-27 pieces 4 1/16” long (I used 26 this time)
The lounger requires 39-40 pieces 4 1/16” long (I used 39 this time)
The table requires 11-13 pieces 3 ½” long (I used 13 this time)
Any variation in number of slats required per unit is based on your starting place for the chair and lounge and personal preference on the table for how far you go with them to wrap around from the top.
I’d suggest making at least ONE extra for each item just in case as the exact amount of slats does depend on placement of the first slat…and your own opinion on the last one.
I started with a 13 inch long piece of 1 x 6. Cutting it in half down its center, I ran it through my planer to 3/16” thick. By my math, this should render 72 pieces if all 24 strips survive. Enough for all three items? Not quite as I came up 6 slats short for the table. Luckily I had more than this left over from a previous build. Way better than having to make two more 13” long strips from scratch. LOL
Now is a good time to start cutting the slats.
All the slats are the same size for width and thickness. I aimed for 5/16” wide by 3/16” thick
The chair requires 25-27 pieces 4 1/16” long (I used 26 this time)
The lounger requires 39-40 pieces 4 1/16” long (I used 39 this time)
The table requires 11-13 pieces 3 ½” long (I used 13 this time)
Any variation in number of slats required per unit is based on your starting place for the chair and lounge and personal preference on the table for how far you go with them to wrap around from the top.
I’d suggest making at least ONE extra for each item just in case as the exact amount of slats does depend on placement of the first slat…and your own opinion on the last one.
I started with a 13 inch long piece of 1 x 6. Cutting it in half down its center, I ran it through my planer to 3/16” thick. By my math, this should render 72 pieces if all 24 strips survive. Enough for all three items? Not quite as I came up 6 slats short for the table. Luckily I had more than this left over from a previous build. Way better than having to make two more 13” long strips from scratch. LOL
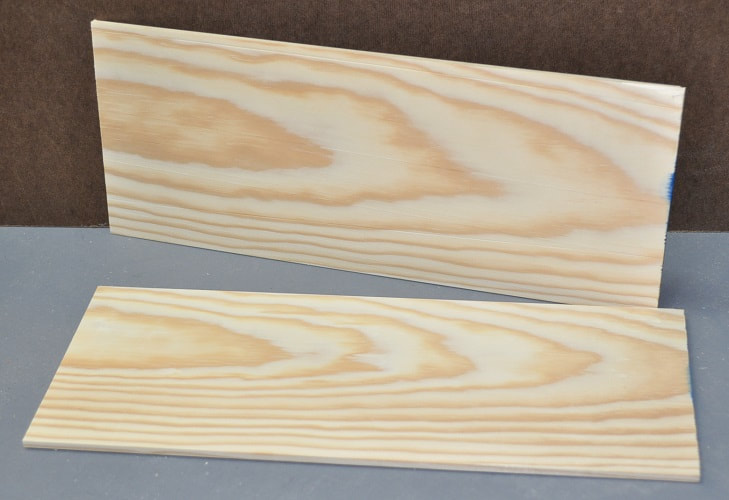
STOCK CUT IN HALF AND PLANED TO 3/16” THICK
Notice: This wood is free of knots as knots cause weak spots.
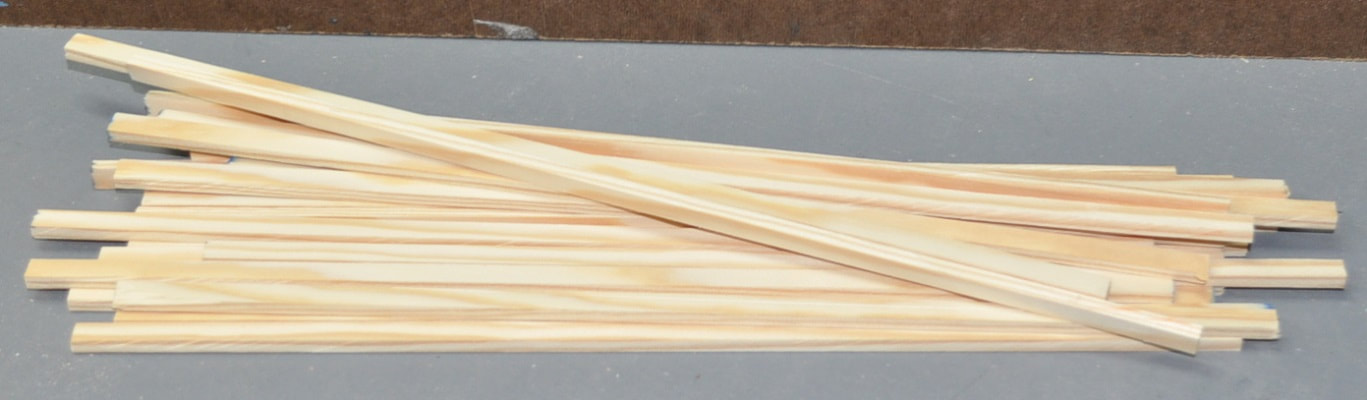
Here are the 24 strips now 13” long x 5/16” wide x 3/16” thick.
You can save your fingertips a lot of grief if you use a palm sander to add a radius to two adjacent corners on a 5/16” side of these strips before cutting them to length. Obviously, the side with the radii will be the top of each slat and gives the items a much more “finished” look when done.
This radius is too small to show a GOOD picture of but the sketch below should give you the idea.
This radius is too small to show a GOOD picture of but the sketch below should give you the idea.
Even using a palm sander, I could only add radii to 12 of the 13” strips before my hand cramped up. This is still better than I do adding the radii to each slat individually as I describe below.
From the pile of slat stock, cut more than enough slats to length…both for the chair and lounger. Wait on cutting the shorter slats for the table for now.
If you didn’t add the needed radii to the strips earlier…now for a tedious chore…rounding two adjacent corners on a 5/16” side of each piece. This will be the top side and gives a more “finished” look to the end project. I’ve done this part by holding a full sheet of 100 grit sandpaper to a table top with one hand and rubbing each required corner against it but found I often, due to their size, end up sanding through at least a few finger tips too. For the last few builds I found it easier and more controllable to hold the piece in one hand and a ¼ sheet electric palm sander in the other. You can use a finer sandpaper but you still have to mind your fingertips…just not as much.
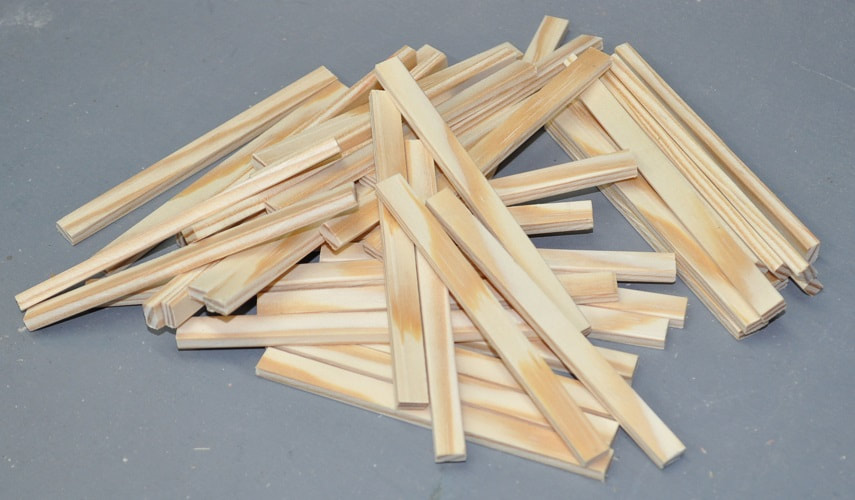
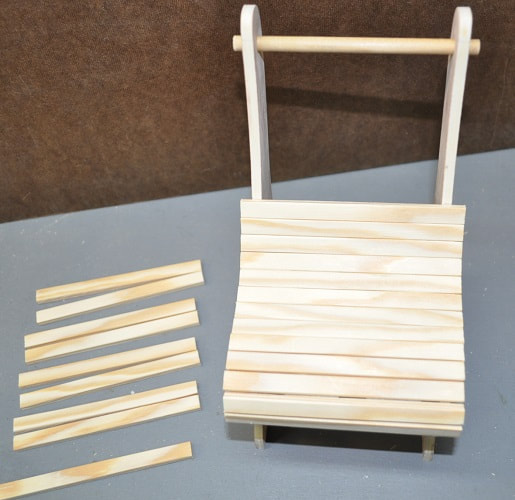
SLAT STOCK CUT TO 4 1/16” LENGTH
I start adding slats to the chair and lounge first so that if I found any slats I was not pleased with, for whatever reason, they could most likely be cut down for the table. As far as sanding the edges of these slats? I would not bother aside from the outer edge of the upper and lower two.
The best way I found to establish a “starting point” with any control is to use some masking tape and carefully tape 7 or 8 together touching with the ends flush.
The best way I found to establish a “starting point” with any control is to use some masking tape and carefully tape 7 or 8 together touching with the ends flush.
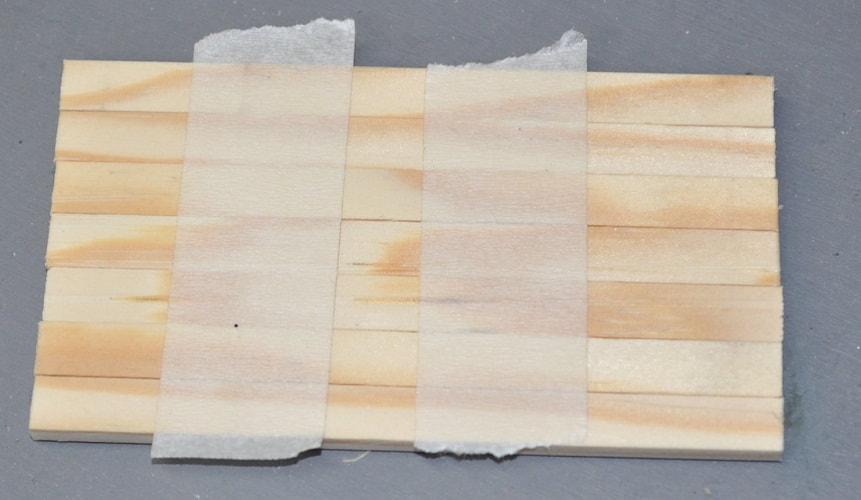
Place this on the chair or lounger…positioning them so the bottom slat is parallel to the table it is setting on. Mark the top and bottom edges on the two sides. This is where the glue will be applied.
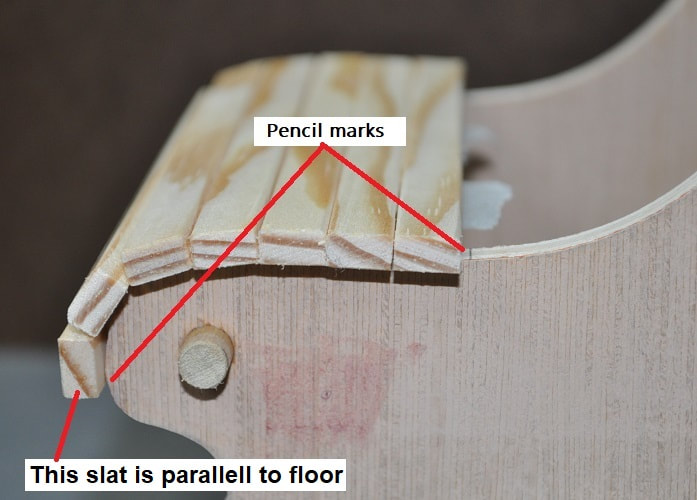
Set these slats aside, apply wood glue to the area marked then replace the slats as a unit. Check with a small square that the top slat IS square to the sides. Very close will count here as minor adjustments can be made as more slats are added later.
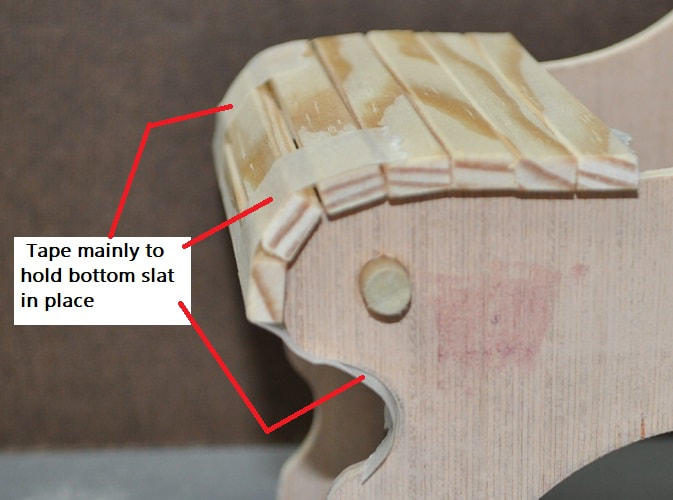
I used two more pieces of masking tape to hold the bottom slat against the sides as the glue dries.
Once this is dry, start adding more glue and more slats…monitor that the slats stay square to the sides and maintain equal overhang at both ends. If the square seems to shift, start adding the slightest gap between the slats at one end until square is reestablished.
Once this is dry, start adding more glue and more slats…monitor that the slats stay square to the sides and maintain equal overhang at both ends. If the square seems to shift, start adding the slightest gap between the slats at one end until square is reestablished.
|
|
SLATS HALF INSTALLED SLATS ¾ INSTALLED
Remember when you add the LAST slat to sand the outer edge.
I again used two strips of masking tape to hold the slats in place around the tight curves at the top while drying.
I again used two strips of masking tape to hold the slats in place around the tight curves at the top while drying.
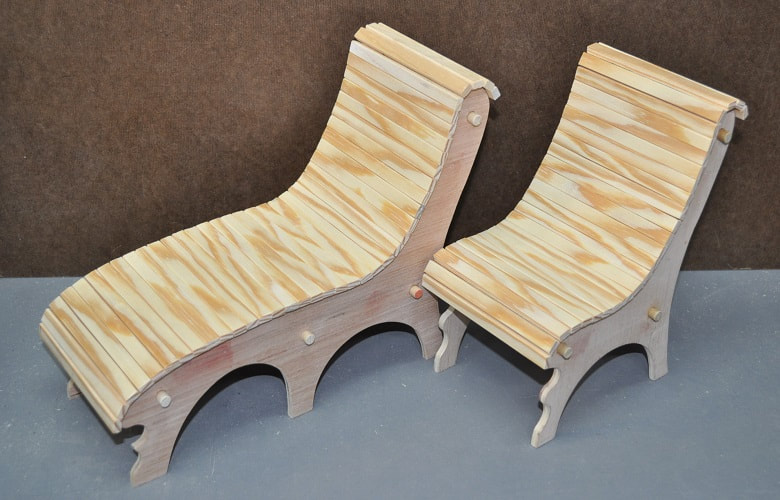
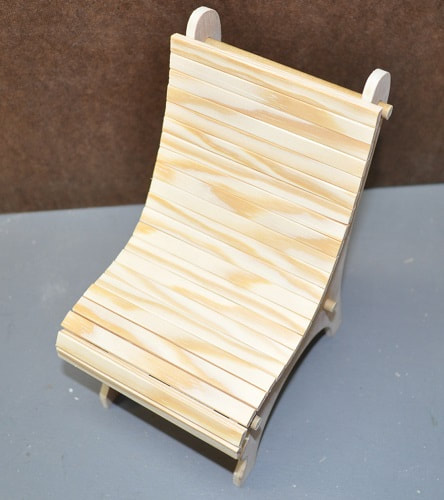
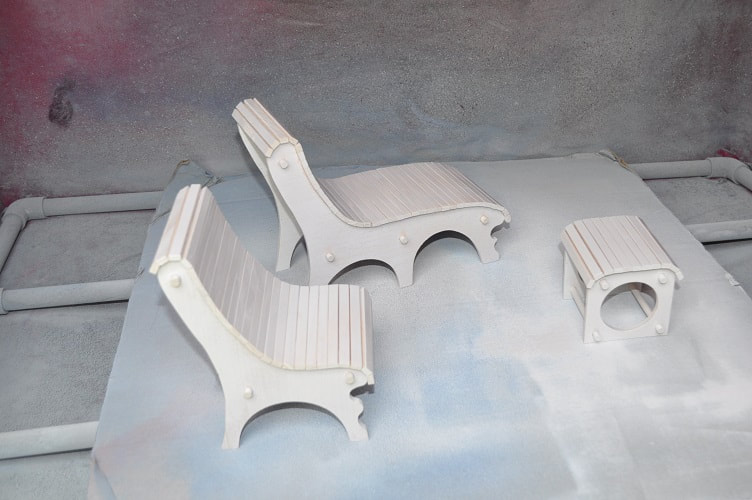
LOUNGER & CHAIR READY FOR PRIMER
With the chair and lounger done, aside from priming and painting, cut enough slats to length for the table. It should take at least 13 slats…I used 15 on this one but you decide. But it WILL be an odd number.
Locate and mark the center of the outer surface of the table.
Locate and mark the center of the outer surface of the table.
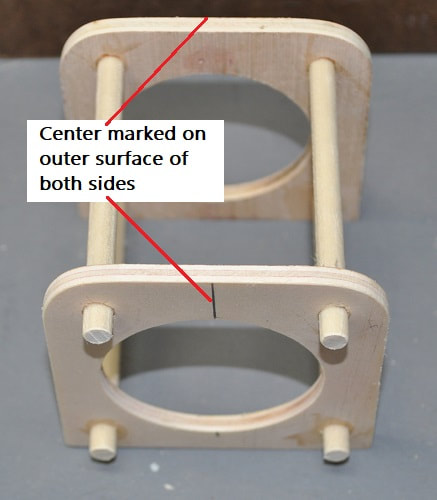
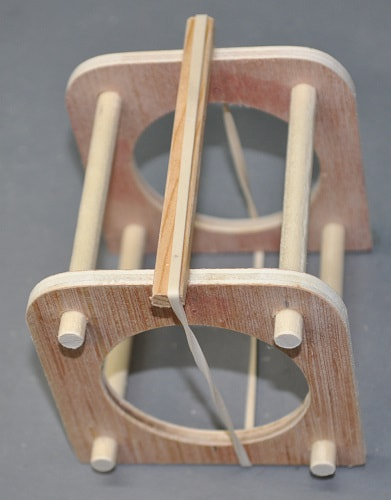
As accurately as possible glue one slat over this location. One rubber band around this assembly can help. I place the slat and rubber band in place but off center enough to allow the application of the glue. Then move one end at a time to center. Checking and rechecking its position before setting aside to dry.
When the glue is dry, start working out from this center slat.
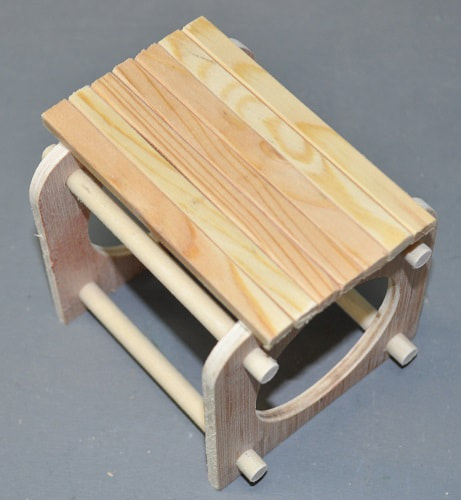
Three slats added to each side of center slat.
I applied the last three slats to each corners by tipping the unit enough to keep them from sliding as the glue dries. A rubber band to hold them would work…but so does this.
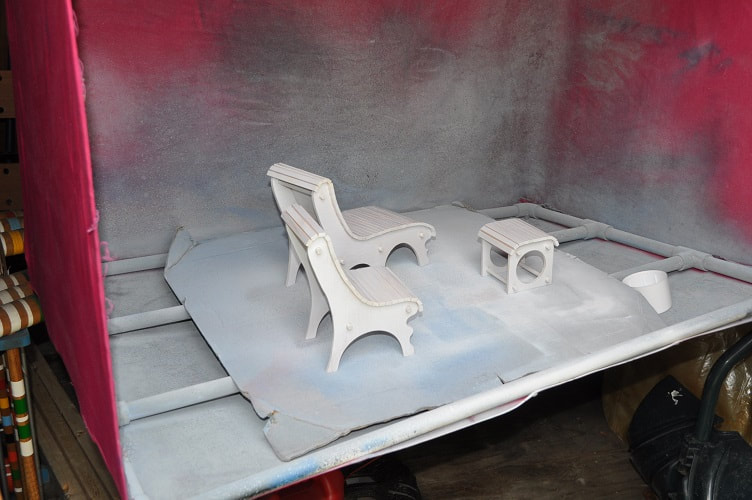
At my age, I am trying harder and harder to get away from “spray paints” and their fumes. But this project simply looks better sprayed due in part to all the slits between the slats.
I set up my collapsible spray booth in our garden shed that I made years ago to give everything a good coat of white primer.
|
|
Once you are happy with the coating of primer and they are fully dry (based on MFG recommendations), apply the final color of your choice. Personally, I prefer something light, like the yellow of blue pictured to brighten a garden scene.

|

|
Above are a couple of pictures from Carly and Sam’s vacation storyline.
Episodes 280 & 281 of iCarly:Five Years Later.
Episodes 280 & 281 of iCarly:Five Years Later.