CONSTRUCTION OF PEDESTRIAN MAIL SLOT FOUR USPS MAILBOX
You will need to be familiar with my first Mailbox Tutorial and refer to it for parts of this build. SEE LINK BELOW
EXTRA PARTS FOR PEDESTRIAN MAIL SLOT
2 pcs 3 ¾” x 3 ¾” LUAN sides of subassembly
1 pc 3 ½” x 3” LUAN slot door
1 pc 3 3/8” x 1 ¾” LUAN replacement mid brace
1 pc 3” x 1 3/4” LUAN slot shelf
2 pcs 1 3/4” max x 1 ¼” LUAN slot shelf spacers (optional)
1 pc 3” x 1/2” x 3/16” pine top door backstop
2 pcs 3 3/8” x 3/8” x ¼” pine bottom panel mounts/plywood brace
1 pc 3 3/4” music wire door pivot shaft (I used .045” music wire but
bigger will work)
1 jumbo paperclip handle
When cutting the top radius of the two sides…attach the two subassembly sides to the main sides in the same manner with another two brads so all four parts end up with the same top radius.
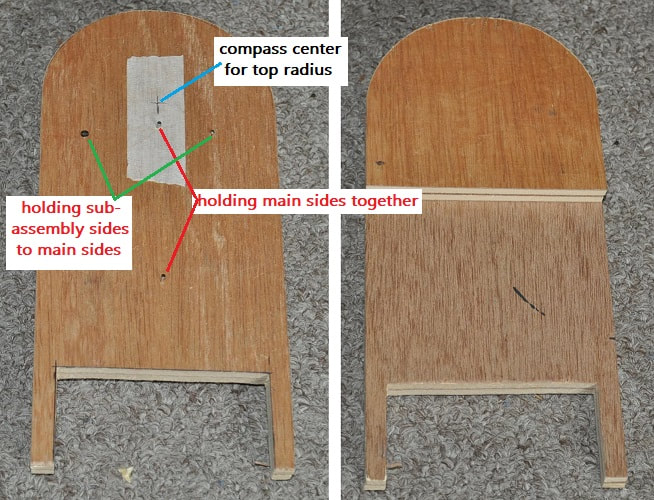
With the top radius finished, mark the edge with a pencil so you do not accidentally get one of the four pieces turned around causing a possible mismatch.
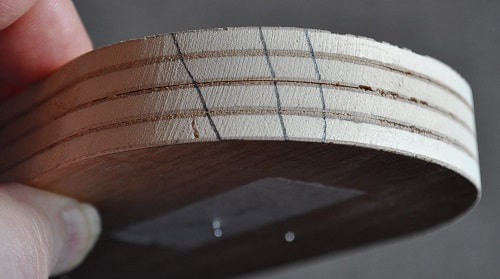
A few pencil lines is sufficient.
Drill a small hole through all four pieces before separating at the compass center point. This will be the pivot point for the door to swing from. You MUST use a good drill press for this step to ensure the hole is perpendicular to all the side pieces. Drilling freehand would be questionable at best.
I’m using a .045” piece of music wire for my pivot shaft so I used a #56 drill bit.
The door is made from a 3 ½ x 3” piece of LUAN. I was going to use 1/16” hobby plywood for this but had none on hand. I simply took my 3/16” thick piece and sanded the top edge…on the INSIDE surface…tapering it until the edge looks about 1/16” wide. If you taper it enough, this illusion should not be noticeable. At the midpoint of the door…again on the inside surface…I set up a stop on my drill press and, using a pointed router bit, made a groove across the piece for the music wire as shown in the sketch and pics. The exact width of this door may need trimmed for clearance…and paint thickness but this should be a good starting width. I expect it will end up being closer to 2 15/16” wide when the final fitting is done.
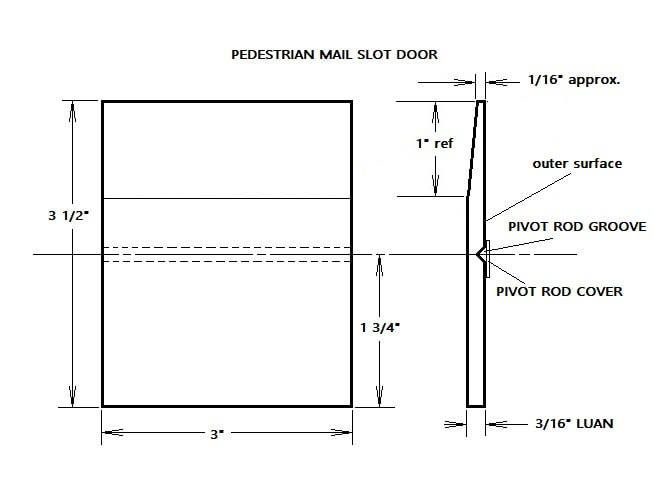
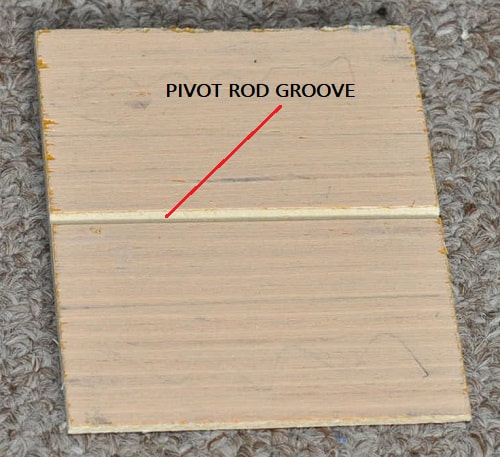
The groove for the pivot shaft can be enclosed with most anything from 1/32” thick hobby plywood (which is what I used) or other thin material. Just mind how much glue you use so as not to fill the groove you cut into the door. You can always place the length of music wire in a drill and clean the groove out if needed. We’ll cover this point later so hold off for now…until after you have added the taper to the one edge.
Either cut a new piece of LUAN or cut down the piece cut as the “mid-brace to 3 3/8” x 1 ¾” and glue to the bottom of the sub-assembly sides as shown below.
Either cut a new piece of LUAN or cut down the piece cut as the “mid-brace to 3 3/8” x 1 ¾” and glue to the bottom of the sub-assembly sides as shown below.
Once this is dry, I found I had to immediately trim 1/16” off the width of my 3 ½” x 3” door piece to have it comfortably fit between the upright pieces. At this point I simply used a piece of masking tape to hold a scrap of paper across the pivot rod groove so I could temporarily install it to check for clearance. Indeed, I had to remove a good 1/16” for it to swing comfortably.
Time to add the taper to the door. BE CAREFUL you taper the right side. It goes on the side WITHOUT the groove. The simplest, and safest, way to do this is to use two brads to attach the door to another piece of wood, flat side out and even with one edge as shown.
Time to add the taper to the door. BE CAREFUL you taper the right side. It goes on the side WITHOUT the groove. The simplest, and safest, way to do this is to use two brads to attach the door to another piece of wood, flat side out and even with one edge as shown.
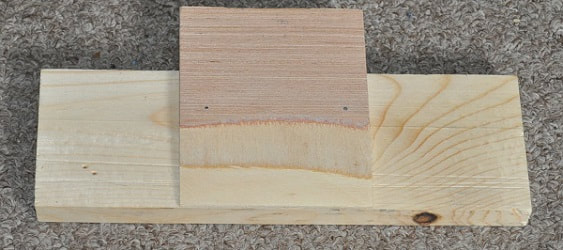
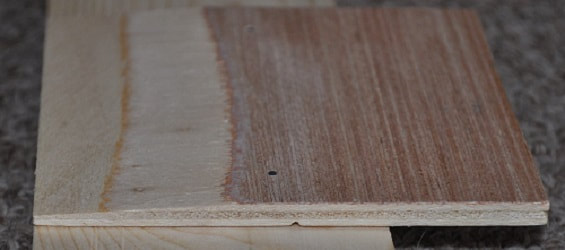
This allows me to set my table saw to 5 degrees and move the fence in a bit at a time until the top edge is about 1/16”. I used a palm sander to sand the taper before removing it from the block
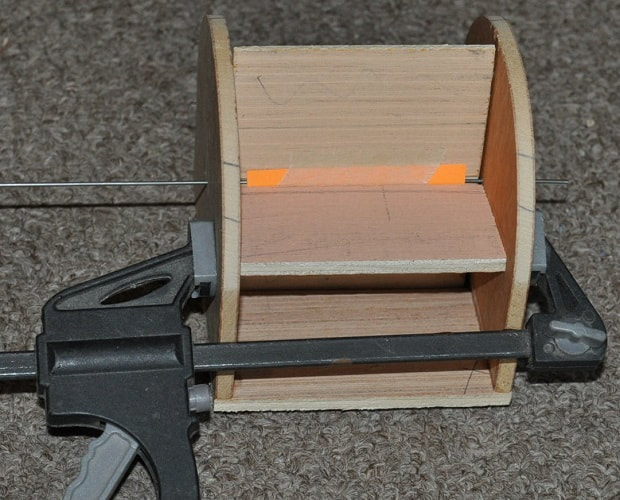
Cut the slot shelf piece to 3” x 1 13/16”. My first shelf was too narrow as I’d planned on having the door installed other-way around, with the groove to the inside…but the function and fit just wasn’t right. With the door properly hanging from the music wire, position this slot shelf piece in place so the top surface is even with the pivot point or just below and secure with a clamp. I simply swung the door to a horizontal position and seated this slot shelf piece against it. Check the function of the door. You may have to lower this shelf a bit or even round the edge that is against the door for it to function properly to the open and closed positions. This is where minor adjustments should be made to the door as well for side clearance.
Continually check and recheck that the two sides are perpendicular and square to the mid-brace.
|
|
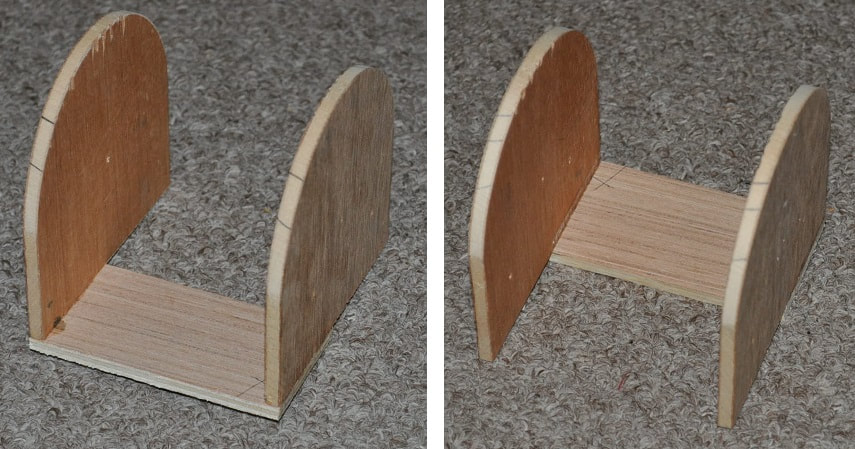
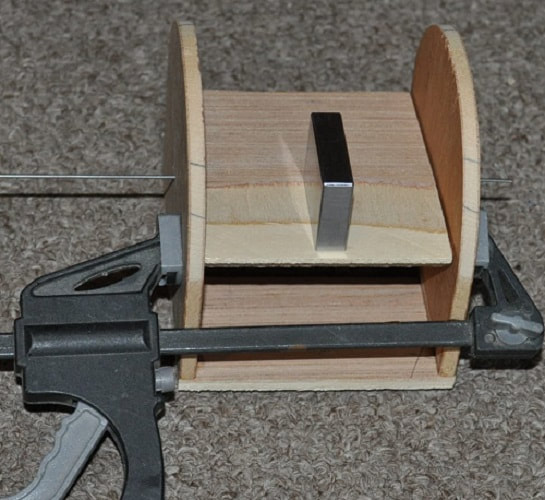
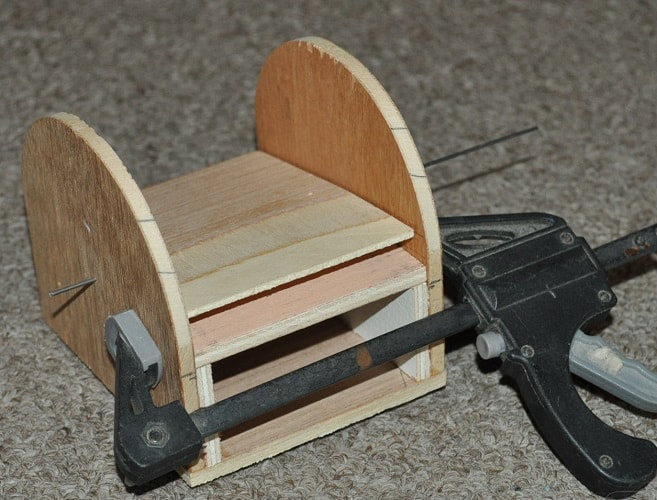
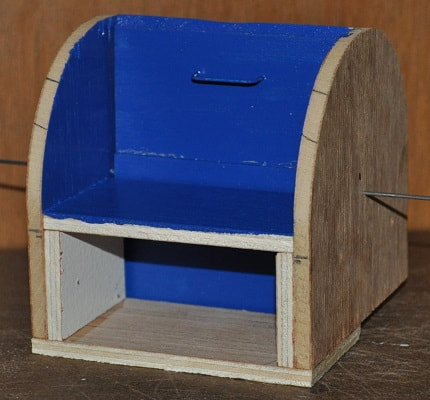
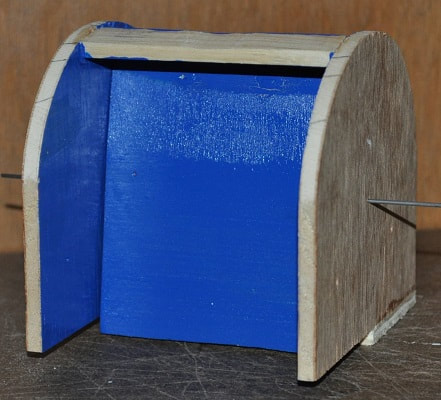
Above is my test fitting of the door and the slot shelf. I used a 1” gage block to hold it down in the second picture as it swings so well, it would not stay down on its own.
With everything seeming to work and fit well, I cut a piece of 1/32” hobby plywood to 5/8” wide and the width of the final door after trimming of 2 15/16” to cover the pivot rod groove. I glued it over the groove 1/8 off center favoring the bottom half. Making the top of it 1 ½” from the tapered top edge. This is not a big deal. I just didn’t want any more of this piece showing than necessary as the slot shelf rests just below the pivot rod.
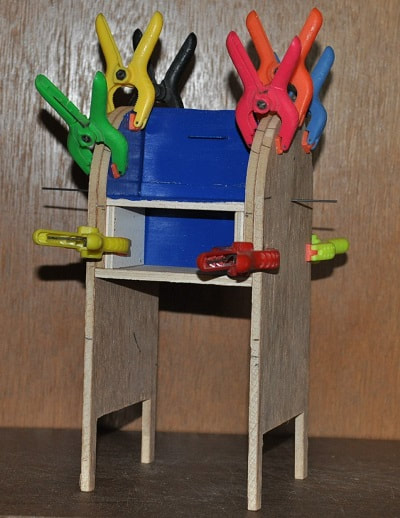
Time to glue this subassembly together into its final form. Once I had everything fitting and functioning properly, I found the gap between the slot shelf and the mid-brace to be 1 5/16”. (This may vary slightly for you.) So I cut two pieces of scrap LUAN to 1 5/16” to act as spacers during assembly. As long as they are short enough not to interfere with the swing of the door and do not stick out past the outer edges of the sub-assembly, they can be glued in place or removed before the glue dries. I left mine in simply to strengthen these joints. (SEE BELOW) Also remember that the door does NOT have to fold down flat against the slot shelf as you still need to add the handle.
With everything seeming to work and fit well, I cut a piece of 1/32” hobby plywood to 5/8” wide and the width of the final door after trimming of 2 15/16” to cover the pivot rod groove. I glued it over the groove 1/8 off center favoring the bottom half. Making the top of it 1 ½” from the tapered top edge. This is not a big deal. I just didn’t want any more of this piece showing than necessary as the slot shelf rests just below the pivot rod.
Time to glue this subassembly together into its final form. Once I had everything fitting and functioning properly, I found the gap between the slot shelf and the mid-brace to be 1 5/16”. (This may vary slightly for you.) So I cut two pieces of scrap LUAN to 1 5/16” to act as spacers during assembly. As long as they are short enough not to interfere with the swing of the door and do not stick out past the outer edges of the sub-assembly, they can be glued in place or removed before the glue dries. I left mine in simply to strengthen these joints. (SEE BELOW) Also remember that the door does NOT have to fold down flat against the slot shelf as you still need to add the handle.
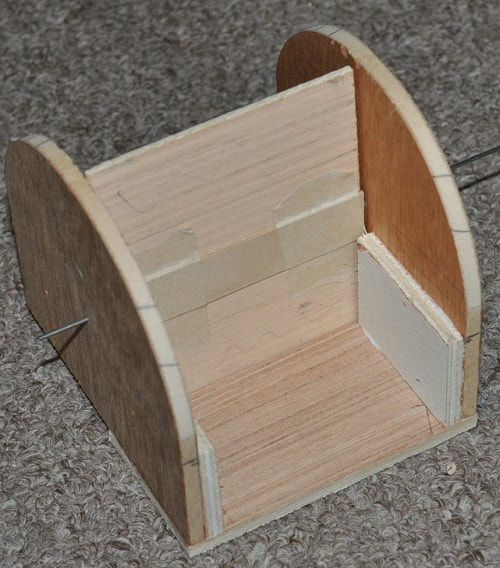
My spacer blocks fit flush with the outer edge and are just short of the edge of the mid brace.
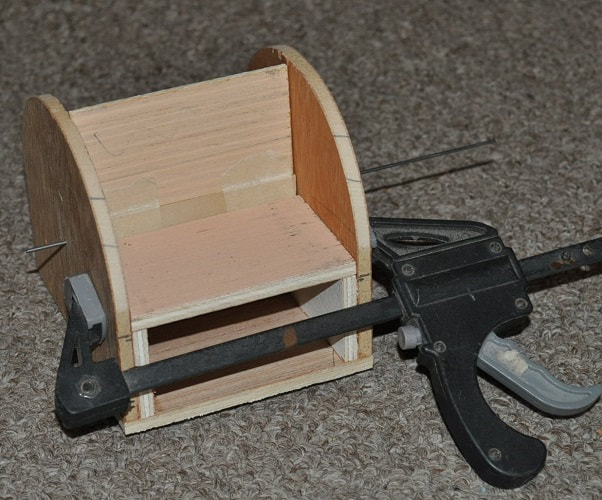
Here we have this subassembly done…aside from the door handle…which is next.
This shows the limit of the door opening which should be near enough perfect for the handle to fit.
Now is as good of a time as any to fabricate the handle. You can certainly go elaborate here but…I chose to use a tried and proven method of making handles from JUMBO paperclips. All the cabinet handles in our iCarly kitchen are made from these. They are sturdy enough to last yet soft enough to be straightened and easily rebent to order. Some 1/16” brass rod would be good here too. My JUMBO paperclips range in diameter from .040” to .044”. This handle was made from one of the already straight legs. You want the handle to be big enough for a male figure to easily grip but not so big that it looks wrong for the smaller female hands.
Now is as good of a time as any to fabricate the handle. You can certainly go elaborate here but…I chose to use a tried and proven method of making handles from JUMBO paperclips. All the cabinet handles in our iCarly kitchen are made from these. They are sturdy enough to last yet soft enough to be straightened and easily rebent to order. Some 1/16” brass rod would be good here too. My JUMBO paperclips range in diameter from .040” to .044”. This handle was made from one of the already straight legs. You want the handle to be big enough for a male figure to easily grip but not so big that it looks wrong for the smaller female hands.
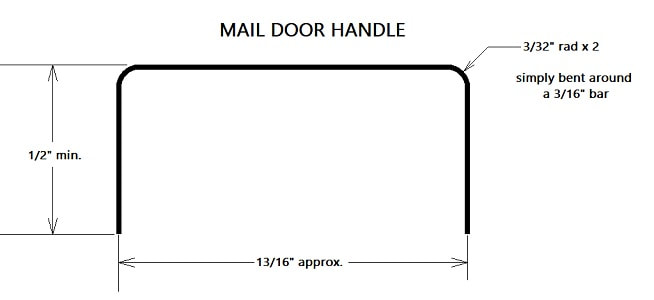
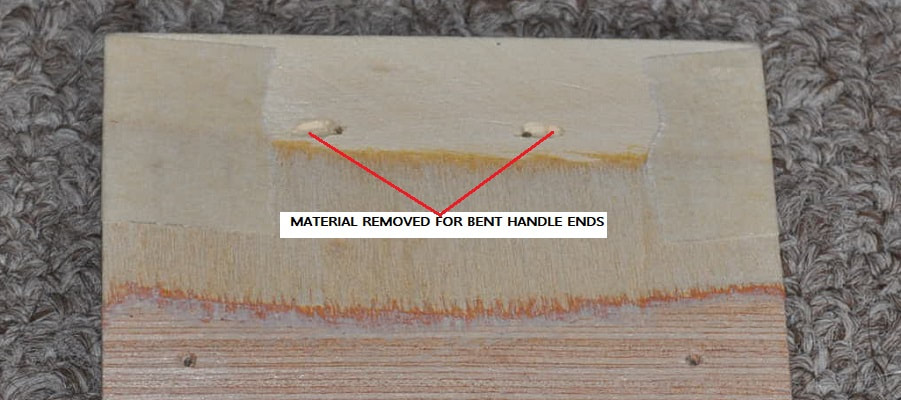
I drew a line ½” from the top of my door, found the center of that line and laid out the width of my handle. After drilling the two holes, I dug out enough material on the inner surface to allow me to insert the handle all the way in and bend over the tips about 1/16”. Then it is a simple matter to pull the handle back through and applying glue over the bent ends and the holes
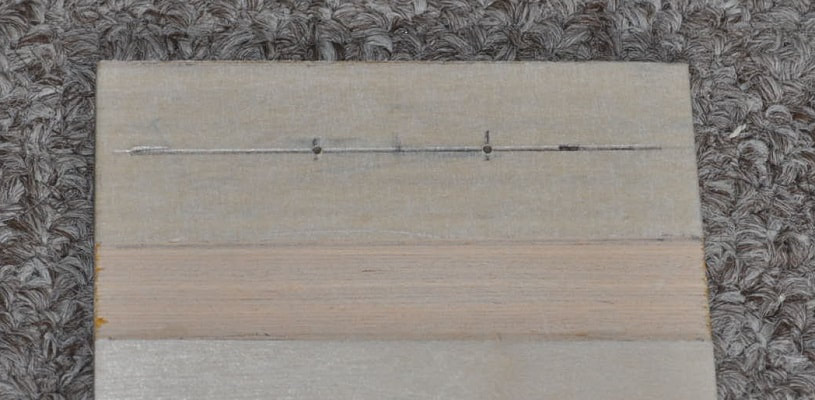
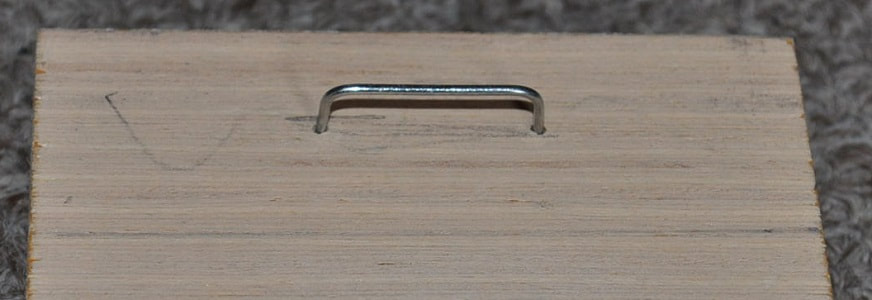
Above shows the handle installed…
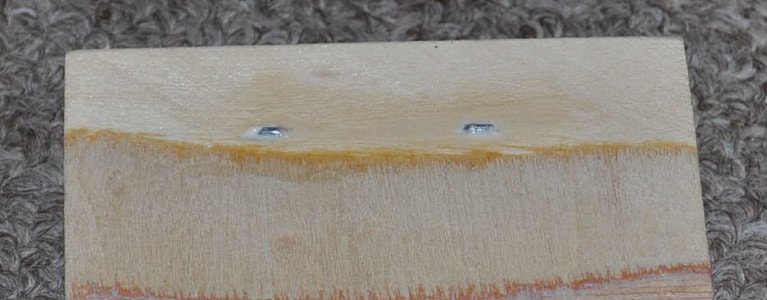
…and the ends bent over, pulled in below the surface and glued over. It may take a couple applications of glue and some sanding to fully hide the ends.
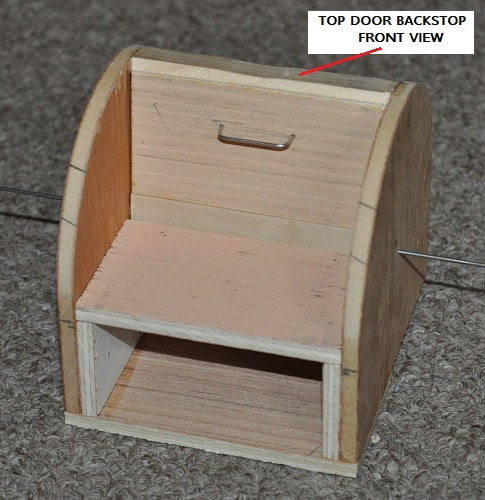
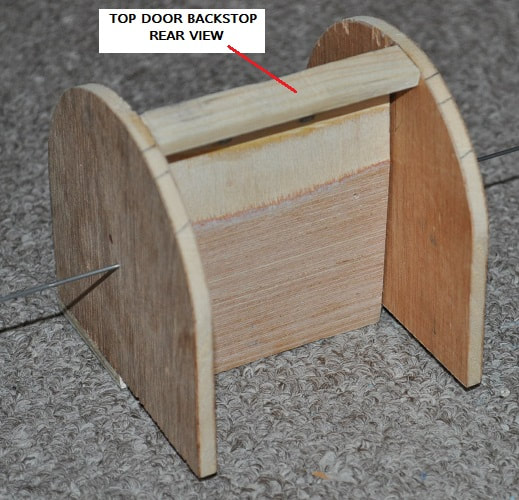
Once the door handle is dry, reinstall it. With it in the fully closed position, install the top door backstop behind it. Yes, this “could” have the proper radius as the top does but that radius is slight enough it is not really needed. Just make sure the corners do NOT stick up above it.
Once the door handle is dry, reinstall it. With it in the fully closed position, install the top door backstop behind it. Yes, this “could” have the proper radius as the top does but that radius is slight enough it is not really needed. Just make sure the corners do NOT stick up above it.
With this subassembly now done, the rest of the construction will be similar to my first one…until we get to cutting out this opening.
But for now it seems prudent to first paint this sub-assembly as all inside surfaces still have easy access. DO NOT paint the edges of the sides or the top of the top door backstop as these are glue surfaces. Also, there is no need to paint the right / left and bottom edges of the door.
But for now it seems prudent to first paint this sub-assembly as all inside surfaces still have easy access. DO NOT paint the edges of the sides or the top of the top door backstop as these are glue surfaces. Also, there is no need to paint the right / left and bottom edges of the door.
|
|
Here I have all surfaces painted that should possibly be visible when completed. There may be some minor touch-ups needed but that beats painting all this through the door opening.
FINAL ASSEMBLY…AND DIFFERENCES
With the pivot rod in place and overly LONG, slip each Main Side piece over the rod and glue to the subassembly sides. Mind that you match up the pencil marks on the radius edges to ensure alignment mentioned at the beginning of this section for adding a pedestrian mail slot. Clamp, check that the four feet rest flat on a smooth surface and let dry.
On my first mailbox I simply glued the bottom panel in place but…I hate to make projects, especially with moving parts, which cannot be easily serviced/repaired. Plus I plan to add the 1/32” plywood skin to the top/front and back with the door removed…to be installed again later. So the bottom needs to be removable.
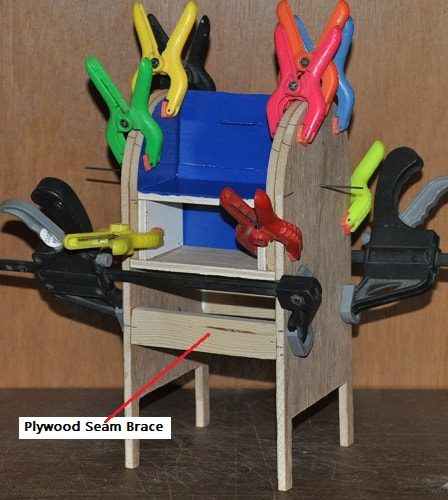
For now determine the position (center-point) for the two plywood-seam braces as described in the original tutorial. This is where a 12” piece of 1/32” plywood will end down each side when centered over it. It should work out to be about 3 1/8” from the bottom of each foot. Install these two braces. NOTE: I made these braces ¼” thick rather than the ½” called out for the first tutorial as I had to get my hand, or my wife’s hand…if mine won’t fit, inside to reinstall the pedestrian mail slot door through the bottom.
For now determine the position (center-point) for the two plywood-seam braces as described in the original tutorial. This is where a 12” piece of 1/32” plywood will end down each side when centered over it. It should work out to be about 3 1/8” from the bottom of each foot. Install these two braces. NOTE: I made these braces ¼” thick rather than the ½” called out for the first tutorial as I had to get my hand, or my wife’s hand…if mine won’t fit, inside to reinstall the pedestrian mail slot door through the bottom.
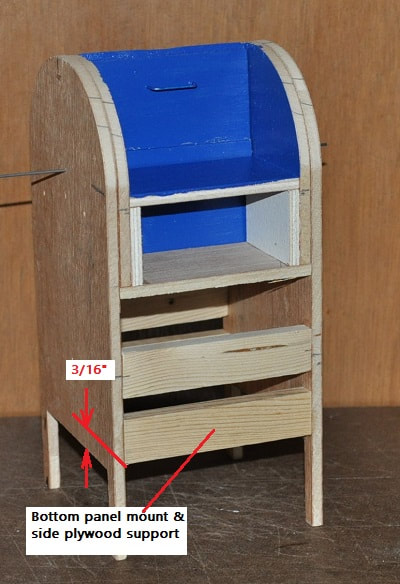
MOUNTING THE BOTTOM PANEL
Cut the two pieces of pine for mounting the bottom panel to as well as glue the plywood sides to. Glue them in place as shown ensuring the bottom edges are recessed from the bottom of the cabinet at lease the thickness of the bottom panel. In my case…a heavy 3/16” will do. I found it easiest to use masking tape to fix the bottom panel in place and use its top surface for locating these pieces properly. Clamp the pieces in place then remove the bottom panel before the glue dries.
Cut the two pieces of pine for mounting the bottom panel to as well as glue the plywood sides to. Glue them in place as shown ensuring the bottom edges are recessed from the bottom of the cabinet at lease the thickness of the bottom panel. In my case…a heavy 3/16” will do. I found it easiest to use masking tape to fix the bottom panel in place and use its top surface for locating these pieces properly. Clamp the pieces in place then remove the bottom panel before the glue dries.
Before gluing the 12” long section of 1/32 plywood over the top radius and down the front and back, I removed the pivot rod and the mail opening door and set aside.
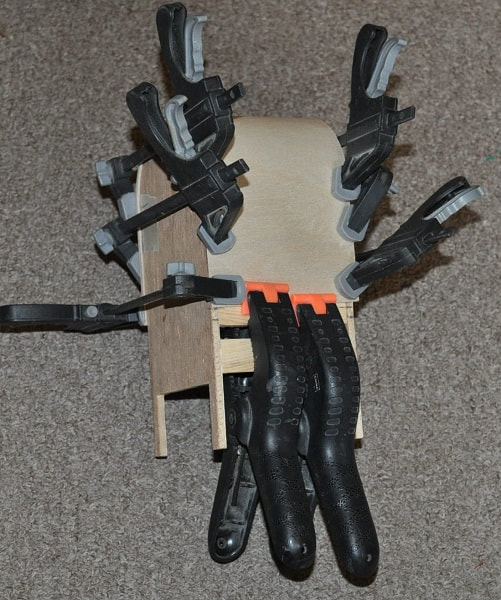
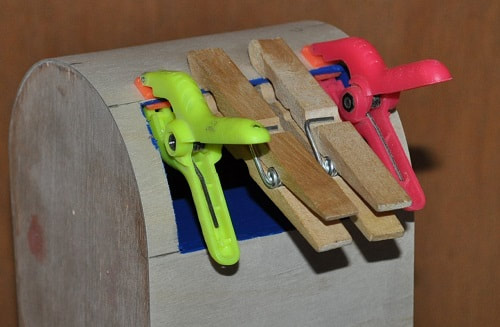
As with the first mailbox, I’d suggest dry-fitting the plywood and experiment on how many and what type of clamps will be needed. I again used three 4” bar clamps down each side and two medium size spring clamps on one plywood seam brace as the plywood stayed tight against the other one.
As with the first mailbox, I’d suggest dry-fitting the plywood and experiment on how many and what type of clamps will be needed. I again used three 4” bar clamps down each side and two medium size spring clamps on one plywood seam brace as the plywood stayed tight against the other one.
Once dry, trim/sand any overhanging plywood.
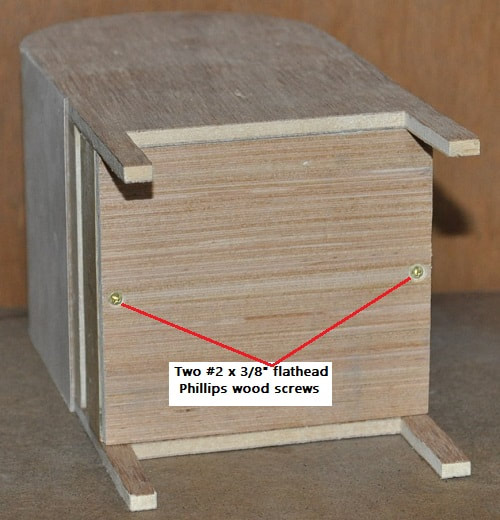
It won’t take much to hold the bottom in place so I opted to use only one 3/8” long, flathead, #2 wood screw in the center of each side where the braces are located rather than a screw in each corner. Now is a good time to secure the bottom…before proceeding further.
It won’t take much to hold the bottom in place so I opted to use only one 3/8” long, flathead, #2 wood screw in the center of each side where the braces are located rather than a screw in each corner. Now is a good time to secure the bottom…before proceeding further.
It is time to cut and install the last two pieces of 1/32” plywood to the main cabinet. Custom cut each piece so their length is correct but leave a little long. This can be sanded off easily enough when the glue is dry. NOTE: Once these two pieces ARE glued and clamped in place…remove the bottom panel so it does not accidentally get glued in place. I simply made a handle for it out of GOOD quality (VERY STICKY) masking tape so it could be easily pulled out.
Now mark, as best you can, where you believe the mail slot shelf is located and draw a line. I have mine located about 6 ¼” from the ends of the feet…not the cabinet. The top of this opening should expose about 2/3 of the distance from this line and the center (top) of the radius. From this line to the top of the radius is just under 3” (5.96”). So measure up from the line 2” following the curvature of the top. Draw another line. This is the top of the opening. The vertical lines for the right and left edges will be about 3/8” to allow for the two thicknesses of the subassembly sides and the main cabinet sides.
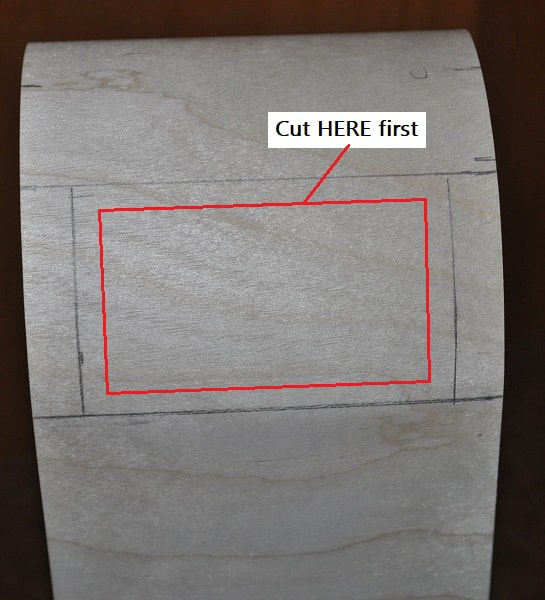
With all four edges clearly marked, there are many ways to do these cuts. To me, the best is a Multi-Tool…and a steady hand.

NOTE: When you make these four cuts, I would suggest cutting about 1/8” from your lines to remove the center of this opening, leaving ample material to go back and cut again once you have confirmed your lines are indeed where they need to be. And even then…cut just short of the target and sand to the final location.
With the hole cut and the edges satisfactorily sanded, I felt the top edge was a bit thin at a single thickness of 1/32” so I cut and painted the front edge and outer surface before gluing another piece of 1/32” plywood to this edge about 5/16” wide. In full scale, this edge is now 3/8”. Once dry, I sanded this edge into a nice smooth radius as though the metal were rolled over.
The sanding around this opening did indeed scuff up the paint on the subassembly, as you can clearly see, but touching this up is a simple task as opposed to painting the whole thing through the small opening.
The sanding around this opening did indeed scuff up the paint on the subassembly, as you can clearly see, but touching this up is a simple task as opposed to painting the whole thing through the small opening.
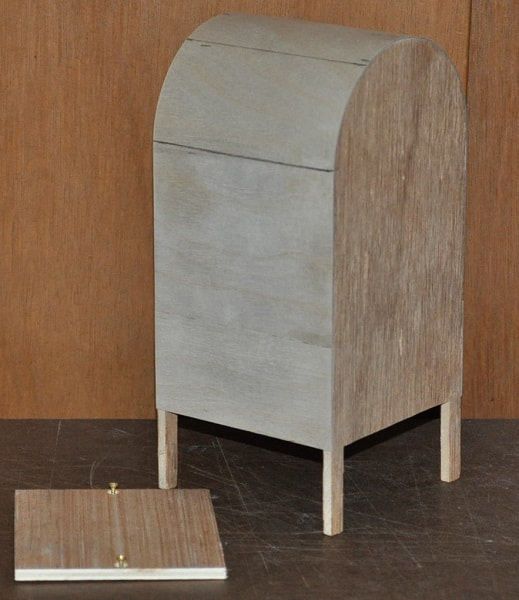
Remove the bottom panel and glue the leg pieces in place running them from the bottom of the legs up to the bottom panel brace. Notch the bottom panel to allow for these new pieces as shown below.

Building and attaching the drive-up side chute is identical to my first build so I refer you to that point of the previous tutorial which is very near its midpoint.
Finish painting and apply stickers.
Before installing the mail door for the final time, clip the length of music wire so it is just a bit shorter than the mailbox is wide. Slip it through the holes supporting the door. I was going to cover these holes in the cabinet with another USPS sticker but found that, once the outside was painted with two coats, that these two holes pretty much disappeared.
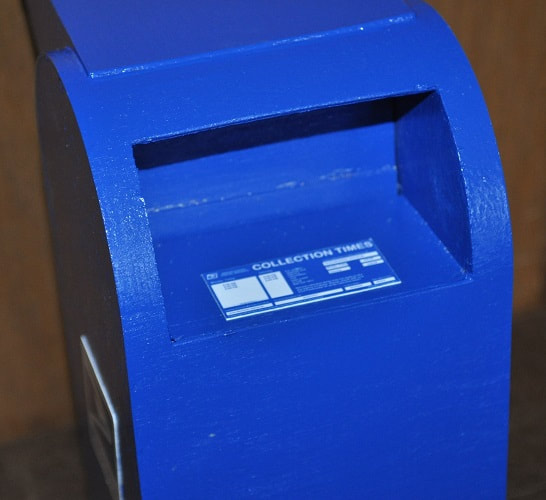
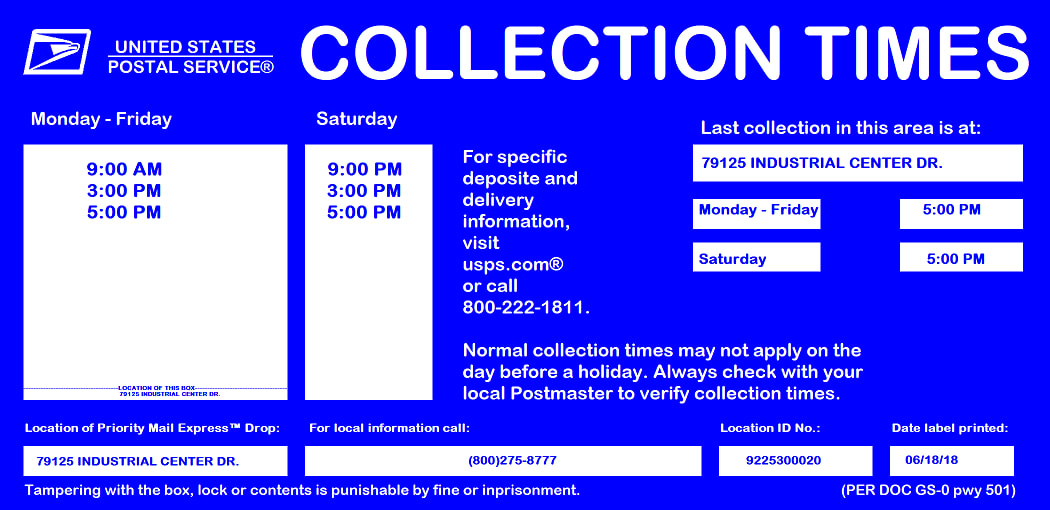
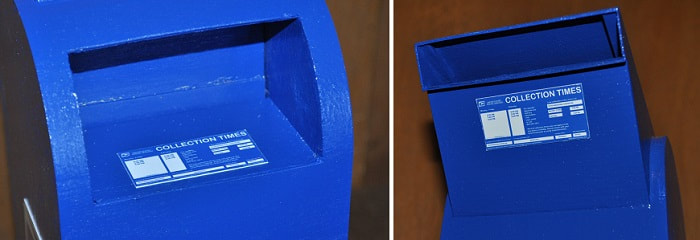
For this build, I did also create the label that shows the collection times and added it to the shelf by the pedestrian mail door and added one to the street-side chute of the first one.
Finish painting and apply stickers.
Before installing the mail door for the final time, clip the length of music wire so it is just a bit shorter than the mailbox is wide. Slip it through the holes supporting the door. I was going to cover these holes in the cabinet with another USPS sticker but found that, once the outside was painted with two coats, that these two holes pretty much disappeared.
For this build, I did also create the label that shows the collection times and added it to the shelf by the pedestrian mail door and added one to the street-side chute of the first one.
|
|
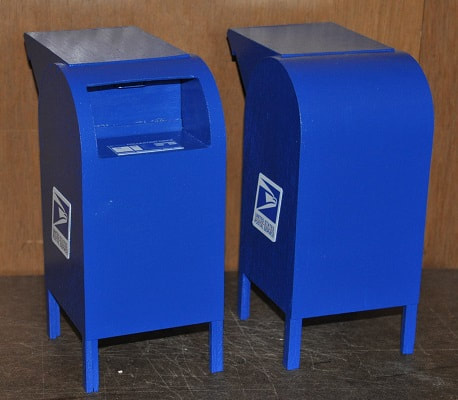
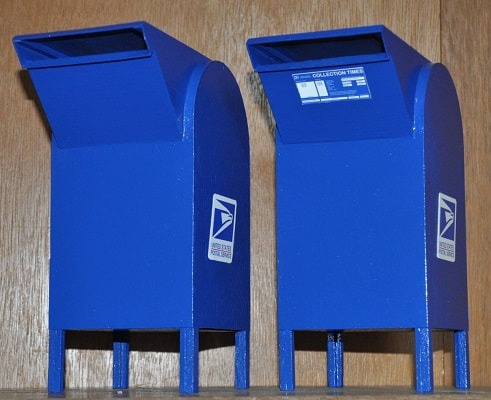
The NEW mailbox is on the left in both pictures.
Please keep an eye out for these being featured in an upcoming episode of iCarly:Five Years Later...